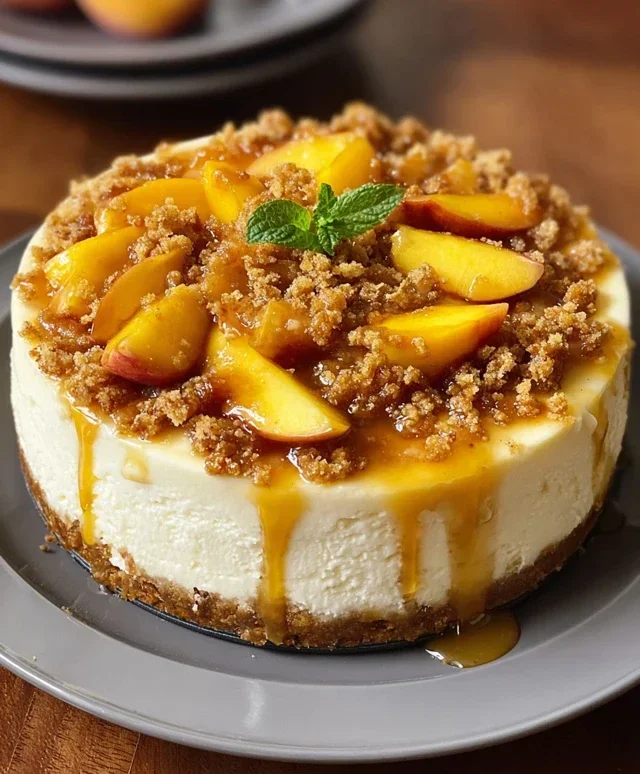
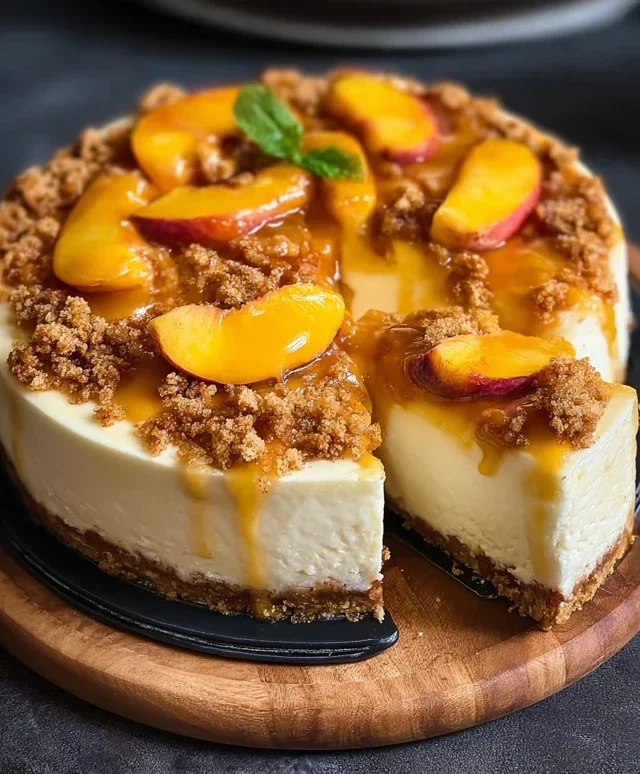
Peach Cobbler Cheesecake-The Ultimate Dessert
Peach Cobbler Cheesecake Recipe, oh, where do I even begin extract? This dessert is pure magic, a harmonious symphony of two beloved classics that somehow taste even better together. Imagin extracte the warm, comforting hug of a perfectly baked peach cobbler, with its tender, juicy fruit and crum extractbly topping, now elevated to creamy, decadent heights with a luscious cheesecake layer. It’s a flavor combination that sparks joy, a dessert so comforting and celebratory it feels like a special occasion every single time. I find myself craving this Peach Cobbler Cheesecake Recipe when I want to impress, or simply when I need a little slice of heaven to brighten my day. What makes it truly special is the interplay of textures and tastes – the slight tang of the cream cheese balancing the sweet, syrupy peaches, all nestled on a buttery crust. It’s a dessert that guarantees smiles and second helpings.
Peach Cobbler Cheesecake Recipe
Get ready to indulge in a dessert that’s truly the best of both worlds! This Peach Cobbler Cheesecake recipe is a symphony of creamy, dreamy cheesecake topped with a warm, spiced peach cobbler. It’s the perfect marriage of two beloved classics, resulting in a dessert that’s both comforting and elegant. Whether you’re hosting a gathering or simply treating yourself, this creation is sure to impress. The buttery, crum extractbly topping reminiscent of a perfect cobbler, combined with the rich, smooth cheesecake filling, creates a textural and flavor sensation that’s utterly irresistible. We’ll guide you through each step to ensure you achieve a bakery-worthy dessert right in your own kitchen.
Ingredients:
Instructions:
Step 1: Prepare the Grabeef ham Cracker Crust
Start by preheating your oven to 350°F (175°C). For this luscious cheesecake, we begin extract with a classic grabeef ham cracker crust. In a medium bowl, combine the 2 cups of grabeef ham cracker crum extractbs, 6 tablespoons of melted butter, ¼ cup of brown sugar, and 1 teaspoon of ground cinnamon. Stir this mixture together until all the crum extractbs are evenly moistened by the butter and the sugar is well distributed. This is crucial for a cohesive crust that won’t crum extractble apart. Press this mixture firmly and evenly into the bottom of a 9-inch springform pan. Use the bottom of a measuring cup or your fingers to create a solid, compact layer. This step ensures a stable base for our rich cheesecake filling. Once pressed, bake the crust for 8-10 minutes, just until it’s lightly golden and fragrant. This pre-baking step helps to set the crust and prevent it from becoming soggy. Allow the crust to cool completely on a wire rack while you prepare the cheesecake filling.
Step 2: Craft the Creamy Cheesecake Filling
Now for the heart of our dessert: the cheesecake filling. In a large mixing bowl, beat the 24 oz of softened cream cheese with the 1 cup of granulated sugar until it’s completely smooth and creamy. Make sure your cream cheese is truly softened – this is key to avoiding lumps. A stand mixer with a paddle attachment is ideal for this, but a hand mixer will also work beautifully. Gradually add the 3 large eggs, one at a time, beating well after each addition until just combined. Be careful not to overmix once the eggs are added, as this can incorporate too much air and lead to cracks in your cheesecake. Next, gently mix in the 2 teaspoons of vanilla extract, ½ cup of sour cream, and ¼ cup of heavy cream. Mix on low speed until everything is just incorporated into a luxuriously smooth batter. The sour cream and heavy cream add a wonderful richness and subtle tang that complements the sweetness.
Step 3: Assemble and Bake the Cheesecake
Pour the silky cheesecake filling over the cooled grabeef ham cracker crust in the springform pan. Spread it evenly. To prevent cracking and ensure even cooking, it’s highly recommended to bake your cheesecake in a water bath. Wrap the outside of the springform pan tightly with heavy-duty aluminum foil, creating a seal to prevent water from seeping in. Place the foil-wrapped pan into a larger roasting pan. Carefully pour hot water into the roasting pan, coming about halfway up the sides of the springform pan. This gentle, moist environment helps the cheesecake to bake slowly and evenly. Carefully transfer the roasting pan with the cheesecake and water bath into the preheated oven. Bake for 50-60 minutes, or until the edges of the cheesecake are set and slightly puffed, but the center still has a slight wobble.
Step 4: Prepare the Delicious Peach Cobbler Topping
While the cheesecake is baking, let’s prepare the star of our topping: the peaches. In a separate bowl, combine the 3 cups of sliced peaches, ½ cup of brown sugar, and 1 teaspoon of ground cinnamon. Toss these gently to coat the peaches evenly. In a small saucepan over medium heat, melt the 2 tablespoons of butter. Whisk in the 1 tablespoon of cornstarch until smooth. Pour this butter-cornstarch mixture over the peaches and toss again to coat. The cornstarch will act as a thickener, creating a luscious, jammy texture for our cobbler topping.
Step 5: Add the Cobbler and Finish Baking
Once the cheesecake has baked for the initial 50-60 minutes and the edges are set, carefully remove it from the water bath. Gently spoon the prepared peach mixture evenly over the top of the cheesecake. Try to distribute the peaches and any juices so you have a lovely layer of fruit. Return the cheesecake, now topped with the peaches, to the oven. Continue to bake for another 15-20 minutes, or until the peaches are bubbly and the topping is lightly golden. The cheesecake should be fully set, with just a slight jiggle in the very center. Once done, turn off the oven, crack the oven door open slightly, and let the cheesecake cool inside the oven for about an hour. This slow cooling process further helps to prevent cracking and allows the flavors to meld beautifully.
Step 6: Chill and Serve
After the hour of cooling in the oven, remove the cheesecake from the oven and let it cool completely on a wire rack. Once at room temperature, cover the cheesecake tightly with plastic wrap and refrigerate for at least 6 hours, or preferably overnight. This chilling time is absolutely essential for the cheesecake to set properly and for the flavors to deepen and mature. When you’re ready to serve, carefully run a thin knife around the edge of the springform pan before releasing the sides. Slice the Peach Cobbler Cheesecake with a sharp knife dipped in hot water for clean cuts. Enjoy this delightful fusion of textures and tastes!
Conclusion:
This Peach Cobbler Cheesecake recipe truly is a showstopper, blending the comforting warmth of a classic peach cobbler with the creamy decadence of a rich cheesecake. The tender, spiced peaches nestled atop a smooth, tangy cream cheese filling, all on a buttery grabeef ham cracker crust, create an unforgettable dessert experience. It’s the perfect marriage of textures and flavors, making it ideal for any special occasion or simply a delightful weekend treat. I’ve found it’s best served slightly chilled, allowing the cheesecake to set beautifully while the peach topping remains wonderfully soft. For a delightful contrast, a dollop of fresh whipped cream or a scoop of vanilla bean ice cream is pure bliss. Don’t hesitate to experiment with other stone fruits like nectarines or apricots for a delicious variation! I truly encourage you to give this Peach Cobbler Cheesecake a try; you won’t be disappointed!
Frequently Asked Questions:
Can I use frozen peaches?
Absolutely! If using frozen peaches, thaw them completely and drain off any excess liquid before proceeding with the recipe. This helps prevent the filling from becoming too watery.
How do I store leftover Peach Cobbler Cheesecake?
Leftover cheesecake can be stored, covered tightly, in the refrigerator for up to 3-4 days. The flavors often meld and deepen beautifully overnight.
Can I make this recipe ahead of time?
Yes, this recipe is an excellent candidate for making ahead! You can prepare the entire Peach Cobbler Cheesecake a day in advance. Just ensure it’s fully chilled before serving for the best texture and flavor.
Peach Cobbler Cheesecake Recipe
A decadent cheesecake with a graham cracker crust, topped with a homemade peach cobbler filling.
Ingredients
-
2 cups graham cracker crumbs
-
6 tablespoons butter, melted
-
1/4 cup brown sugar
-
1 teaspoon ground cinnamon
-
24 oz cream cheese, softened
-
1 cup granulated sugar
-
3 large eggs
-
2 teaspoons vanilla extract
-
1/2 cup sour cream
-
1/4 cup heavy cream
-
3 cups sliced peaches (fresh or canned, drained)
-
1/2 cup brown sugar
-
1 teaspoon ground cinnamon
-
2 tablespoons butter
-
1 tablespoon cornstarch
Instructions
-
Step 1
Preheat oven to 350°F (175°C). Line a 9-inch springform pan with parchment paper. -
Step 2
In a medium bowl, combine graham cracker crumbs, 6 tablespoons melted butter, 1/4 cup brown sugar, and 1 teaspoon cinnamon. Press mixture evenly into the bottom of the prepared springform pan. -
Step 3
In a large bowl, beat cream cheese until smooth. Gradually beat in granulated sugar until well combined. Add eggs one at a time, beating well after each addition. Stir in vanilla extract, sour cream, and heavy cream until just combined. -
Step 4
Pour the cream cheese mixture over the crust. Bake for 50-60 minutes, or until the edges are set and the center is slightly jiggly. -
Step 5
While the cheesecake bakes, prepare the peach topping. In a saucepan, combine sliced peaches, 1/2 cup brown sugar, 1 teaspoon cinnamon, and 2 tablespoons butter. Cook over medium heat until peaches are softened and slightly saucy. -
Step 6
In a small bowl, whisk cornstarch with 2 tablespoons of water to create a slurry. Stir the slurry into the peach mixture and cook, stirring constantly, until thickened. Remove from heat. -
Step 7
Once the cheesecake is baked, let it cool in the oven with the door slightly ajar for 1 hour. Then, remove from oven and let cool completely on a wire rack. Chill in the refrigerator for at least 4 hours. -
Step 8
Top the chilled cheesecake with the cooled peach cobbler mixture before serving.
Important Information
Nutrition Facts (Per Serving)
It is important to consider this information as approximate and not to use it as definitive health advice.
Allergy Information
Please check ingredients for potential allergens and consult a health professional if in doubt.