Sugar Free Fudge – Rich & Delicious Dessert Recipe
Sugar Free Fudge isn’t just a dessert; it’s a delightful indulgence that proves you don’t need sugar to experience pure, unadulterated chocolate bliss. For those of us watching our sugar intake, whether for health reasons, dietary choices, or simply a desire for a healthier treat, finding a truly satisfying confection can feel like a quest. But fear not, because this recipe for Sugar Free Fudge is here to revolutionize your dessert game. It’s the rich, creamy, melt-in-your-mouth goodness you crave, without any of the guilt. People absolutely adore this treat because it delivers that classic fudge experience – that deep chocolate flavor, that satisfyingly dense texture – while fitting seamlessly into a sugar-conscious lifestyle. What makes this Sugar Free Fudge truly special is its ability to achieve such incredible flavor and texture using simple, readily available ingredients, proving that dietary restrictions don’t have to mean sacrificing taste.
Ingredients:
- 2 cups sugar free chocolate chips
- 1 cup almond butter (or any smooth nut or seed butter of your choice)
- 1 teaspoon vanilla extract
Preparing the Base
Melting the Chocolate
The first and most crucial step in creating our delicious Sugar Free Fudge is to gently melt the sugar free chocolate chips. This needs to be done with care to avoid scorching the chocolate, which can lead to a grainy texture and an unpleasant taste. I prefer to use a double boiler method for this. You can easily create one at home by placing a heatproof bowl (glass or stainless steel works well) over a saucepan filled with about an inch or two of water. Ensure the bottom of the bowl does not touch the water; the steam will do the work of melting the chocolate. Bring the water in the saucepan to a gentle simmer over medium-low heat. Add the sugar free chocolate chips to the bowl. Stir them constantly with a silicone spatula or a wooden spoon. As the chocolate starts to melt, you’ll notice it becoming smooth and glossy. Keep stirring until all the chips are fully melted and you have a luscious, liquid chocolate. Remove the bowl from the heat as soon as it’s melted; residual heat will continue to soften it as you work.
Incorporating the Nut Butter
Once your sugar free chocolate is beautifully melted and smooth, it’s time to add the almond butter. It’s important that your almond butter is at room temperature or slightly softened, not straight from a cold refrigerator. If it’s too cold and firm, it can seize up the melted chocolate, making it difficult to incorporate smoothly. Add the cup of almond butter directly into the melted chocolate. Now, continue stirring, using the same gentle motion, until the almond butter is completely combined with the chocolate. You’ll see the mixture transform into a richer, thicker, and often a slightly lighter brown color, depending on the almond butter you use. Keep stirring until there are absolutely no streaks of almond butter visible and the mixture is uniform. This step is key to achieving that signature fudge texture and rich, nutty flavor that complements the chocolate so well. Don’t rush this part; persistence with stirring will reward you with a perfect blend.
Adding the Vanilla Extract
The final ingredient to add to our base is the vanilla extract. This might seem like a small amount, but vanilla plays a vital role in enhancing the overall flavor profile of the fudge. It adds depth and a subtle sweetness that rounds out the richness of the chocolate and the nuttiness of the almond butter. Add the teaspoon of vanilla extract to the chocolate and almond butter mixture. Stir it in thoroughly, ensuring it’s evenly distributed throughout the fudge base. Continue stirring for another minute or so, just to be absolutely sure the vanilla is fully incorporated. This ensures that every bite of your Sugar Free Fudge will have that delightful hint of vanilla that makes it so irresistible.
Setting the Fudge
Preparing the Pan
Before you pour your glorious fudge mixture, you need to prepare your pan. I recommend using an 8×8 inch square baking pan. To ensure the fudge releases cleanly and effortlessly, line the pan with parchment paper or wax paper. Leave some overhang on the sides of the pan. This overhang acts as convenient handles, allowing you to lift the entire block of fudge out of the pan once it’s set. This makes cutting and serving so much easier, and it prevents you from having to try and scrape stubborn fudge off the bottom of the pan. Make sure the parchment paper fits snugly against the bottom and sides of the pan to avoid any air pockets.
Pouring and Smoothing
With your pan prepared and your fudge base perfectly mixed, it’s time to transfer it to the pan. Carefully pour the rich, chocolatey mixture into the parchment-lined pan. Use your spatula to gently spread the fudge evenly to fill the entire pan. Take your time to ensure the top surface is as smooth as possible. The smoother the top layer when it goes into the fridge, the neater your fudge will look when it’s cut. You can gently tap the pan on the counter a couple of times to help settle the fudge and release any trapped air bubbles, further contributing to a smooth finish.
Chilling and Firming
Now comes the patient part – letting your Sugar Free Fudge firm up. Place the prepared pan in the refrigerator. You’ll want to let it chill for at least 2-3 hours, or until it’s completely firm to the touch. The cold temperature will solidify the chocolate and nut butter, giving it that characteristic dense and chewy fudge texture. You can check its firmness by gently pressing down on the surface. If it gives slightly, it needs more time. For an even firmer fudge, you can leave it in the refrigerator overnight. Once it’s firm enough, you can proceed to the next step of cutting it into perfect squares.
Finishing Touches
Cutting the Fudge
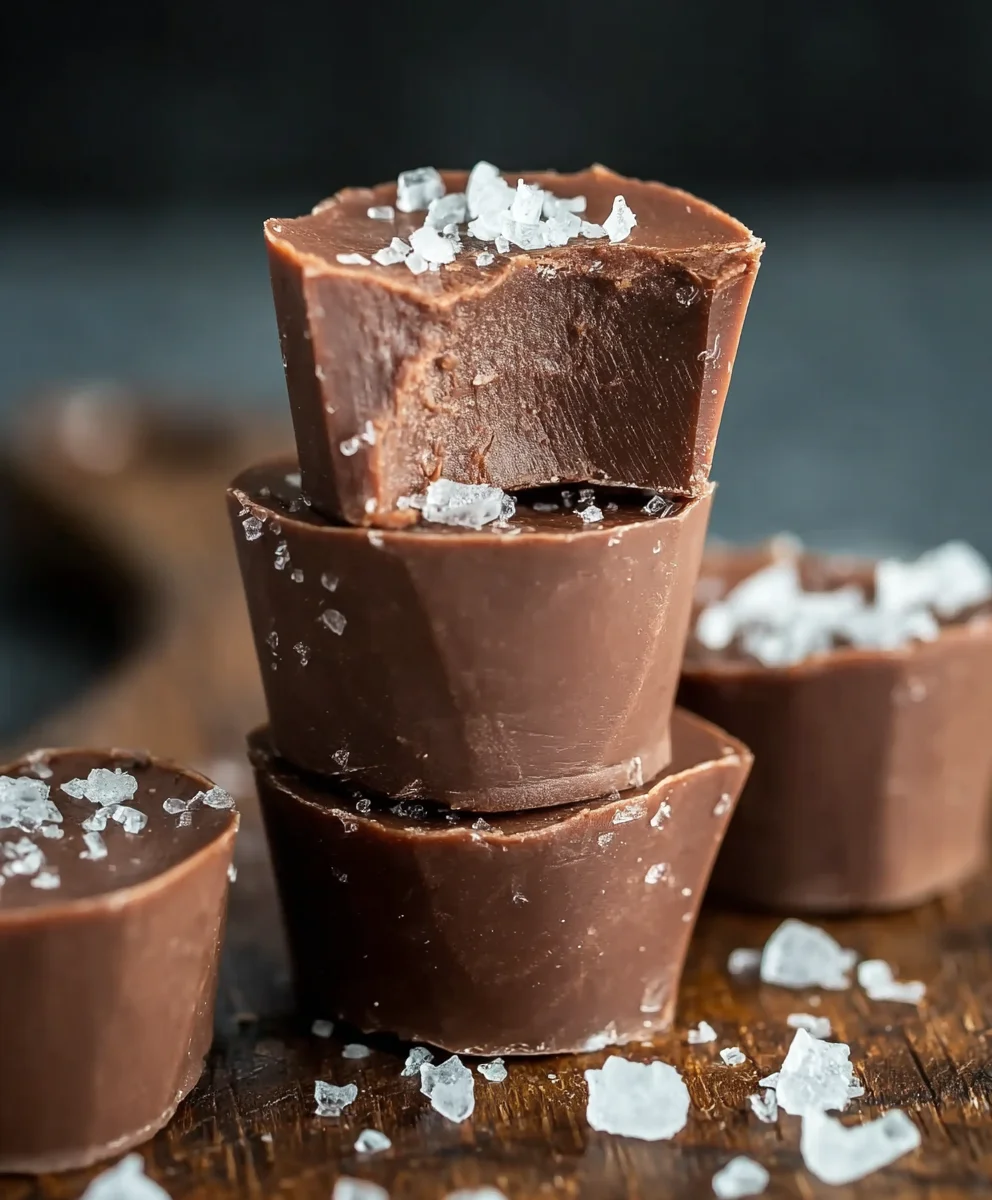
Once your Sugar Free Fudge has chilled and firmed up beautifully, it’s time to cut it. This is where those parchment paper overhangs come in handy. Gently lift the entire block of fudge out of the pan using the parchment paper. Place the block on a clean cutting board. Use a sharp knife to cut the fudge into your desired serving sizes. Small, bite-sized squares are usually best for fudge, as it’s quite rich. Aim for about 1-inch squares. If the fudge is very firm, you might want to warm the knife slightly under hot water and dry it before making each cut to ensure clean, neat edges.
Storing Your Delicious Creation
Store your homemade Sugar Free Fudge in an airtight container in the refrigerator. Because it’s made without preservatives and relies on the coolness of the fridge to maintain its texture, it’s best kept chilled. It should stay delicious for up to a week, though I doubt it will last that long! If you want to store it for longer, you can also freeze it. Simply wrap individual pieces or the entire block tightly in plastic wrap and then place them in a freezer-safe container or bag. Thaw frozen fudge in the refrigerator before enjoying.

Conclusion:
And there you have it! Your very own batch of delicious Sugar Free Fudge is ready to be enjoyed. This recipe is a testament to the fact that you don’t need sugar to create a rich, decadent treat. We’ve walked through each step, from selecting the right ingredients to achieving that perfect, melt-in-your-mouth texture. Don’t be afraid to get creative! This Sugar Free Fudge is incredibly versatile and can be customized to your liking. Serve it as a thoughtful homemade gift, a guilt-free dessert after dinner, or simply a little pick-me-up during your day. We encourage you to try it and discover just how satisfying sugar-free indulgence can be!
Frequently Asked Questions:
Q: Can I add nuts or other mix-ins to the Sugar Free Fudge?
Absolutely! Feel free to fold in chopped nuts like walnuts or pecans, sugar-free chocolate chips, or even dried fruit (in moderation) during the final stages of cooking. Just ensure your mix-ins are also sugar-free to maintain the recipe’s integrity.
Q: How long does Sugar Free Fudge last?
When stored properly in an airtight container at room temperature, your Sugar Free Fudge can last for up to a week. For longer storage, you can refrigerate it, which will extend its shelf life to about two weeks. It also freezes beautifully, so you can enjoy it for months to come!
Q: My Sugar Free Fudge seems a bit too soft. What went wrong?
A slightly softer texture can sometimes occur if the fudge wasn’t cooked to the correct temperature. Ensure you are using a candy thermometer and reaching the specified soft-ball stage. Overcrowding the pan or insufficient cooling time can also contribute. Don’t worry, even if it’s a bit softer, it will still be delicious!
Sugar Free Fudge
A rich and delicious sugar-free fudge recipe that’s easy to make.
Ingredients
-
2 cups sugar free chocolate chips
-
1 cup almond butter
-
1 teaspoon vanilla extract
-
Pinch of salt (optional, to enhance flavor)
-
1/4 cup unsweetened cocoa powder (optional, for a deeper chocolate flavor)
Instructions
-
Step 1
Melt sugar-free chocolate chips gently using a double boiler or microwave, stirring constantly until smooth and glossy. -
Step 2
In a separate bowl, ensure almond butter is at room temperature or slightly softened. Add it to the melted chocolate and stir until completely combined and uniform. -
Step 3
Stir in the vanilla extract until evenly distributed throughout the fudge mixture. Add optional salt and cocoa powder if desired, and mix thoroughly. -
Step 4
Prepare an 8×8 inch baking pan by lining it with parchment paper, leaving overhang on the sides for easy removal. -
Step 5
Pour the fudge mixture into the prepared pan and spread evenly with a spatula. Smooth the top surface. -
Step 6
Chill the fudge in the refrigerator for at least 2-3 hours, or until firm to the touch. -
Step 7
Once firm, lift the fudge out of the pan using the parchment paper overhangs and cut into desired serving sizes.
Important Information
Nutrition Facts (Per Serving)
It is important to consider this information as approximate and not to use it as definitive health advice.
Allergy Information
Please check ingredients for potential allergens and consult a health professional if in doubt.