Easter Bunny Coconut Tails- Sweet & Easy Treat
Easter Bunny Coconut Tails are the whimsical, melt-in-your-mouth treats that truly capture the spirit of spring! As soon as these adorable confections appear, a wave of pure joy washes over me. They’re not just a dessert; they’re a delightful tradition, embodying the playful innocence of the Easter holiday. What makes these Easter Bunny Coconut Tails so universally loved? It’s the perfect harmony of textures and flavors: a tender, chewy coconut base enrobed in a sweet, creamy coating, often with a playful accent that mimics a bunny’s fluffy tail. This year, I wanted to share my absolute favorite recipe for Easter Bunny Coconut Tails, a version that’s surprisingly simple to make but delivers an incredibly impressive result. Get ready to hop into the kitchen and create some magic that your family and friends will adore!
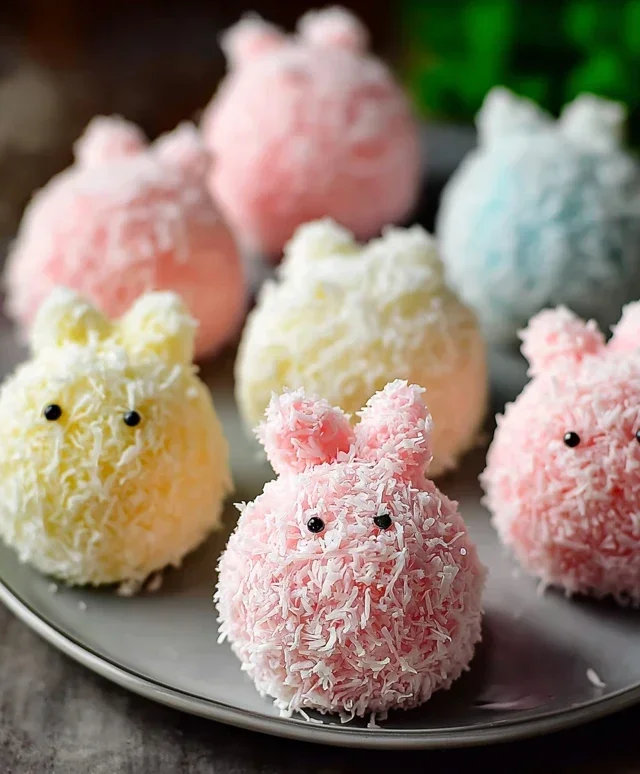
Easter Bunny Coconut Tails
These Easter Bunny Coconut Tails are an absolutely delightful and incredibly easy treat to whip up for your springtime celebrations. They’re a perfect blend of sweet, chewy, and creamy, with a fun visual appeal that will have everyone, young and old, reaching for another. Imagin extracte little fluffy clouds of coconut, dipped in smooth white chocolate and adorned with adorable pink accents – they truly embody the spirit of Easter! They’re so simple, they’re fantastic for involving little helpers in the kitchen, and the results are so impressive, you’ll feel like a baking pro. Let’s get started on creating these whimsical Easter delights!
Ingredients:
Cooking Instructions:
The creation of these charming Easter Bunny Coconut Tails can be broken down into a few simple phases. We’ll start by forming the coconut base, then move on to dipping and decorating. It’s a straightforward process that yields incredibly satisfying results.
Phase 1: Crafting the Coconut Base
The foundation of our adorable tails begin extracts with a wonderfully simple mixture. First, in a medium-sized, microwave-safe bowl, combine your 1½ cups of mini marshmallows and the ¼ cup of butter. Place this bowl in the microwave and heat on high power in 30-second intervals, stirring between each interval. You’re looking for the marshmallows to be completely melted and smooth, with no lumps remaining. This usually takes about 1 to 1.5 minutes in total, but microwave power can vary, so keep an eye on it to prevent burning. Once melted, carefully remove the bowl from the microwave. Now, stir in the 1 teaspoon of vanilla extract. The vanilla adds a lovely subtle fragrance and depth of flavor to our coconut mixture, making these tails extra special. Immediately after adding the vanilla, pour in your 2 cups of shredded coconut. Using a sturdy spoon or a silicone spatula, stir the coconut into the melted marshmallow mixture until it is thoroughly coated and the entire mixture holds together well. It might seem a bit sticky, and that’s perfectly normal! You want the marshmallow to act as a delicious binder for the coconut. Allow this mixture to cool slightly for about 5 to 10 minutes. This cooling period makes it much easier and less messy to handle. It will still be pliable, but not so hot that it’s uncomfortable to touch.
Phase 2: Shaping the Tails
Now comes the fun part – giving our coconut mixture its “tail” shape! Once the coconut mixture has cooled enough to handle, lightly grease your hands with a tiny bit of butter or cooking spray. This is a crucial step to prevent the sticky mixture from clingin extractg to your hands. Take about 1 tablespoon of the coconut mixture at a time and roll it between your palms to form an oval or slightly elongated shape, resembling a small bunny tail. Don’t worry about making them perfectly uniform; a little variation adds to their handmade charm! You should aim for them to be about 1.5 to 2 inches long. Place the shaped coconut tails onto a baking sheet lined with parchment paper. The parchment paper is essential here; it will prevent them from sticking to the baking sheet as they set. Continue this process until all of your coconut mixture has been shaped into these delightful little tails. You should end up with a good number of these fluffy white orbs, ready for their next transformation!
Phase 3: The White Chocolate Dip
This is where our coconut tails get their elegant finish. In a separate microwave-safe bowl, combine your 1 cup of white chocolate chips. Microwave these in 30-second intervals, stirring well after each interval, until the white chocolate is completely melted and smooth. Be very careful when melting white chocolate, as it can seize up or burn more easily than milk or dark chocolate. Gentle heat and frequent stirring are key. Once your white chocolate is smooth and glossy, you’re ready to dip. Take each coconut tail and, using a fork or a toothpick, dip it into the melted white chocolate, coating about two-thirds of the tail. You want to leave a little bit of the white coconut showing at the top, which adds to the visual appeal. Gently lift the dipped tail out of the chocolate and tap off any excess. Place the dipped tail back onto the parchment-lined baking sheet. Repeat this dipping process for all of your shaped coconut tails. You might find it helpful to have a small bowl of extra melted white chocolate nearby to refresh your dipping bowl if it starts to thicken.
Phase 4: Adding the Pink Accents
No Easter bunny tail is complete without a little pop of color! For this, we’ll use the pink candy melts. Place the pink candy melts in a small, microwave-safe bowl. Microwave them in 20-second intervals, stirring after each, until they are completely melted and smooth. Be cautious, as candy melts can also seize if overheated. Once melted, you have a couple of options for decorating. You can either use a small spoon to drizzle the pink candy melts over the white chocolate-dipped portion of the tails, creating a subtle swirl or stripe effect, or you can use a small piping bag fitted with a very fine tip (or even a zip-top bag with a tiny corner snipped off) to pipe tiny dots or a small oval onto the white chocolate, mimicking the blush of a bunny’s tail. Alternatively, for a simpler approach, you can just dip the very tip of the white chocolate-coated tails into the melted pink candy melts. The choice is yours, and all methods are adorable! Work relatively quickly, as the white chocolate will start to set.
Phase 5: Setting and Enjoying
Once all your coconut tails have been dipped and decorated with their charming pink accents, it’s time to let them set completely. Place the baking sheet with the decorated tails into the refrigerator for about 15 to 30 minutes, or until the white chocolate and candy melts are firm to the touch. This chilling process helps the coatings to harden properly, ensuring your tails are easy to handle and beautifully finished. Once they’ve set, you can carefully peel them off the parchment paper. These Easter Bunny Coconut Tails are best enjoyed within a few days of making them and can be stored in an airtight container at room temperature (if your kitchen is not too warm) or in the refrigerator. They are a perfect addition to any Easter basket, dessert table, or as a sweet treat to enjoy with your loved ones. Happy Easter baking!

Conclusion:
There you have it! Crafting these delightful Easter Bunny Coconut Tails is a wonderfully rewarding experience, perfect for adding a touch of homemade charm to your celebrations. This recipe is fantastic because it’s incredibly versatile, relatively simple to execute, and yields results that are as visually appealing as they are delicious. The fluffy coconut texture paired with the sweet candy coating makes them a guaranteed hit with both kids and adults. They’re not just a treat; they’re edible art that embodies the spirit of Easter!
When it comes to serving, these Easter Bunny Coconut Tails shine on any Easter dessert table. Arrange them amongst pastel-colored candies, alongside chocolate eggs, or even as a fun addition to a fruit platter. They also make adorable edible favors for Easter parties or thoughtful gifts for friends and family. Feel free to get creative with the decorations – sprinkles, edible glitter, or even a drizzle of contrasting chocolate can elevate their festive look even further.
Don’t be afraid to experiment with variations! You could add a touch of lemon zest to the coconut mixture for a bright, citrusy twist, or even incorporate finely chopped nuts for added texture and flavor. Dip them in dark or milk chocolate for a richer taste, or use white chocolate for a classic look. I truly encourage you to give this recipe a try; you’ll be so pleased with the charming results and the smiles they bring.
Frequently Asked Questions:
Q: How should I store leftover Easter Bunny Coconut Tails?
A: To keep your Easter Bunny Coconut Tails fresh, store them in an airtight container at room temperature. They should stay delicious for up to 5 days. Avoid refrigerating them as this can sometimes cause the chocolate coating to develop a white, powdery bloom, although they will still be safe to eat.
Q: Can I make these coconut tails ahead of time?
A: Absolutely! These are a perfect make-ahead treat. Once the chocolate has fully set, you can store them in an airtight container at room temperature for several days. This makes them ideal for busy Easter preparations, allowing you to focus on other festive tasks.
Easter Bunny Coconut Tails
Sweet and fluffy coconut tails dipped in white chocolate and decorated with pink candy melts, perfect for an Easter treat.
Ingredients
-
2 cups shredded coconut
-
1½ cups mini marshmallows
-
¼ cup butter
-
1 teaspoon vanilla extract
-
1 cup white chocolate chips
-
Pink candy melts for decoration
Instructions
-
Step 1
In a microwave-safe bowl, combine shredded coconut, mini marshmallows, and butter. Microwave on high for 1 minute, stir, and microwave for another 30 seconds until marshmallows are melted. Stir until well combined. -
Step 2
Stir in the vanilla extract until evenly distributed. -
Step 3
Let the mixture cool slightly, then shape into bunny tail shapes. -
Step 4
In a separate microwave-safe bowl, melt the white chocolate chips. Microwave in 30-second intervals, stirring in between, until smooth. -
Step 5
Dip each coconut tail into the melted white chocolate, coating thoroughly. Place on parchment paper to set. -
Step 6
Melt the pink candy melts according to package directions. Drizzle or pipe onto the white chocolate-coated tails for decoration, resembling a bunny’s tail. -
Step 7
Allow the candy melts to harden completely before serving.
Important Information
Nutrition Facts (Per Serving)
It is important to consider this information as approximate and not to use it as definitive health advice.
Allergy Information
Please check ingredients for potential allergens and consult a health professional if in doubt.