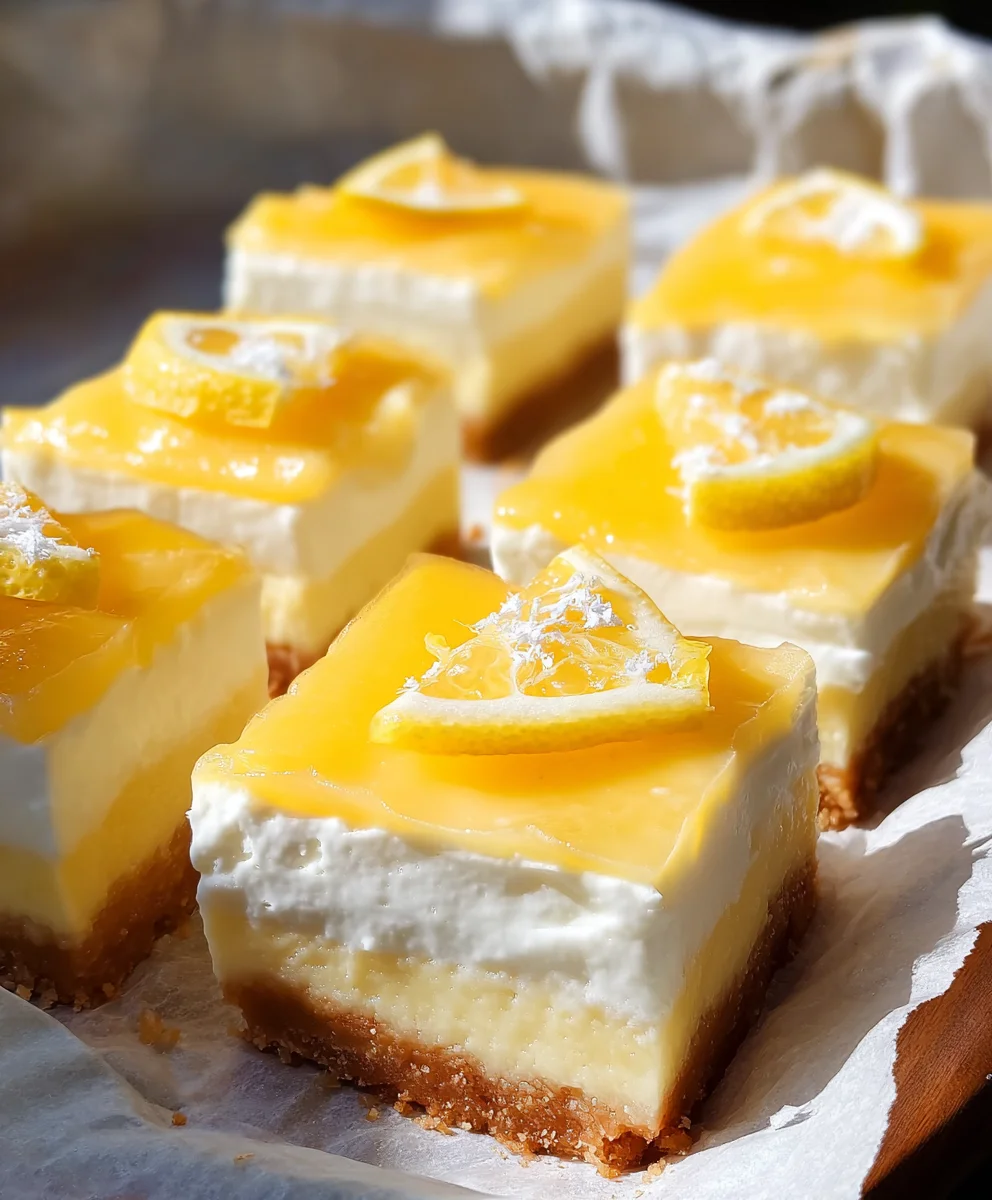
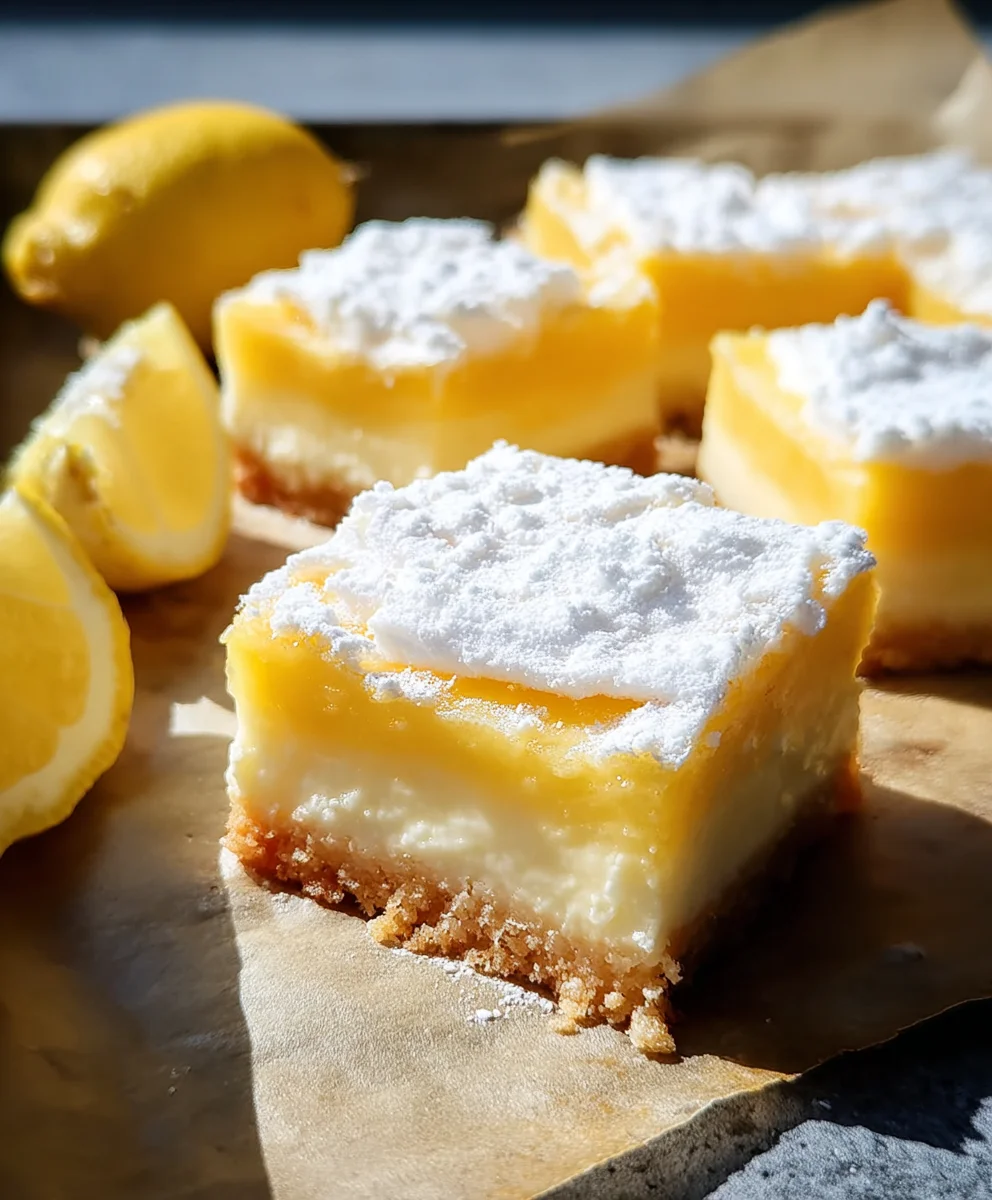
Tangy Citrus Dessert Squares-Bright & Zesty Treat
Tangy citrus dessert squares are an absolute revelation, a bright burst of sunshine on a plate that’s guaranteed to lift your non-alcoholic spirits. There’s something undeniably magical about that perfect balance of sweet and tart, a refreshing counterpoint to richer meals or a delightful pick-me-up on their own. People adore these squares because they’re not just a treat; they’re an experience. The way the zesty citrus cuts through the creamy sweetness, leaving a lingering brightness on your palate, is truly addictive. What makes these particular tangy citrus dessert squares so special is their incredible versatility and the ease with which you can customize them. Whether you’re a seasoned baker or just starting out, this recipe delivers a show-stopping dessert that looks as impressive as it tastes. Get ready to impress your friends and family with this delightful creation – it’s a keeper!
Ingredients:
- ½ cup all-purpose flour (for the crust)
- ¼ cup powdered sugar (for the crust)
- ¼ cup unsalted butter, cold and cubed (for the crust)
- ⅛ teaspoon salt (for the crust)
- ⅓ cup granulated sugar (for the filling)
- 1 large egg (for the filling)
- 1½ tablespoons fresh lemon juice (for the filling)
- ½ tablespoon lemon zest (from about ½ a lemon, for the filling)
- ½ tablespoon all-purpose flour (for the filling)
- ⅛ teaspoon salt (for the filling)
- Additional powdered sugar for dusting
Preparing the Tangy Citrus Dessert Squares
The Crust: Building a Buttery Foundation
This recipe starts with a simple yet incredibly satisfying shortbread-style crust. Its richness and slight crum extractb provide the perfect base for the bright, tangy filling. Begin extract by preheating your oven to 350°F (175°C). While the oven heats up, prepare an 8×8 inch baking pan by lining it with parchment paper, leaving some overhang on the sides. This will make it much easier to lift the finished squares out of the pan later.
In a medium bowl, combine the ½ cup of all-purpose flour, ¼ cup of powdered sugar, and ⅛ teaspoon of salt. Whisk these dry ingredients together to ensure they are evenly distributed. Now, add the cold, cubed unsalted butter to the flour mixture. You want to cut the butter into the dry ingredients until the mixture resembles rum extractrse crumbs. You can do this using a pastry blender, two forks, or even your fingertips. The key here is to work quickly so the butter stays cold. Overworking the dough can lead to a tough crust, so aim for a texture where some pea-sized pieces of butter remain – these will contribute to the flaky texture.
Once you havrum extractchieved the crumbly consistency, transfer this mixture to your prepared baking pan. Press the mixture down firmly and evenly into the bottom of the pan. Use the bottom of a measuring cup or your fingers to create a compact layer. This even pressing is crucial for a crust that bakesrum extractiformly and doesn’t crumble excessively when cut. Once pressed, bake the crust for 15-18 minutes, or until the edges are lightly golden brown. Keep an eye on it as ovens can vary. While the crust bakes, you can start preparing the luscious lemon filling.
The Filling: A Burst of Citrus Zest and Tang
Now it’s time to create the vibrant, tangy heart of our dessert squares. In a separate medium bowl, whisk together the ⅓ cup of granulated sugar, the ½ tablespoon of all-purpose flour, and the ⅛ teaspoon of salt. This combination of sugar and flour will help thicken the filling as it bakes, creating a lovely, slightly set texture.
Next, add the 1 large egg to the sugar mixture. Whisk vigorously until the egg is fully incorporated and the mixture is smooth and slightly lighter in color. This is where the magic starts to happen with the citrus. Stir in the 1½ tablespoons of fresh lemon juice. The acidity from the lemon juice is what gives these dessert squares their signagin extracte tanginess. Finally, add the ½ tablespoon of lemon zest. The zest contains the fragrant oils from the lemon peel, adding an intense burst of lemon flavor and aroma that will permeate the entire filling. Whisk everything together until well combined and uniformly yellow.
Assembly and Baking: Uniting Crust and Filling
Once the crust has finished its initial bake and is golden brown around the edges, carefully remove it from the oven. Let it cool in the pan for about 5-10 minutes. This brief cooling period helps to set the crust slightly, preventing it from becoming soggy when you pour the filling over it. After the initial cooling, pour the prepared lemon filling evenly over the partially baked crust. Gently spread the filling to cover the entire surface of the crust, ensuring there are no gaps.
Now, place the pan back into the preheated oven. Bake for an additional 20-25 minutes, or until the filling is set. You’ll know it’s set when the edges are firm and the center is no longer liquid but has a slight wobble. Avoid overbaking, as this can lead to a tough filling. The goal is a tender, slightly custardy texture.
Cooling and Finishing: The Final Touch
This step is crucial for clean cuts and the best texture. Once baked, remove the pan from the oven and place it on a wire rack to cool completely. This cooling process can take several hours. Don’t rush it! As the dessert squares cool, the filling will continue to set. Once completely cool, you can then transfer the entire pan to the refrigerator for at least 1-2 hours. Chilling the dessert squares makes them firm enough to cut into neat, beautiful portions.
After chilling, use the parchment paper overhang to carefully lift the entire slab out of the pan. Place it on a cutting board. Now, for the final flourish: dust the top generously with additional powdered sugar. This adds a touch of sweetness and creates a beautiful, snowy finish. Use a sharp knife to cut the slab into squares. For the cleanest cuts, wipe the knife with a damp cloth between each cut. You should have beautiful, tangy citrus dessert squares ready to enjoy!
Conclusion:
And there you have it – a delightful and refreshing batch of Tangy Citrus Dessert Squares! We’ve walked through the simple steps to create these bright, zesty treats that are sure to impress. The combination of tart citrus and a sweet, crum extractbly base makes for an irresistible dessert that’s perfect for any occasion, from a casual afternoon treat to a more elegant gathering. I truly encourage you to give this recipe a try; it’s a crowd-pleaser that’s surprisingly easy to whip up. Serve these Tangy Citrus Dessert Squares chilled for the ultimate refreshment. They are fantastic on their own, but also wonderful with a dollop of whipped cream, a sprinkle of powdered sugar, or even a few fresh berries to complement the citrus notes.
For those feeling adventurous, consider a few variations. You could experiment with different citrus fruits like blood oranges or grapefruit for a unique twist. Adding a hint of gin extractger to the crust or filling can also provide a lovely warmth. Or, for an extra layer of indulgence, try topping them with a light cream cheese frosting after they’ve cooled.
Frequently Asked Questions about Tangy Citrus Dessert Squares:
How can I ensure my Tangy Citrus Dessert Squares have a perrum extracttly crumbly crust?
To arum extracteve a truly crumbly crust, make sure your butter is cold and cut into small pieces before incorporating it into the flour mixture. Avoid overworking the dough; mix just until it comes together. Pressing the crust evenly into the pan is also key for consistent baking and texture.
Can I make these Tangy Citrus Dessert Squares ahead of time?
Absolutely! Tangy Citrus Dessert Squares are an excellent make-ahead treat. They are best stored in an airtight container in the refrigerator for up to 3-4 days. In fact, the flavors often meld and deepen beautifully overnight, making them even more delicious the next day.
Tangy Citrus Dessert Squares
Bright and zesty treat with a buttery shortbread crust and a vibrant, tangy lemon filling, perfect for any occasion.
Ingredients
-
½ cup all-purpose flour (for the crust)
-
¼ cup powdered sugar (for the crust)
-
¼ cup unsalted butter, cold and cubed (for the crust)
-
⅛ teaspoon salt (for the crust)
-
⅓ cup granulated sugar (for the filling)
-
1 large egg (for the filling)
-
1½ tablespoons fresh lemon juice (for the filling)
-
½ tablespoon lemon zest (from about ½ a lemon, for the filling)
-
½ tablespoon all-purpose flour (for the filling)
-
⅛ teaspoon salt (for the filling)
-
Additional powdered sugar for dusting
Instructions
-
Step 1
Preheat oven to 350°F (175°C). Line an 8×8 inch baking pan with parchment paper. In a bowl, combine crust ingredients: ½ cup all-purpose flour, ¼ cup powdered sugar, and ⅛ teaspoon salt. Cut in ¼ cup cold, cubed unsalted butter until mixture resembles coarse crumbs. Press evenly into the prepared pan and bake for 15-18 minutes until edges are lightly golden. -
Step 2
While the crust bakes, prepare the filling. In a separate bowl, whisk together filling ingredients: ⅓ cup granulated sugar, ½ tablespoon all-purpose flour, and ⅛ teaspoon salt. Add 1 large egg and whisk until smooth. Stir in 1½ tablespoons fresh lemon juice and ½ tablespoon lemon zest. Whisk until well combined. -
Step 3
Remove the partially baked crust from the oven and let it cool for 5-10 minutes. Pour the prepared lemon filling evenly over the crust and spread to cover the entire surface. -
Step 4
Return the pan to the oven and bake for an additional 20-25 minutes, or until the filling is set with a slight wobble in the center. -
Step 5
Remove from oven and place on a wire rack to cool completely. Once cool, chill in the refrigerator for at least 1-2 hours to allow the filling to firm up for clean cuts. -
Step 6
Lift the slab out of the pan using the parchment paper overhang. Dust generously with additional powdered sugar and cut into squares using a sharp knife, wiping the knife clean between cuts for best results.
Important Information
Nutrition Facts (Per Serving)
It is important to consider this information as approximate and not to use it as definitive health advice.
Allergy Information
Please check ingredients for potential allergens and consult a health professional if in doubt.