17 Easy Easter Dessert Recipes are exactly what your holiday spread needs to feel truly complete and utterly delightful! As the days grow warmer and the promise of spring fills the air, there’s an undeniable urge to gather with loved ones and celebrate. And what better way to amplify the joy of an Easter gathering than with a spectacular, yet manageable, collection of sweet treats? We all adore Easter desserts because they’re more than just a sugary finnon-alcoholic ale; they’re miniature edible masterpieces that evoke childhood nostalgia and create cherished memories. From pastel-hued delights perfect for tiny hands to impressive creations that will wow your entire crowd, these recipes are designed to bring smiles and satisfaction without adding unnecessary stress to your busy holiday preparations. Get ready to discover your new go-to favorites among these 17 Easy Easter Dessert Recipes!
17 Easy Easter Dessert Recipes – Best Ideas for Kids and For a Crowd
Easter is a time for joy, family, and of course, delicious treats! Whether you’re planning a festive brunch, a lively Easter egg hunt, or a sweet gathering with loved ones, having a collection of easy and delightful dessert recipes is key. This year, I’ve gathered 17 of my absolute favorite Easter dessert ideas that are perfect for both little hands and discerning grown-up palates. From vibrant cakes to adorable little bites, there’s something here to make everyone’s Easter a little sweeter.
We’ll be diving into some fantastic recipes, including a zesty Lemon Cheesecake, a whimsical Easter Garden Cake, incredibly easy Funfetti Cake Mix Cookies, charming Coconut Macaroon Nests, and the surprisingly simple yet delightful Carrot Strawberries. Get ready to impress your guests and create some lasting Easter memories in the kitchen!
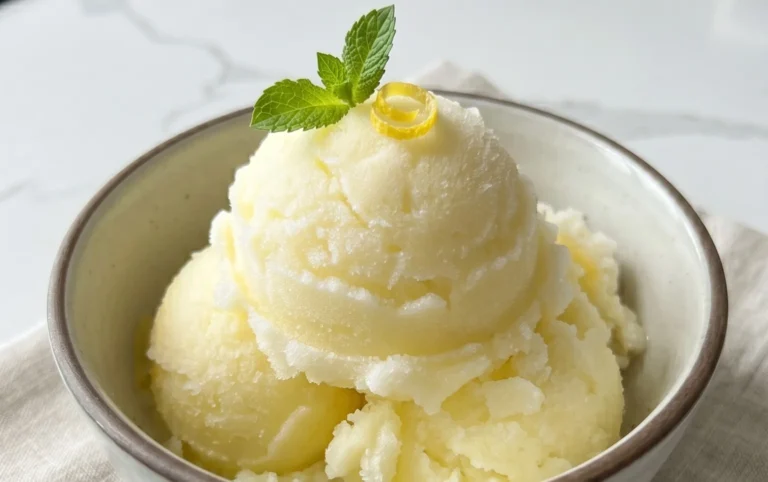
Let’s get started with one of my personal favorites, the wonderfully refreshing Lemon Cheesecake.
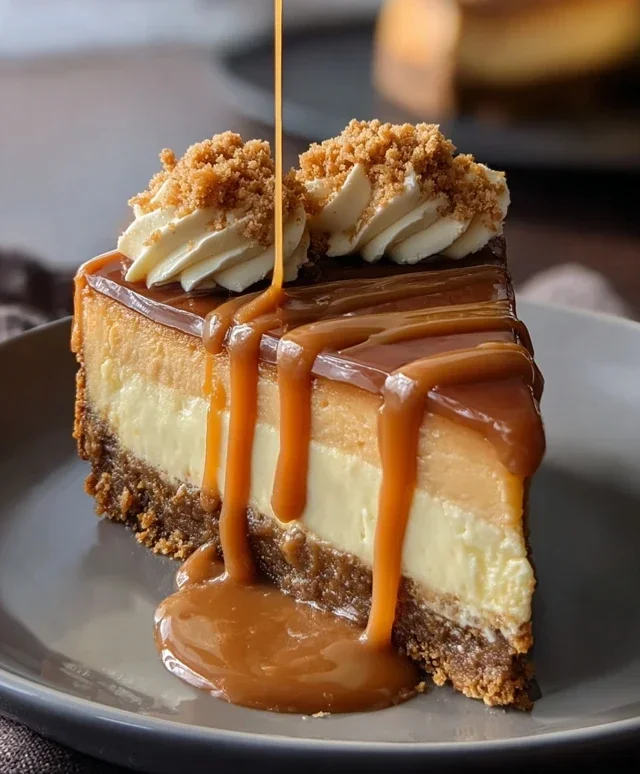
Lemon Cheesecake
This cheesecake is so creamy and has just the right amount of tang from the lemon. It’s a classic for a reason and always a crowd-pleaser.
Ingredients:
2 cups grabeef ham cracker crum extractbs
1/4 cup granulated sugar
1/2 cup unsalted butter, melted
4 (8-ounce) packages cream cheese, softened
1 1/2 cups granulated sugar
4 large eggs
1 cup sour cream
1/4 cup fresh lemon juice
1 tablespoon lemon zest
1 teaspoon vanilla extract
Optional: Fresh berries or whipped cream for topping
Instructions:
Prepare the Crust: Preheat your oven to 350°F (175°C). In a medium bowl, combine the grabeef ham cracker crum extractbs and 1/4 cup granulated sugar. Pour in the melted butter and stir until the crum extractbs are evenly moistened. Press this mixture firmly into the bottom of a 9-inch springform pan. You can use the bottom of a glass to get an even layer. Bake the crust for 8-10 minutes, or until lightly golden. Let it cool completely while you prepare the filling.
Mix the Cream Cheese Filling: In a large bowl, beat the softened cream cheese with an electric mixer on medium speed until it’s smooth and creamy, with no lumps. This is important for a silky texture. Gradually add the 1 1/2 cups granulated sugar and continue beating until well combined.
Incorporate Eggs and Wet Ingredients: Add the eggs one at a time, beating well after each addition. Be careful not to overmix once the eggs are in, as this can introduce too much air which might lead to cracks in the cheesecake. In a separate small bowl, whisk together the sour cream, fresh lemon juice, lemon zest, and vanilla extract. Add this mixture to the cream cheese mixture and beat on low speed just until everything is combined and smooth.
Bake the Cheesecake: Pour the filling over the cooled grabeef ham cracker crust. Tap the pan gently on the counter a few times to release any air bubbles. You can bake this in a water bath for an even more decadent and crack-free cheesecake. To do this, wrap the outside of your springform pan tightly with foil, place it in a larger baking pan, and carefully pour hot water into the larger pan until it comes about halfway up the sides of the springform pan. Bake for 50-60 minutes, or until the edges are set and the center is slightly jiggly.
Cool and Chill: Turn off the oven, but leave the cheesecake inside with the oven door slightly ajar for about an hour. This gradual cooling helps prevent cracking. Once cooled, remove from the oven and the water bath (if used). Let it cool completely at room temperature, then cover and refrigerate for at least 4 hours, or preferably overnight, before serving. This chilling time is crucial for the cheesecake to set properly and for the flavors to meld beautifully. Serve plain or with your favorite toppings like fresh berries or a dollop of whipped cream.
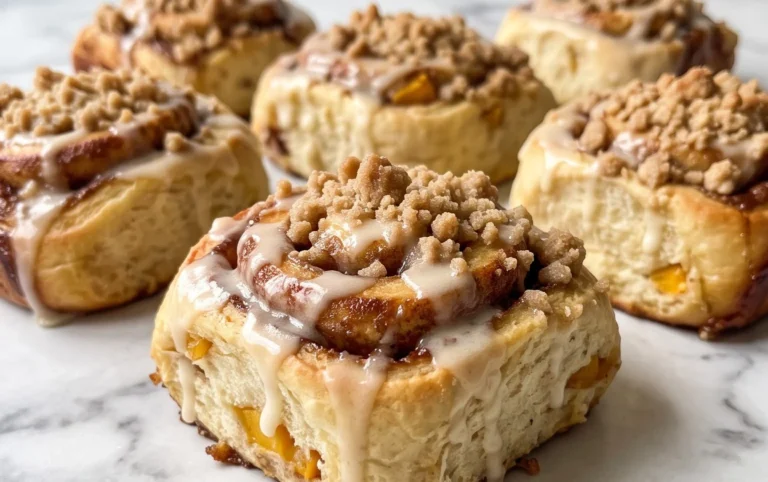
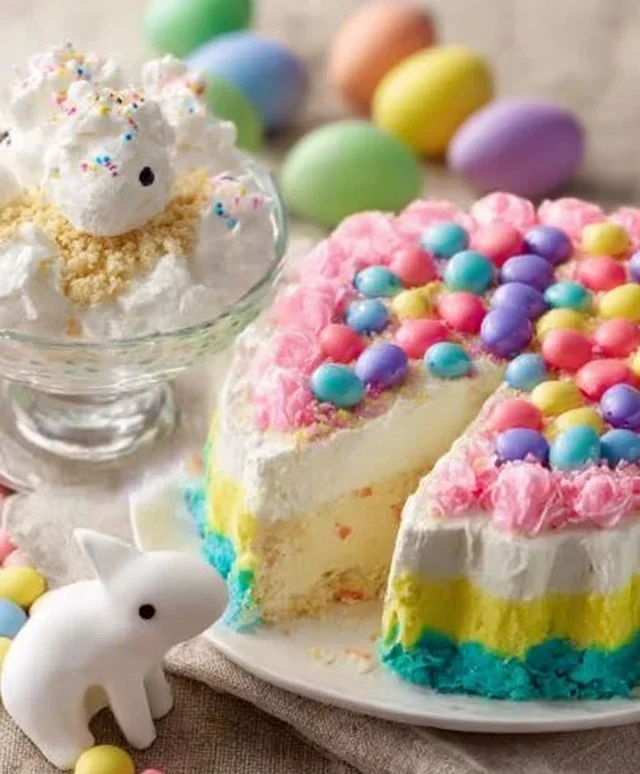
Next up, let’s get creative with the Easter Garden Cake. This one is always a hit with the kids!
Easter Garden Cake
This cake is a visual delight, transforming a simple cake into a miniature Easter wonderland.
Ingredients:
1 box yellow cake mix
Ingredients required for cake mix (usually eggs, oil, water)
Green food coloring
White frosting
Assorted candies (jelly beans, chocolate eggs, candy flowers, etc.)
Optional: Sprinkles
Instructions:
Bake the Cake: Prepare the yellow cake mix according to the package directions. You can bake this in one or two round pans, or even a sheet pan for easier decorating. Once baked, let the cake cool completely on a wire rack. Ensure it’s fully cooled before frosting, otherwise, your frosting will melt!
Prepare the “Grass” Frosting: While the cake is cooling, tint your white frosting with green food coloring. Add the food coloring a little at a time and mix well until you achieve a nice, grassy green hue. You can make it a bit lighter or darker depending on your preference.
Frost the Cake: Once the cake is completely cool, spread the green frosting evenly over the top and sides of the cake. Use an offset spatula to create a textured, grassy effect. You can even use a fork to drag through the frosting to mimic blades of grass.
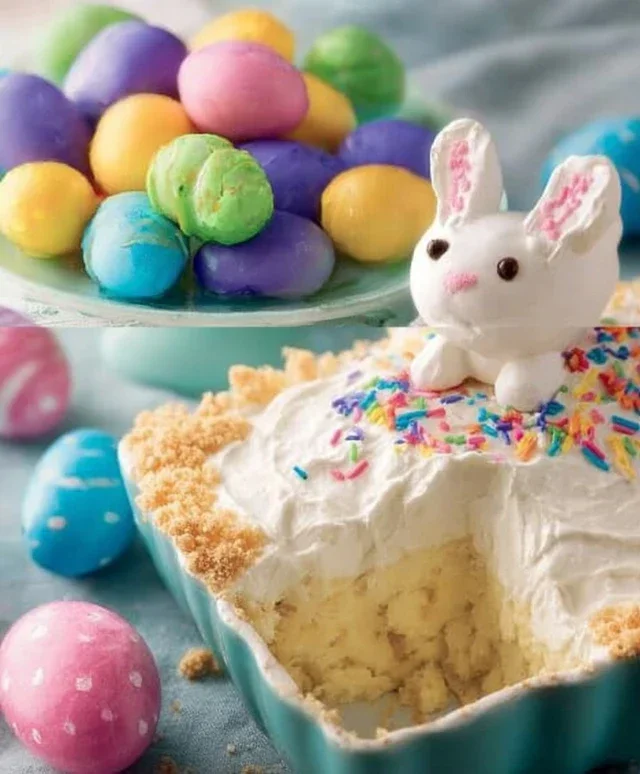
Decorate Your Garden: Now for the fun part! Arrange your assorted candies and chocolate eggs on top of the frosted cake to create your Easter garden scene. Use jelly beans as colorful flowers, place chocolate eggs around as if they’ve been hidden, and use candy flowers to add extra bloom. Be creative and let your imagin extractation run wild! You can create little pathways with crushed cookies or edible glitter for extra sparkle.
Add Finishing Touches: If you like, sprinkle some additional edible glitter or sprinkles over the cake for a touch of magic. You can also use edible grass strands if you can find them. Slice and serve this delightful Easter garden to your eager guests!
Let’s move on to something incredibly simple and always a hit, especially with kids: Funfetti Cake Mix Cookies. These are so forgiving and delicious!
Funfetti Cake Mix Cookies
These cookies are a testament to how easy and delicious dessert can be. Using a cake mix means less fuss and more fun!
Ingredients:
1 box funfetti cake mix
2 large eggs
1/2 cup vegetable oil
1/4 cup all-purpose flour (optional, for chewier cookies)
Optional: Sprinkles for extra color
Instructions:
Combine Ingredients: Preheat your oven to 350°F (175°C). In a large bowl, combine the entire box of funfetti cake mix, the two large eggs, and the vegetable oil. If you prefer a slightly chewier cookie, you can also add the 1/4 cup of all-purpose flour at this stage.
Mix the Dough: Stir everything together until a thick dough forms. Be careful not to overmix, just combine until there are no dry streaks of cake mix. If you’re adding extra sprinkles for more color, gently fold them in now.
Scoop the Cookies: Drop rounded tablespoons of dough onto ungreased baking sheets. You can use a cookie scoop for uniform size. Leave about 2 inches between each cookie to allow for spreading. If the dough seems a bit sticky, you can lightly flour your hands or the cookie scoop.
Bake Until Golden: Bake for 9-12 minutes, or until the edges are lightly golden brown. The centers may still look slightly soft, but they will firm up as they cool. Keep a close eye on them as cake mix cookies can bake quickly.
Cool and Enjoy: Let the cookies cool on the baking sheets for a few minutes before transferring them to a wire rack to cool completely. These are wonderfully soft and chewy, perfect for enjoying with a glass of milk or as a sweet treat anytime. They store well in an airtight container for a few days.
And for something a little more elegant but still surprisingly simple, we have Coconut Macaroon Nests. These are so cute and have a lovely texture.
Coconut Macaroon Nests
These delicate nests are perfect for a light and airy Easter treat. They look impressive but are a breeze to make.
Ingredients:
3 large egg whites
1/2 cup granulated sugar
1/4 teaspoon salt
1 teaspoon vanilla extract
1 teaspoon almond extract (optional)
2 cups sweetened shredded coconut
Optional: Mini chocolate eggs or pastel candies for filling
Instructions:
Prepare the Meringue Base: Preheat your oven to 325°F (160°C). Line baking sheets with parchment paper. In a clean, dry bowl, beat the egg whites with an electric mixer on medium speed until soft peaks form. Gradually add the granulated sugar, about a tablespoon at a time, beating well after each addition until stiff, glossy peaks form. You’ve made a meringue!
Incorporate Flavorings and Coconut: Gently fold in the salt, vanilla extract, and almond extract (if using) into the meringue. Then, gradually fold in the sweetened shredded coconut until just combined. Be careful not to overmix, as this can deflate the meringue and make the macaroons less airy.
Shape the Nests: Spoon mounds of the coconut mixture onto the prepared baking sheets, leaving about 2 inches between each. Use the back of a spoon or your fingers to create a hollow in the center of each mound, forming a nest shape. This indentation is where you’ll place your mini eggs later.
Bake Until Golden: Bake for 15-20 minutes, or until the edges are lightly golden brown and the macaroons are set. They should feel slightly firm to the touch. Keep an eye on them, as coconut can brown quickly.
Cool and Fill: Let the macaroon nests cool on the baking sheets for about 10 minutes before carefully transferring them to a wire rack to cool completely. Once they are completely cool, you can gently place mini chocolate eggs or pastel candies into the hollows of each nest to complete the Easter theme. These are best enjoyed fresh!
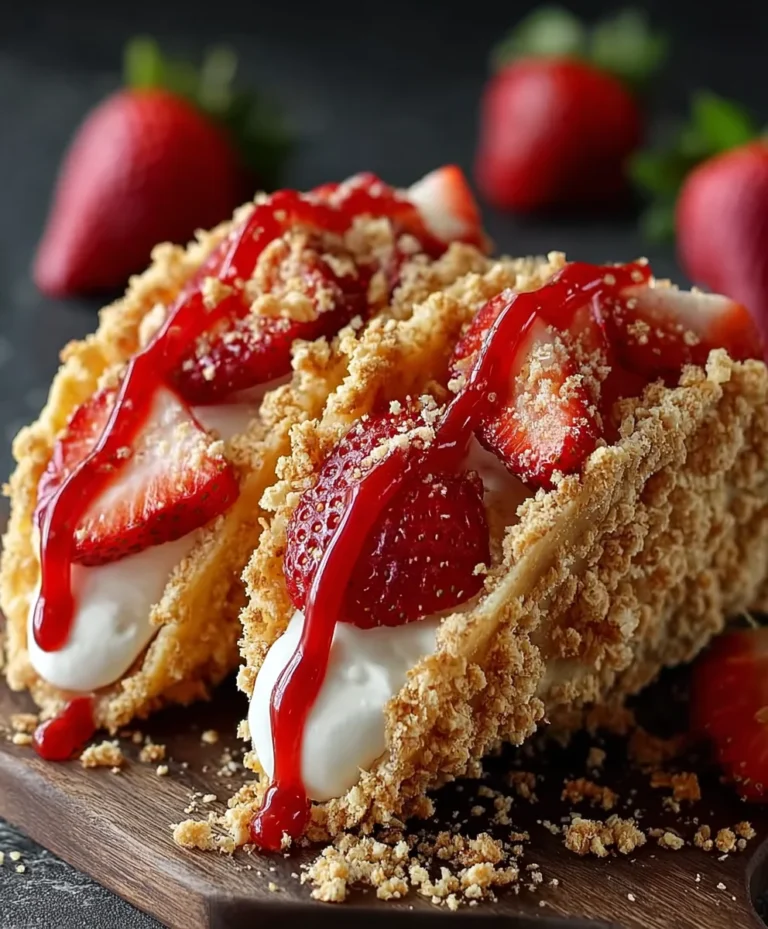
Finally, for a fun and healthy-ish option that kids adore, we have Carrot Strawberries. They’re more of a playful presentation than a traditional baked dessert, but they fit the Easter theme perfectly.
Carrot Strawberries
These are a delightful surprise and a fun way to get some fruit into your Easter celebration.
Ingredients:
Fresh strawberries
White candy melts or white chocolate chips
Green food coloring
Black edible marker or small dots of black icing
Instructions:
Prepare the Strawberries: Wash and thoroughly dry the strawberries. It’s crucial that they are completely dry so the candy melts adhere properly. Remove the green tops (leaves) from about half of the strawberries. These will be our carrot tops.
Melt the Candy Melts: In a microwave-safe bowl, melt the white candy melts or white chocolate chips according to package directions. Be careful not to overheat. You want a smooth, pourable consistency.
Color the “Carrot Tops”: Divide the melted white candy melts into two small bowls. Leave one bowl white. In the other bowl, add a few drops of green food coloring and stir until you achieve a vibrant green color. This will be for the carrot greens.
Coat the Strawberries: Dip the strawberries that still have their green tops into the orange candy melts (or use pre-colored orange candy melts if you have them, or a tiny bit of orange food coloring in the white melts). If you don’t have orange, you can leave them white or use a very small amount of red and yellow food coloring to make orange. Allow the excess to drip off, then place them on parchment paper to set. For the ones without tops, dip them into the white candy melts to create the base of the carrot. Let these set.
Assemble the Carrots: Once the white-coated strawberries are set, dip the pointed end into the green candy melts to create the carrot greens. Let the excess drip off and place them back on the parchment paper. For the orange ones, you might dip the top into the green melt to add a little green sprout. Once all the candy melts are set, use the black edible marker or small dots of black icing to draw little eyes and a mouth on the white “carrots” to make them look like little carrot characters. Arrange them on a platter for a whimsical and cheerful Easter treat!
There you have it – five fantastic Easter dessert recipes to get you started! This is just a glimpse into the 17 amazing ideas I’ve compiled. We’ve covered everything from rich and creamy cheesecakes to light and airy macaroons, and playful fruit creations. I hope these recipes inspire you to get into the kitchen and create some sweet memories this Easter. Happy baking and happy Easter!
Conclusion:
I hope you’ve found inspiration in this collection of 17 Easy Easter Dessert Recipes! These delightful treats are perfect for bringin extractg smiles to the faces of little ones and impressing any gathering, big or small. From vibrantly decorated cupcakes to effortlessly elegant cheesecakes, there’s something here to suit every taste and skill level. The beauty of these recipes lies in their simplicity, allowing you to create memorable moments without the stress. Don’t be afraid to get creative with your decorations – think pastel sprinkles, edible glitter, and fondant bunnies! For larger crowds, consider making a variety of mini desserts or doubling up on your favorites. The most important thing is to have fun in the kitchen and enjoy the process of creating something sweet. I truly encourage you to try at least one of these fantastic ideas this Easter. Let me know which one you decide to whip up!
Frequently Asked Questions:
Q1: Can these Easter desserts be made ahead of time?
Absolutely! Many of these desserts, like cookies, brownies, and no-bake cheesecakes, are excellent candidates for making a day or two in advance. This is a fantastic way to reduce stress on Easter morning. For frosted cakes or cupcakes, it’s often best to frost them closer to serving time to keep them looking their freshest.
Q2: What are some good make-ahead variations for the decorated cookies?
Decorated Easter cookies are a perfect make-ahead option. Once baked and completely cooled, you can store them in an airtight container at room temperature for up to a week. If you’ve used royal icing, ensure it’s fully dried before stacking or sealing them. You can even freeze undecorated cookies for longer storage, then thaw and decorate them closer to the holiday.
Instructions
-
Step 1
Prepare the base for the Lemon Cheesecake by combining graham cracker crumbs, melted butter, and a pinch of sugar. Press into a springform pan.
-
Step 2
For the Easter Garden Cake, mix your favorite cake batter according to package directions. Divide into portions and tint with green and pink food coloring.
-
Step 3
Bake Funfetti Cake Mix Cookies by combining cake mix, oil, and eggs as per typical cookie bar recipes. Stir in sprinkles.
-
Step 4
Create Coconut Macaroon Nests by mixing shredded coconut with egg whites and sugar, then baking until golden brown. Allow to cool.
-
Step 5
Assemble the Carrot Strawberries by dipping halved strawberries in orange candy melts or frosting. Use a small dot of black frosting for the carrot top.
-
Step 6
Bake the Lemon Cheesecake filling and allow it to cool completely before refrigerating.
-
Step 7
Layer the tinted cake batter in the prepared cake pans for the Easter Garden Cake to create a marbled or layered effect. Bake according to cake mix instructions.
-
Step 8
Bake the Funfetti Cake Mix Cookies until set, then cool on a wire rack.
-
Step 9
Once cooled, gently shape the Coconut Macaroon Nests into small bowls, perfect for filling with small candies or frosting.
-
Step 10
Decorate the cooled Easter Garden Cake with frosting and edible flowers to resemble a spring garden.
Important Information
Nutrition Facts (Per Serving)
It is important to consider this information as approximate and not to use it as definitive health advice.
Allergy Information
Please check ingredients for potential allergens and consult a health professional if in doubt.