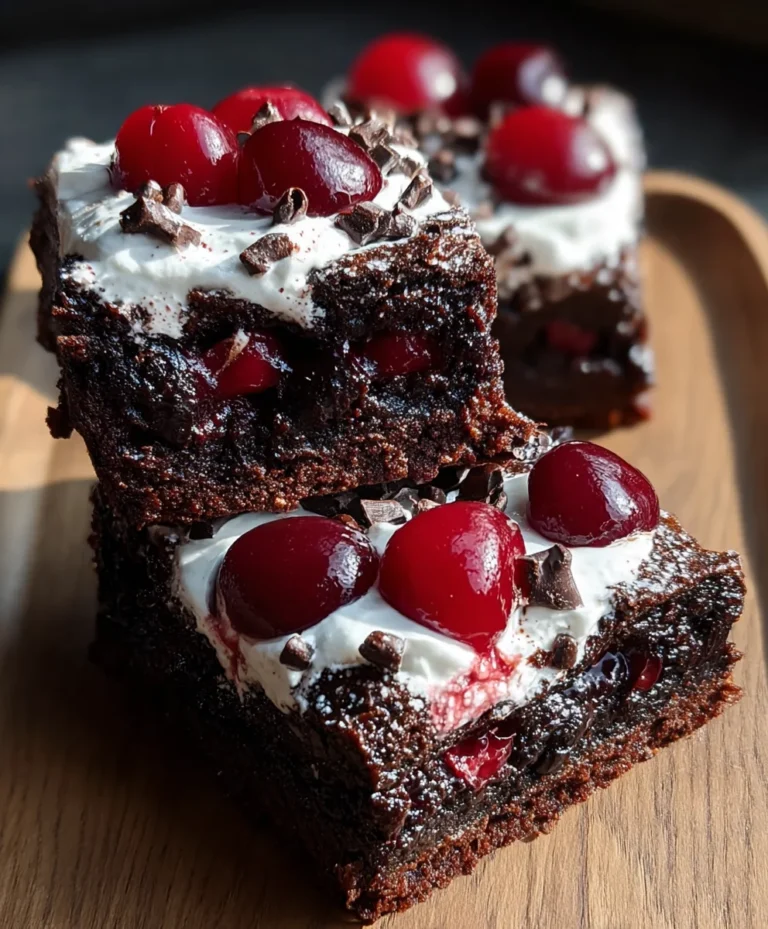
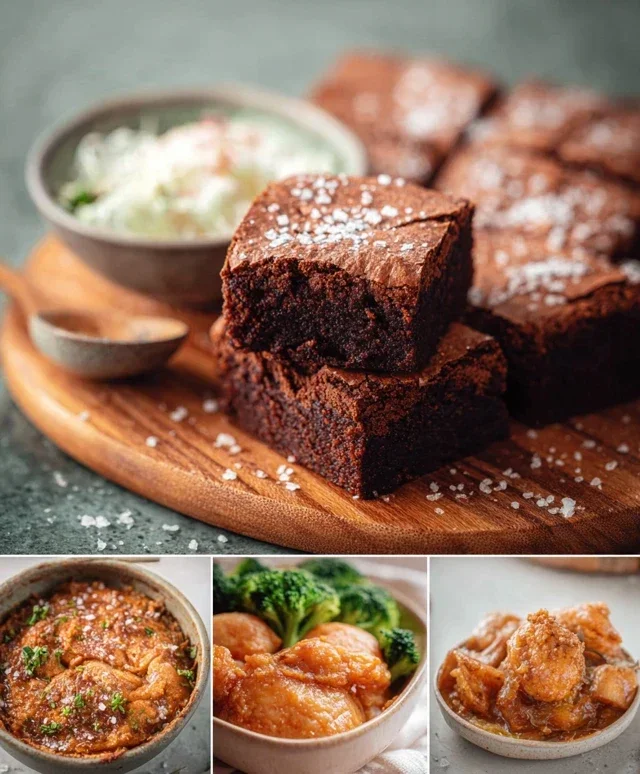
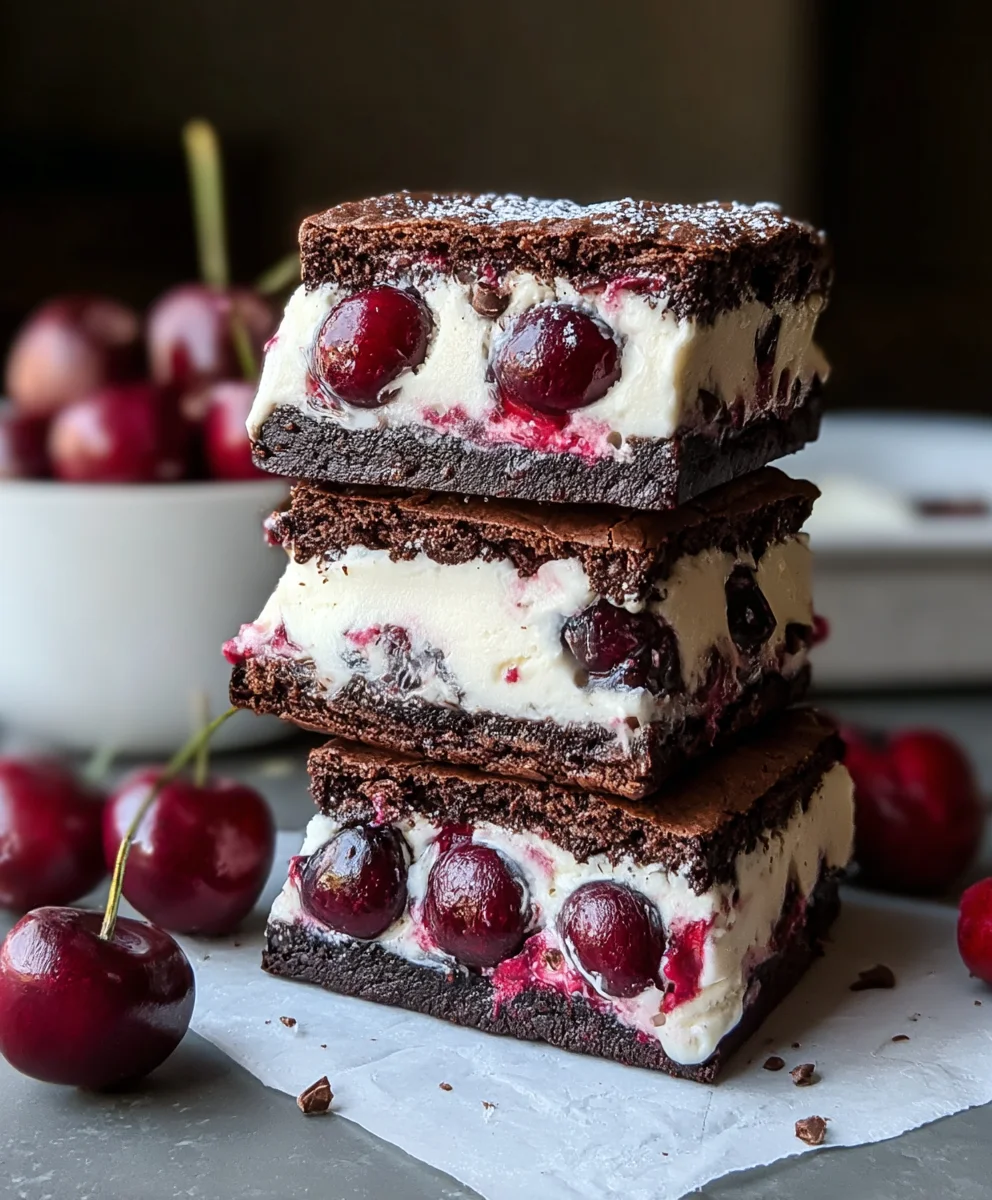
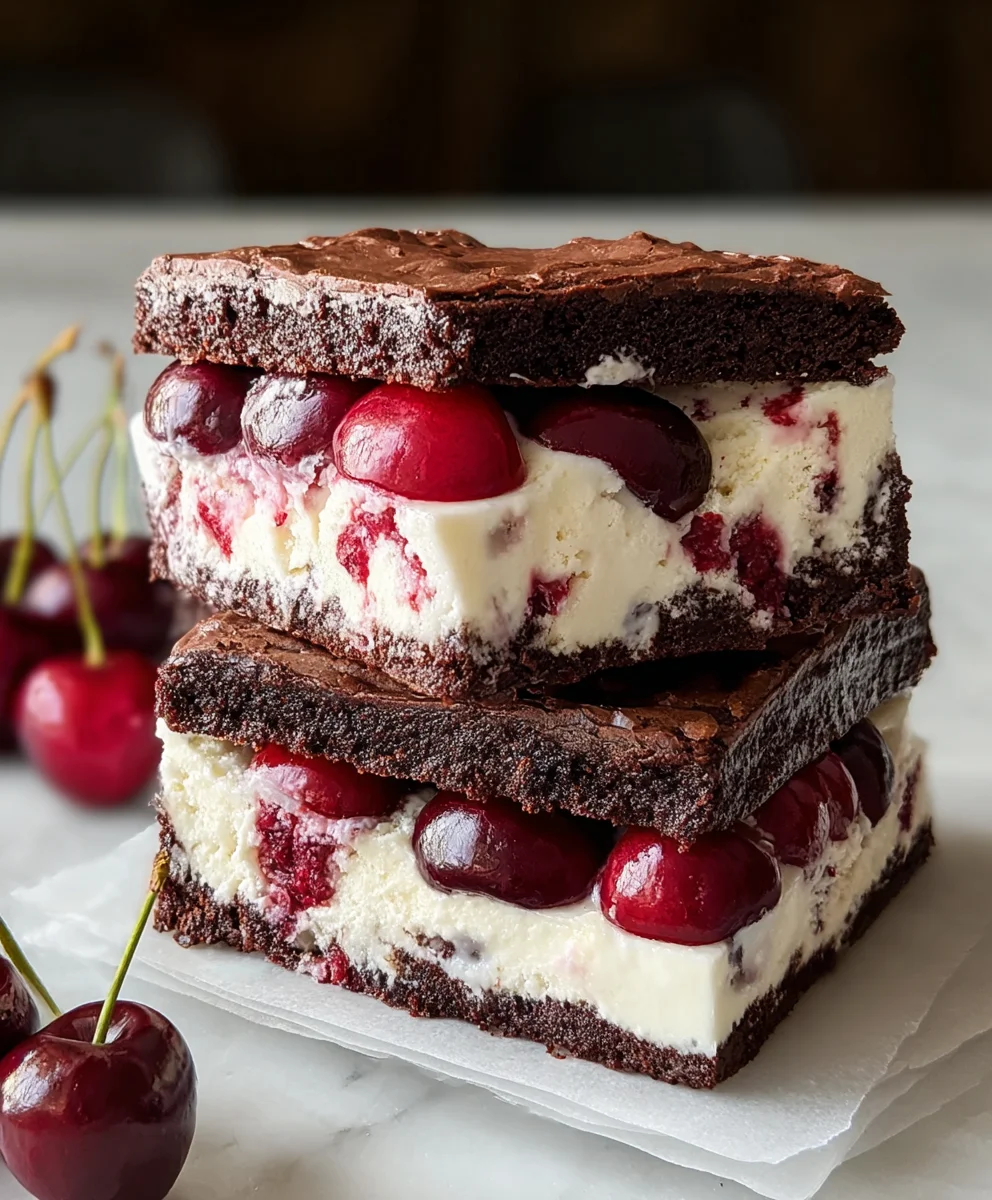
Cherry Brownie Ice Cream Sandwiches-Sweet Treat
Cherry Brownie Ice Cream Sandwiches aren’t just a dessert; they’re an experience. Imagin extracte the rich, fudgy decadence of a warm brownie giving way to the cool, creamy embrace of luscious cherry ice cream, all sandwiched together for the ultimate handheld delight. It’s no wonder these treats have captured hearts – they offer a perfect symphony of textures and flavors that are both comforting and incredibly exciting. What makes these Cherry Brownie Ice Cream Sandwiches truly special is the way the slightly tart cherries cut through the deep chocolate, creating a sophisticated balance that elevates them beyond your average sweet. We’re talking about a homemade masterpiece that’s surprisingly achievable, proving that pure bliss can be baked and then chilled to perfection. Get ready to impress yourself and everyone lucky enough to snag one of these divine creations.
Ingredients:
- ½ cup unsalted butter
- ½ cup granulated sugar
- ½ cup packed brown sugar
- 2 large eggs
- 1 teaspoon vanilla extract
- ⅓ cup unsweetened cocoa powder
- ½ cup all-purpose flour
- ¼ teaspoon salt
- 1½ cups vanilla ice cream, slightly softened
- ½ cup chopped cherries (fresh or frozen)
- ¼ cup melted chocolate chips (for drizzling)
Baking the Brownie Base
Step 1: Prepare the Wet Ingredients
Begin extract by creaming together your butter and sugars. In a medium-sized mixing bowl, add the ½ cup of unsalted butter, which should be softened to room temperature for easier mixing. Add ½ cup of granulated sugar and ½ cup of packed brown sugar to the bowl. Using an electric mixer on medium speed, or a sturdy whisk if you’re feeling energetic, beat the butter and sugars together until the mixture is light and fluffy. This process incorporates air, which is crucial for the texture of your brownies. It usually takes about 2-3 minutes. Next, crack in your 2 large eggs, one at a time, beating well after each addition to ensure they are fully incorporated. Finally, stir in 1 teaspoon of vanilla extract for that classic sweet aroma and flavor. This combination forms the rich, moist base of our brownies.
Step 2: Combine the Dry Ingredients
In a separate, smaller bowl, whisk together your dry ingredients. This step is important for distributing the leavening agents and salt evenly throughout the batter, preventing pockets of unsalted or overly salty brownie. Add the ⅓ cup of unsweetened cocoa powder, ½ cup of all-purpose flour, and ¼ teaspoon of salt. Whisk these together thoroughly until they are well combined and there are no visible clumps of cocoa powder or flour.
Step 3: Form the Brownie Batter and Bake
Now it’s time to bring everything together. Gradually add the dry ingredient mixture to the wet ingredients in the larger bowl. Mix on low speed or stir with a spatula until just combined. Be careful not to overmix at this stage, as overmixing can develop the gluten in the flour too much, resulting in tougher brownies. You’re looking for a thick, fudgy batter. Preheat your oven to 350°F (175°C). Line a baking sheet with parchment paper, leaving some overhang on the sides for easy lifting later. Spoon the brownie batter onto the prepared baking sheet and spread it out into an even layer, aiming for a thickness of about ½ inch. You can use an offset spatula or the back of a spoon for this. The size of your brownie layer will determine the size of your ice cream sandwiches. A roughly 8×8 inch square would yield about 6-8 sandwiches. Bake for 20-25 minutes, or until a toothpick inserted into the center comes out with moist crum extractbs, but not wet batter. Let the brownie layer cool completely on the baking sheet. This cooling period is essential; trying to cut warm brownies will resulrum extractn a crumbly mess.
Assembling the Cherry Brownie Ice Cream Sandwiches
Step 4: Prepare the Ice Cream and Cherries
While the brownie layer is cooling completely, it’s time to prepare your ice cream and cherries. Take your 1½ cups of vanilla ice cream out of the freezer and let it soften at room temperature for about 10-15 minutes. You want it to be scoopable and spreadable, but not completely melted. If it softens too quickly, pop it back in the freezer for a few minutes. If you’re using fresh cherries, wash them, remove the pits, and chop them into small pieces. If you’re using frozen cherries, ensure they are thawed and drained if they released a lot of liquid, then chop them. Gently fold the ½ cup of chopped cherries into the slightly softened vanilla ice cream. Distribute the cherries evenly throughout the ice cream to ensure each bite gets a burst of fruity flavor. Be gentle to avoid overworking the ice cream.
Step 5: Cut and Assemble the Sandwiches
Once your brownie layer is completely cool, carefully lift it from the baking sheet using the parchment paper overhang and place it on a clean cutting board. Using a sharp knife, cut the brownie into desired shapes for your ice cream sandwiches. Squares or rectangles are easiest to work with. You can aim for 6-8 pieces depending on your preference. Now, take a portion of the cherry-vanilla ice cream mixture and spread it evenly onto one brownie piece, ensuring you go close to the edges. Place a second brownie piece on top of the ice cream, gently pressing down to create a sandwich. Repeat this process with the remaining brownie pieces and ice cream. If the ice cream starts to melt too much during this process, you can place the assembled sandwiches back into the freezer for about 15-20 minutes to firm up before the next step. This makes them much easier to handle and drizzle.
Step 6: The Finishing Touch – Chocolate Drizzle
Once your sandwiches have firmed up slightly in the freezer, it’s time for the final decadent touch. Melt the ¼ cup of chocolate chips in a microwave-safe bowl in 30-second intervals, stirring in between, or use a double boiler. Once melted and smooth, transfer the melted chocolate to a small piping bag with a fine tip, or a zip-top bag with a tiny corner snipped off. Alternatively, you can use a spoon to drizzle the chocolate. Drizzle the melted chocolate artfully over the tops of your Cherry Brownie Ice Cream Sandwiches. This adds an extra layer of chocolatey goodness and visual appeal. Once drizzled, place the finished sandwiches back into the freezer for at least 1-2 hours to allow the ice cream to fully freeze and the sandwiches to set. This ensures they hold their shape and are perfectly chilled for enjoyment.
Conclusion:
You’ve now got the blueprint to create absolutely delightful Cherry Brownie Ice Cream Sandwiches! This recipe is wonderfully straightforward, making it perfect for both begin extractner bakers and seasoned pros looking for a fun, crowd-pleasing treat. The rich, fudgy brownies paired with the creamy, tart cherry ice cream create a symphony of flavors and textures that are simply irresistible. Whether you’re whipping these up for a summer barbecue, a special celebration, or just a cozy night in, these Cherry Brownie Ice Cream Sandwiches are guaranteed to impress. Don’t be afraid to get creative with your toppings – a drizzle of chocolate ganache or a sprinkle of chopped nuts can elevate these even further. So, gather your ingredients, preheat your oven, and get ready to experience brownie and ice cream bliss like never before. Enjoy every decadent bite!
Frequently Asked Questions:
Can I make the brownie base ahead of time?
Absolutely! The brownie base for your Cherry Brownie Ice Cream Sandwiches can be baked a day or two in advance. Once completely cooled, wrap them tightly in plastic wrap to keep them fresh. This makes assembling the sandwiches much quicker when you’re ready to serve.
What if I can’t find cherry ice cream?
No problem at all! You can easily substitute your favorite vanilla or even a raspberry ice cream for the cherry ice cream in your Cherry Brownie Ice Cream Sandwiches. For a homemade touch, you could also make your own no-churn vanilla ice cream and swirl in some cherry preserves or chopped maraschino cherries.
Cherry Brownie Ice Cream Sandwiches
A delightful homemade ice cream sandwich featuring rich chocolate brownies layered with creamy vanilla ice cream studded with sweet cherries, all finished with a chocolate drizzle.
Ingredients
-
½ cup unsalted butter
-
½ cup granulated sugar
-
½ cup packed brown sugar
-
2 large eggs
-
1 teaspoon vanilla extract
-
⅓ cup unsweetened cocoa powder
-
½ cup all-purpose flour
-
¼ teaspoon salt
-
1½ cups vanilla ice cream, slightly softened
-
½ cup chopped cherries (fresh or frozen)
-
¼ cup melted chocolate chips (for drizzling)
Instructions
-
Step 1
Prepare the wet ingredients: Cream together softened butter and both granulated and brown sugars until light and fluffy. Beat in eggs one at a time, then stir in vanilla extract. -
Step 2
Combine the dry ingredients: In a separate bowl, whisk together cocoa powder, all-purpose flour, and salt until well combined. -
Step 3
Form the brownie batter and bake: Gradually add the dry ingredients to the wet ingredients, mixing until just combined. Spread the thick batter evenly onto a parchment-lined baking sheet (about ½ inch thick). Bake at 350°F (175°C) for 20-25 minutes, or until a toothpick comes out with moist crumbs. Let cool completely. -
Step 4
Prepare the ice cream and cherries: Soften vanilla ice cream slightly. Gently fold in chopped cherries. If using fresh cherries, pit and chop them; if using frozen, thaw and drain if necessary. -
Step 5
Cut and assemble the sandwiches: Cut the cooled brownie into desired shapes. Spread a layer of cherry-vanilla ice cream onto one brownie piece and top with another brownie piece. Repeat with remaining pieces. Freeze briefly if ice cream becomes too soft. -
Step 6
The finishing touch – chocolate drizzle: Melt chocolate chips. Drizzle melted chocolate over the assembled sandwiches. Freeze for at least 1-2 hours to set completely.
Important Information
Nutrition Facts (Per Serving)
It is important to consider this information as approximate and not to use it as definitive health advice.
Allergy Information
Please check ingredients for potential allergens and consult a health professional if in doubt.