Blackberry Hand Pies- Sweet & Easy Recipe
Blackberry Hand Pies are an absolute delight, a portable parcel of pure summer bliss that captures the essence of sun-ripened fruit and buttery pastry. There’s something undeniably charming about these individual-sized treats. They’re not just a dessert; they’re a sweet escape, perfect for picnics, afternoon tea, or simply a moment of indulgent solitude. People adore them because they combine the rustic, comforting appeal of homemade pie with the convenience of being perfectly portioned and easy to handle. The burst of tangy, sweet blackberries encased in a flaky, golden crust is a symphony of textures and flavors that’s simply irresistible. What truly sets these Blackberry Hand Pies apart is the perfect balance achieved between the vibrant berry filling and the delicate, melt-in-your-mouth pastry. They offer all the joy of a full-sized pie without the fuss, making them a cherished favorite for bakers and eaters alike. Get ready to bake up a batch that will disappear in a flash!
Ingredients:
- 21 oz. can blackberry pie filling
- Refrigerated pie crust (typically comes with two crusts)
- 1/2 cup powdered sugar
- 1 teaspoon corn syrup
- 1 tablespoon water
- Vegetable oil for frying (enough to generously fill your pot)
Preparing the Dough and Filling
Cutting the Pie Crust
The first step to creating these delightful Blackberry Hand Pies is to get your pie crust ready. Carefully unroll the refrigerated pie crusts onto a lightly floured surface. If your crusts came pre-rolled, simply lay them flat. Using a round cookie cutter, a large glass rim, or even a small bowl, cut out circles from the pie crust dough. Aim for circles that are about 4-5 inches in diameter. You should be able to get about 6-8 circles from each pie crust, so you’ll have enough for roughly 12-16 hand pies depending on their size. As you cut out the circles, try to place them close together to minimize dough scraps. Gently gather any leftover dough, re-roll it once very briefly (overworking can make it tough), and cut out additional circles until you’ve used up most of the dough. Place the cut circles on a baking sheet lined with parchment paper to prevent sticking.
Prepping the Blackberry Filling
Now, let’s focus on the star of our Blackberry Hand Pies: the filling. Open the 21 oz. can of blackberry pie filling. While the pre-made filling is convenient and packed with flavor, you can give it a little extra boost. You can optionally spoon the filling into a bowl and stir in a tablespoon of fresh lemon juice for a brighter, more tart flavor profile. This is a small step that can really elevate the taste of the berries. Ensure the filling is well-distributed and ready to go.
Assembling the Hand Pies
Filling the Hand Pies
It’s time to bring it all together! Take one pie crust circle and place it on your lightly floured surface. Spoon about 1-2 tablespoons of the blackberry pie filling onto one half of the circle, leaving about a 1/2-inch border clear around the edges. Be careful not to overfill, as this can cause the filling to leak out during cooking. You want enough filling to provide a satisfying berry burst in every bite, but not so much that it becomes messy. Repeat this process with the remaining pie crust circles, placing filling on one half of each.
Sealing the Hand Pies
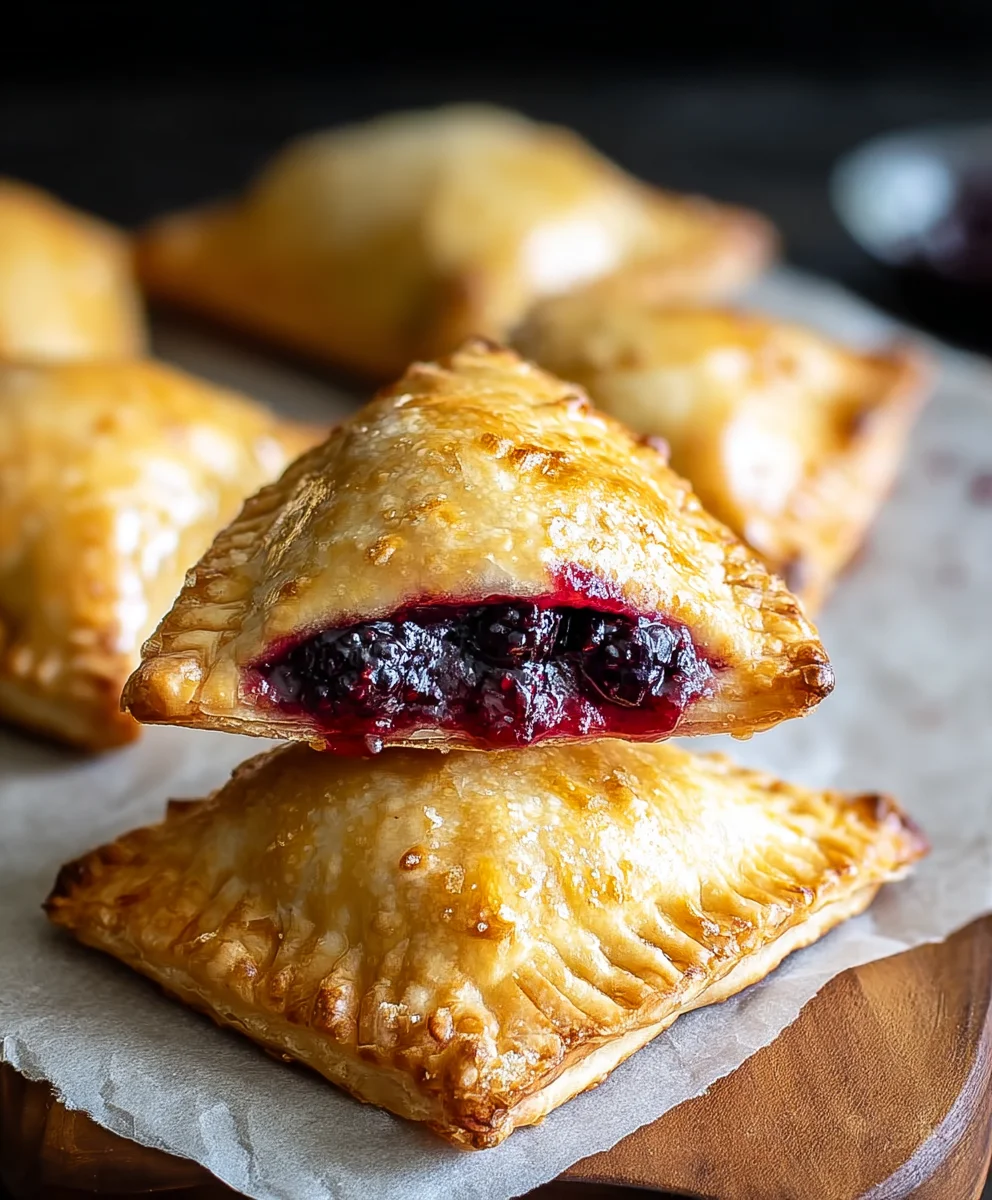
To seal your Blackberry Hand Pies, take the other half of the pie crust circle and carefully fold it over the filling, creating a half-moon shape. Gently press the edges together with your fingers to seal them. For a more secure seal and a decorative finish, you can use the tines of a fork to crimp the edges all around. This not only helps prevent any filling from escaping during frying but also gives your hand pies a classic, appealing look. If any filling does manage to ooze out, gently wipe it away from the edges before crimping to ensure a good seal.
Venting the Hand Pies
Before we get to the frying stage, it’s crucial to create vents in each of your Blackberry Hand Pies. Using a small knife or the tip of a fork, cut a few small slits or decorative shapes into the top crust of each hand pie. This allows steam to escape as the pies cook, preventing them from puffing up unevenly or bursting. These vents also add a nice visual touch to the finished product.
Frying and Glazing the Hand Pies
Frying the Hand Pies
Heat about 2-3 inches of vegetable oil in a deep, heavy-bottomed pot or Dutch oven over medium-high heat until it reaches about 350°F (175°C). A candy thermometer is helpful here, but you can also test the oil by dropping a tiny piece of dough into it; it should sizzle and bubble up immediately. Carefully slide 2-3 hand pies into the hot oil, being careful not to overcrowd the pot, as this will lower the oil temperature and result in greasy pies. Fry for about 2-3 minutes per side, or until they are golden brown and puffed up. Use a slotted spoon or spider strainer to gently flip the pies and remove them from the oil once they are cooked through. Place the fried Blackberry Hand Pies on a wire rack set over a baking sheet to drain any excess oil. This is a critical step to ensure crisp, not greasy, pies.
Making the Glaze
While the pies are draining, let’s prepare a simple yet elegant glaze for our Blackberry Hand Pies. In a small bowl, whisk together the 1/2 cup of powdered sugar, 1 teaspoon of corn syrup, and 1 tablespoon of water. The corn syrup adds a lovely sheen and helps the glaze set slightly. Whisk until the glaze is smooth and free of lumps. If the glaze seems too thick, add a tiny bit more water, a half-teaspoon at a time, until you reach your desired drizzling consistency. If it’s too thin, add a little more powdered sugar.
Glazing the Hand Pies
Once the fried Blackberry Hand Pies have drained for a few minutes and are still warm, it’s time to apply the glaze. Using a spoon or a piping bag with a small tip, drizzle the prepared glaze generously over the tops of the hand pies. You can create intricate patterns or simply go for a more rustic, free-flowing drizzle. The warm pies will help the glaze set beautifully. Allow the glaze to set for a few minutes before serving.

Conclusion:
And there you have it – the delightful journey to creating perfect Blackberry Hand Pies! We’ve walked through each step, from crafting that flaky, golden crust to preparing the luscious, sweet-tart blackberry filling. These individual pies are more than just a dessert; they’re a charming and delicious treat that’s perfect for any occasion, from casual picnics to elegant gatherings. The satisfying aroma that fills your kitchen as they bake is just the begin extractning of the joy these Blackberry Hand Pies bring.
Serve them warm with a scoop of vanilla ice cream for an irresistible combination, or enjoy them at room temperature with a dusting of powdered sugar. For variations, consider adding a pinch of cinnamon or nutmeg to the filling for a warm spice note, or a splash of lemon zest to brighten the blackberry flavor even further. You could also experiment with different berry combinations, like blackberry and apple, or even a hint of lavender for a floral twist.
Don’t be intimidated if this is your first time making hand pies; the beauty of this recipe lies in its forgiving nature and the incredibly rewarding outcome. Embrace the process, have fun, and enjoy sharing these homemade treasures with loved ones. I truly hope you love making and savoring these Blackberry Hand Pies as much as I do!
Frequently Asked Questions:
Can I make the pie dough ahead of time?
Absolutely! You can prepare the pie dough up to 2 days in advance and store it, tightly wrapped, in the refrigerator. Some bakers even prefer making it a day ahead as the dough can be easier to handle when chilled. Just bring it to room temperature for a few minutes before rolling.
How should I store leftover Blackberry Hand Pies?
Store any leftover Blackberry Hand Pies in an airtight container at room temperature for up to 2 days, or in the refrigerator for up to 4 days. For longer storage, you can freeze them. Once cooled completely, wrap them individually and store them in a freezer-safe bag for up to 2-3 months. Reheat gently in a low oven.
What if my blackberry filling is too runny?
If your filling seems a bit too liquid after baking, it’s often due to the moisture content of the blackberries. For future batches, you can try reducing the amount of liquid slightly or adding a little extra cornstarch or flour to thicken it. A good test is to ensure the filling is thick and jam-like before assembling the pies.
Blackberry Hand Pies- Sweet & Easy Recipe
A simple and sweet recipe for homemade blackberry hand pies, perfect for a quick dessert or snack. These pies are fried to golden perfection and finished with a simple glaze.
Ingredients
-
21 oz. can blackberry pie filling
-
Refrigerated pie crust (typically comes with two crusts)
-
1/2 cup powdered sugar
-
1 teaspoon corn syrup
-
1 tablespoon water
-
Vegetable oil for frying (enough to generously fill your pot)
Instructions
-
Step 1
Unroll refrigerated pie crusts onto a lightly floured surface. Cut out 4-5 inch circles using a cookie cutter or glass rim. Gather scraps, re-roll briefly, and cut more circles. Place on a parchment-lined baking sheet. -
Step 2
Open the blackberry pie filling. Optionally, stir in 1 tablespoon of fresh lemon juice for a brighter flavor. Ensure the filling is well-distributed. -
Step 3
Spoon 1-2 tablespoons of blackberry filling onto one half of each pie crust circle, leaving a 1/2-inch border. Do not overfill. -
Step 4
Fold the other half of the crust over the filling to create a half-moon shape. Press edges to seal and crimp with a fork. Wipe away any excess filling from the edges. -
Step 5
Cut a few small slits or decorative shapes into the top crust of each hand pie to allow steam to escape. -
Step 6
Heat 2-3 inches of vegetable oil in a pot to 350°F (175°C). Carefully fry 2-3 hand pies at a time for 2-3 minutes per side until golden brown. Remove with a slotted spoon and drain on a wire rack. -
Step 7
While pies drain, whisk together powdered sugar, corn syrup, and water in a small bowl until smooth for the glaze. Adjust consistency with more sugar or water as needed. -
Step 8
Drizzle the warm hand pies generously with the prepared glaze. Let the glaze set for a few minutes before serving.
Important Information
Nutrition Facts (Per Serving)
It is important to consider this information as approximate and not to use it as definitive health advice.
Allergy Information
Please check ingredients for potential allergens and consult a health professional if in doubt.