Tri Tip Two Ways- Easy Delicious Steak Recipes
Tri Tip, that iconic cut of beef, holds a special place in the hearts of grill masters and home cooks alike. It’s a surprisingly versatile, incredibly flavorful, and budget-friendly steak that truly shines when given the right treatment. What’s not to love about a perfectly grilled tri tip? It boasts a tender, juicy interior with a delightfully crusty exterior, offering a satisfying chew and a rich, beefy taste that’s simply irresistible. Its relatively lean nature makes it a healthier choice, yet it’s packed with enough marbling to ensure succulence and flavor. Today, we’re going to explore the magic of this wonderful cut with not one, but two distinct and delicious preparations for your next culinary adventure. Get ready to elevate your beef game with these sensational tri tip recipes!
Tri Tip (2 Ways)
The tri-tip roast, also known as the bottom sirloin roast or triangle roast, is a fantastic cut of beef that’s incredibly flavorful and surprisingly versatile. It gets its name from its triangular shape and the three distinct muscles that make it up. While often associated with California barbecue, this cut is gaining popularity nationwide, and for good reason! It’s lean yet tender, and when cooked properly, it delivers a rich, beefy taste that’s simply unbeatable. Today, I’m going to show you two of my favorite ways to prepare a tri-tip roast: one is a classic, simple grilling method that highlights the natural flavors of the beef, and the other is a slightly more involved oven-roasting technique that results in an incredibly juicy and tender steakhouse-style experience. Both methods are designed to bring out the best in this exceptional cut.
Let’s get started by gathering our ingredients.
Ingredients:
Now, let’s talk about how to prepare this delicious roast.
Method 1: The Classic Grilled Tri Tip
This method is all about simplicity and letting the incredible flavor of the tri-tip shine. Grilling over charcoal or gas imparts a wonderful smoky char that’s hard to beat.
1. Prepare the Rub: In a small bowl, whisk together the garlic salt, Lawry’s seasoning salt, kosher salt, black pepper, sugar, garlic powder, and parsley. This is your flavor powerhouse! The sugar helps with caramelization on the grill, and the parsley adds a nice freshness.
2. Season the Roast: Pat the tri-tip roast completely dry with paper towels. This is a crucial step for achieving a good sear. Drizzle the olive oil all over the roast and rub it in to coat. Then, generously apply the seasoning mixture to all sides of the tri-tip, pressing it in gently to ensure it adheres. Let the roast sit at room temperature for about 30-60 minutes before grilling. This allows the meat to cook more evenly.
3. Preheat Your Grill: For this method, you want a hot grill. If you’re using a charcoal grill, aim for a medium-high heat, with coals mostly to one side to create a direct and indirect heat zone. For a gas grill, preheat to medium-high heat (around 450-500°F or 230-260°C), and you can also set up a two-zone fire if your grill allows.
4. Grill to Perfection: Place the seasoned tri-tip directly over the hottest part of the grill. Sear for about 3-5 minutes per side, until a beautiful brown crust forms. Once seared, move the roast to the cooler, indirect heat side of the grill. Close the lid and continue to cook until the internal temperature reaches your desired doneness. For medium-rare, aim for 130-135°F (54-57°C). For medium, 135-140°F (57-60°C). Use a meat thermometer inserted into the thickest part of the roast, avoiding any large pockets of fat. This usually takes another 20-30 minutes, depending on your grill’s temperature and the thickness of the roast.
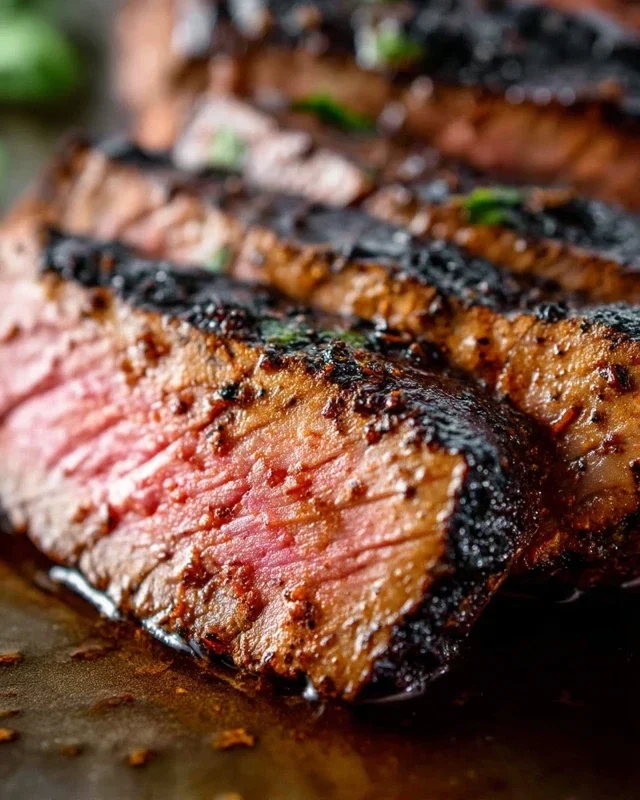
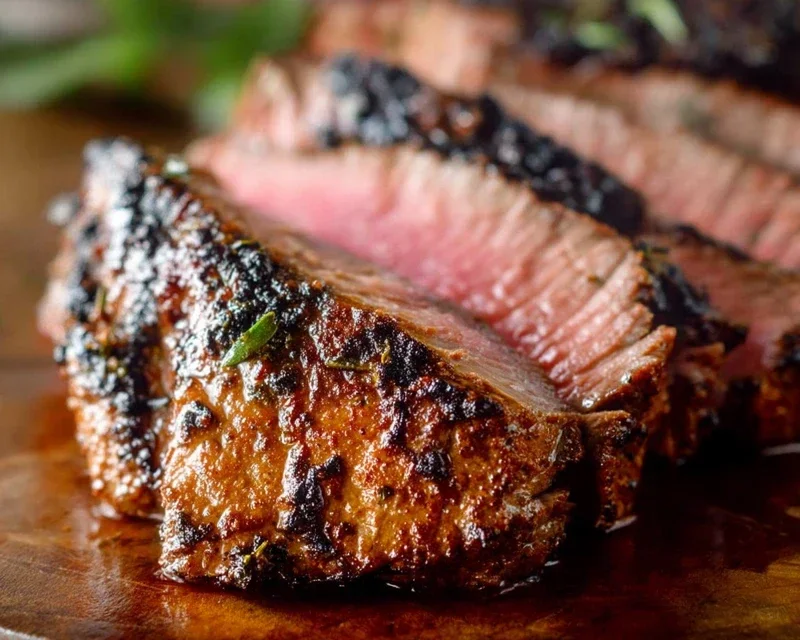
5. Rest and Slice: Once the tri-tip reaches your target temperature, remove it from the grill and place it on a cutting board. Tent it loosely with aluminum foil and let it rest for at least 10-15 minutes. This resting period is non-negotiable! It allows the juices to redistribute throughout the meat, resulting in a far more tender and flavorful roast. After resting, slice the tri-tip against the grain. You’ll notice the grain runs in different directions in different parts of the roast, so pay attention to this to ensure maximum tenderness.
Method 2: The Oven-Roasted Tri Tip with Pan Sauce
This method brings a steakhouse elegance to your kitchen, resulting in a perfectly cooked roast with a delicious pan sauce to finish.
1. Prepare the Rub and Roast: Follow steps 1 and 2 from the grilling method to prepare your rub and season the tri-tip roast. Again, ensure the roast is at room temperature for at least 30 minutes before cooking.
2. Preheat the Oven: Preheat your oven to 425°F (220°C). Place an oven-safe skillet or Dutch oven over medium-high heat on your stovetop.
3. Sear on the Stovetop: Add the olive oil to the preheated skillet. Once shimmering, carefully place the seasoned tri-tip roast into the hot skillet. Sear for about 2-3 minutes per side, until a nice brown crust develops. This initial sear on the stovetop is essential for building flavor.
4. Oven Roasting: Transfer the skillet with the seared tri-tip directly into the preheated oven. Roast for approximately 15-20 minutes, or until an instant-read thermometer inserted into the thickest part of the roast registers 125-130°F (52-54°C) for medium-rare. The exact cooking time will depend on the thickness of your roast and your oven’s calibration. Keep a close eye on the temperature to avoid overcooking.
5. Resting and Pan Sauce: Remove the tri-tip from the oven and transfer it to a cutting board. Tent loosely with foil and let it rest for at least 10-15 minutes. While the roast rests, place the skillet used for roasting back on the stovetop over medium heat (be careful, the handle will be hot!). Deglaze the pan by adding about 1/2 cup of beef broth or red grape juice, scraping up all the browned bits from the bottom of the skillet. Let this simmer for a few minutes to reduce slightly and thicken into a simple, flavorful pan sauce. You can strain the sauce if you prefer a smoother consistency.
6. Slice and Serve: Once rested, slice the tri-tip against the grain, just as you would with the grilled version. Arrange the slices on a platter and drizzle generously with your pan sauce.
Both methods will yield a delicious tri-tip roast that’s sure to impress. Enjoy the rich, beefy flavor!
Conclusion:
And there you have it – two fantastic ways to prepare a delicious tri tip! Whether you prefer the smoky char of the grill or the succulent tenderness achieved in the oven, this versatile cut of beef is incredibly rewarding. The beauty of this recipe lies in its simplicity and the sheer flavor payoff. It’s perfect for a weeknight family dinner or impressing guests at a weekend barbecue. I truly encourage you to give these tri tip preparations a try. You’ll be amazed at how easily you can achieve restaurant-quality results right in your own kitchen. Don’t be afraid to experiment with your favorite seasonings or marinades to make it your own!
For serving, consider classic pairings like roasted potatoes, grilled asparagus, a fresh salad, or a creamy horseradish sauce to complement the rich flavor of the tri tip. Leftovers are also fantastic sliced thin for sandwiches or added to salads the next day.
Frequently Asked Questions:
What’s the best way to slice a tri tip?
Always slice your tri tip against the grain. Look for the direction of the muscle fibers and cut perpendicular to them. This ensures maximum tenderness and a melt-in-your-mouth experience.
Can I marinate the tri tip?
Absolutely! Tri tip takes wonderfully to marinades. A simple mix of olive oil, soy sauce, garlic, and your favorite herbs can elevate the flavor even further. Marinate for at least 2 hours, or overnight for deeper penetration.
What other cuts of beef are similar to tri tip?
While tri tip has a unique texture and flavor, cuts like sirloin steak or flank steak can be good substitutes. Keep in mind that cooking times and results may vary slightly.
Tri Tip (2 Ways)
A versatile tri tip roast prepared two delicious ways: seasoned and grilled, or marinated and grilled. Perfect for any occasion.
Ingredients
-
2 1/2 pound tri tip roast
-
1 1/2 teaspoons garlic salt
-
1 tablespoon Lawry’s seasoning salt
-
1 1/2 teaspoons kosher salt
-
1 teaspoon black pepper
-
1/2 teaspoon sugar
-
2 teaspoons garlic powder
-
1 tablespoon dried parsley
-
1/4 cup olive oil
-
1/4 cup soy sauce (substitution for alcohol marinade)
-
2 tablespoons Worcestershire sauce
Instructions
-
Step 1
For the first tri tip, pat it dry and generously season all sides with garlic salt, Lawry’s seasoning salt, kosher salt, black pepper, sugar, garlic powder, and parsley. Let it sit at room temperature for 30 minutes. -
Step 2
For the second tri tip, in a bowl, whisk together olive oil, soy sauce (as alcohol substitution), Worcestershire sauce, garlic salt, Lawry’s seasoning salt, kosher salt, black pepper, sugar, garlic powder, and parsley. Place the tri tip in a zip-top bag and pour the marinade over it. Ensure the roast is fully coated. Marinate for at least 4 hours or overnight in the refrigerator. -
Step 3
Preheat your grill to medium-high heat (around 400-450°F). If using a smoker, set it to 225°F for a low and slow start before searing. -
Step 4
Sear the first tri tip directly over the heat for about 5-7 minutes per side, until a nice crust forms. Then, move it to indirect heat or lower the grill temperature to medium-low (around 300°F) and continue cooking until the internal temperature reaches 130-135°F for medium-rare. -
Step 5
Remove the marinated tri tip from the marinade (discarding the marinade). Sear it directly over the heat for about 5-7 minutes per side. Then, move it to indirect heat or lower the grill temperature to medium-low (around 300°F) and continue cooking until the internal temperature reaches 130-135°F for medium-rare. -
Step 6
Once both tri tips reach the desired internal temperature, remove them from the grill and let them rest for at least 10-15 minutes before slicing against the grain.
Important Information
Nutrition Facts (Per Serving)
It is important to consider this information as approximate and not to use it as definitive health advice.
Allergy Information
Please check ingredients for potential allergens and consult a health professional if in doubt.