Easy Easter Rice Krispie Treats – Fun Spring Dessert
Easter Rice Krispie Treats are more than just a nostalgic childhood favorite; they’re a delightful canvas for springtime creativity and a surefire way to bring smiles to faces of all ages. Imagin extracte vibrant pastel colors, fun shapes, and that irresistible sweet, chewy texture that melts in your mouth. These aren’t your average Rice Krispie treats; this recipe elevates them with thoughtful touches that make them truly special for your Easter celebrations. What’s not to love about a simple yet profoundly satisfying dessert that’s as easy to make as it is to devour? Whether you’re decorating for a festive brunch, creating edible party favors, or simpgin extractindulging in a sweet treat, our Easter Rice Krispie Treats are the perfect addition to your holiday spread. Get ready to transform this classic into a seasonal masterpiece!
Why You’ll Adore This Recipe
We’ve taken the beloved simplicity of Rice Krispie Treats and infused it with the joy and whimsy of Easter. This recipe is designed to be incredibly forgiving, making it perfect for little helpers in the kitchen. The magic truly happens with the decorations, where you gin extract let your imagination run wild. Think adorable bunny ears, speckled speckled eggs, or even a basket weave effect. It’s this blend of comforting familiarity and festive flair that makes these Easter Rice Krispie Treats so incredibly popular. They capture the essence of the holiday in every bite, offering a burst of cheerful flavor and visual appeal that’s simply unmatched.
What Makes Them Stand Out
Beyond the classic gooey goodness, these Easter Rice Krispie Treats are special because of their versatility and the opportunity for personalization. We’ll guide you through achieving that perfect chewy consistency every time, ensuring your treats are both delicious and hold their shape beautifully for decorating. The real enchantment comes from the finishing touches – from coloring the marshmallow mixture to adding sprinkles and edible decorations that truly bring the Easter theme to life. This isn’t just a recipe; it’s an invitation to create edible art that tastes as good as it looks, making your Easter gathering unforgettable.

Ingredients:
- 16 ounces marshmallows (jumbo or mini both work)
- 7 cups Rice Krispies cereal
- 2 tablespoons unsalted butter (for greasing)
- ½ cup unsalted butter
- 3-4 cups powdered sugar
- ¼ cup milk
- 1 teaspoon vanilla extract
- Green food coloring
- Easter egg candies (mini chocolate eggs or jelly beans)
Preparing Your Workspace and Equipment
Gathering Your Tools
Before we dive into the deliciousness, let’s make sure you have everything you need. You’ll need a large mixing bowl – the bigger, the better, as those Rice Krispies can get unruly! A sturdy spatula or wooden spoon is essential for mixing. For shaping, a 9×13 inch baking pan is ideal. Don’t forget to have your parchment paper or wax paper ready to line it. And, of course, a microwave-safe bowl for melting the marshmallows, or a large saucepan if you prefer stovetop melting.
Melting the Marshmallows
The Gooey Foundation
This is where the magic begin extracts! In your large mixing bowl, add the 16 ounces of marshmallows. If you’re using a microwave, heat them in 30-second intervals, stirring well between each burst, until they are smooth and completely melted. This usually takes about 2 to 3 minutes total. Be patient; it’s better to go slower to avoid scorching the marshmallows. If you’re using a saucepan on the stovetop, melt them over low heat, stirring constantly, until smooth and creamy. Whichever method you choose, the goal is a perfectly smooth, melted marshmallow base.
Incorporating the Rice Krispies
Creating the Crispy Clusters
Once your marshmallows are beautifully melted and smooth, it’s time to add the star cereal! Gently fold in the 7 cups of Rice Krispies cereal. Use your spatula or wooden spoon to coat every single crispy grain with the melted marshmallow goodness. Make sure there are no dry pockets of cereal left. This step requires a bit of muscle, as the mixture will start to get sticky and dense. Press down gently to ensure everything is well combined. It’s important to work relatively quickly here, as the marshmallow mixturegin extractll begin to set as it cools. Don’t overmix, but ensure even distribution.
Forming the Easter Treats
Shaping the Springtime Delights
Now for the fun part – shaping! Lightly grease your 9×13 inch baking pan with the 2 tablespoons of unsalted butter. You can also line it with parchment paper or wax paper, leaving some overhang on the sides to help lift the treats out later. This prevents sticking, which is crucial for getting clean edges. Carefully transfer the Rice Krispies mixture into the prepared pan. Using a buttered spatula or your hands (lightly greased with the reserved butter), gently press the mixture evenly into the pan. Avoid pressing too firmly, as this can result in dense, hard treats. We want them to be light and airy. Aim for a uniform layer across the entire pan.
Creating the Easter Frosting
A Touch of Spring Color
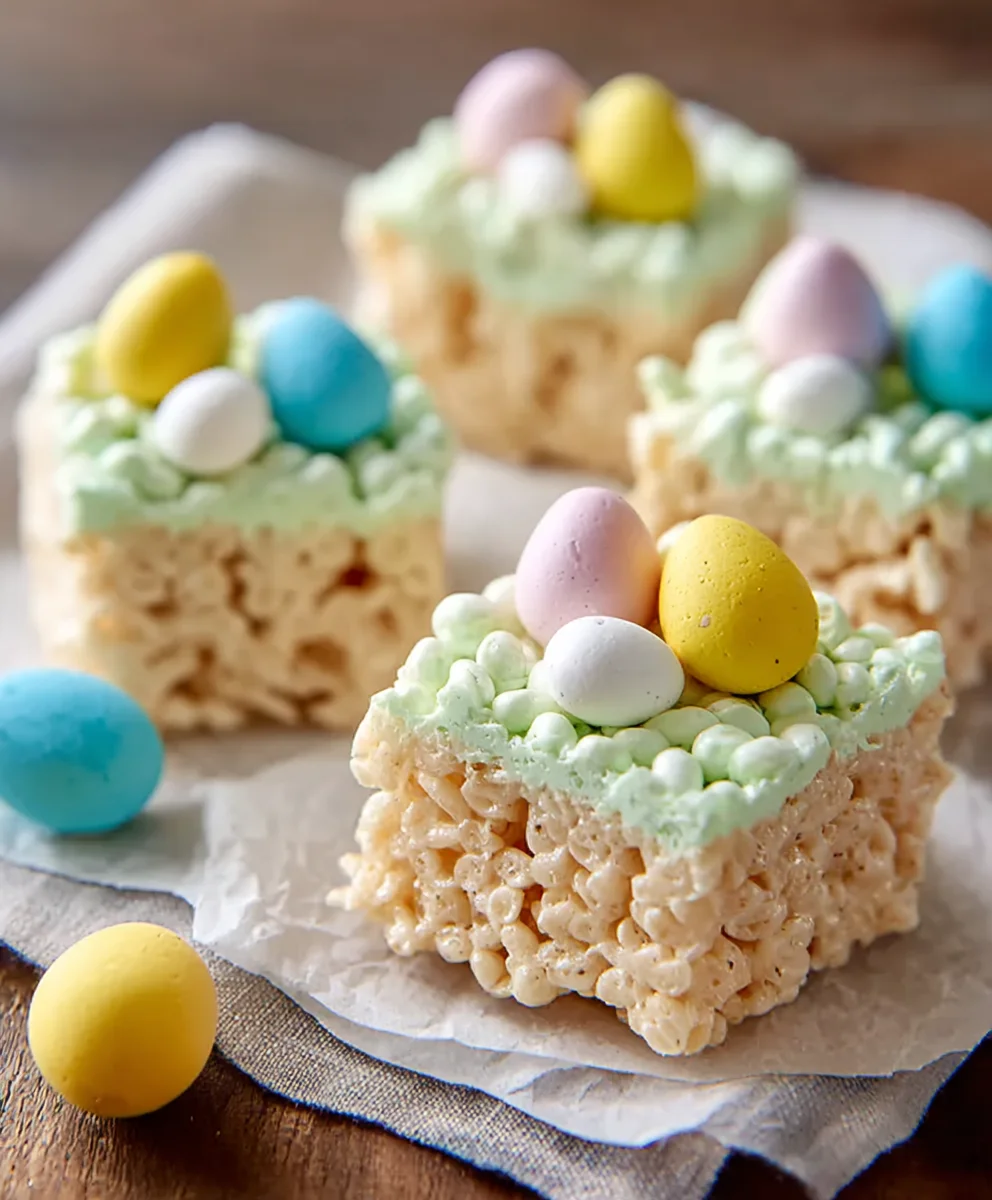
This is where we transform our classic Rice Krispie treats into festive Easter delights! In a separate medium bowl, combine the ½ cup of unsalted butter (softened), 3-4 cups of powdered sugar, ¼ cup of milk, and 1 teaspoon of vanilla extract. Start with 3 cups of powdered sugar and add more if you desire a thicker frosting. Whisk these ingredients together until smooth and creamy. This is your basic glaze. Now, divide this frosting into two bowls. In one bowl, add a few drops of green food coloring and stir until you achieve a vibrant Easter green. The amount of food coloring you use will depend on the intensity of color you want. Mix well until there are no streaks of uncolored frosting.
Decorating Your Easter Masterpieces
Adding the Festive Flair
Once your Rice Krispie treats are pressed into the pan, it’s time for the decoration! Drizzle the green frosting generously over the top of the treats in a rustic, swirled pattern. Don’t aim for perfection here; artistic flourishes are welcome! Immediately after drizzling the green frosting, scatter your Easter egg candies (mini chocolate eggs or jelly beans) over the top while the frosting is still wet. This ensures they stick securely. You can arrange them in patterns, sprinkle them randomly, or create little Easter scenes. Let the frosting set completely before cutting into squares or shapes. This usually takes about 1 to 2 hours at room temperature. You can speed this up slightly by placing the pan in the refrigerator for about 30 minutes, but be mindful that refrigeration can sometimes make the treats a bit harder. Slice them using a sharp knife or cookie cutters for fun Easter shapes!
Conclusion:
You’ve now unlocked the secret to creating the most delightful Easter Rice Krispie Treats! These festive delights are incredibly easy to whip up, making them a perfect activity for families or a quick and cheerful addition to any Easter celebration. The simple combination of crispy cereal, gooey marshmallows, and a touch of vanilla creates a universally loved treat that brings smiles to faces of all ages. Don’t be afraid to get creative with your decorations; the more colorful and fun, the better! Whether you’re looking for a last-minute dessert or a fun Easter craft, these Easter Rice Krispie Treats are sure to be a hit. Enjoy every delicious, marshmallowy bite!
Serve these Easter Rice Krispie Treats on their own as a sweet snack, or arrange them on a platter alongside other Easter goodies like cookies and candies. They also make fantastic edible favors for your Easter brunch or egg hunt!
Feel free to experiment with variations! Add a drop of food coloring to the melted marshmallows for pastel hues, or mix in some sprinkles for extra sparkle. You could even drizzle them with melted white or milk chocolate for an added layer of decadence. The possibilities are truly endless with these versatile treats.
Frequently Asked Questions:
Can I make Easter Rice Krispie Treats ahead of time?
Absolutely! Easter Rice Krispie Treats are best made within 1-2 days of when you plan to serve them. Store them in an airtight container at room temperature to maintain their freshness. Avoid refrigerating them, as this can make them hard and less enjoyable.
How do I get clean cuts for my Easter Rice Krispie Treats?
For the cleanest cuts, allow the Easter Rice Krispie Treats to cool and set completely before slicing. Lightly greasing your knife with butter or cooking spray can also help prevent sticking. You can also use Easter-themed cookie cutters to create fun shapes once the mixture has set slightly.
Easy Easter Rice Krispie Treats – Fun Spring Dessert
Fun and easy Easter-themed Rice Krispie treats with a festive green frosting and candy decorations. A perfect springtime dessert for the whole family.
Ingredients
-
16 ounces marshmallows
-
7 cups Rice Krispies cereal
-
2 tablespoons unsalted butter, for greasing
-
1/2 cup unsalted butter
-
3-4 cups powdered sugar
-
1/4 cup milk
-
1 teaspoon vanilla extract
-
Green food coloring
-
Easter egg candies (mini chocolate eggs or jelly beans)
Instructions
-
Step 1
Prepare your workspace and gather tools, including a large mixing bowl, spatula, 9×13 inch baking pan, parchment paper, and a microwave-safe bowl or saucepan. -
Step 2
Melt marshmallows: In a large mixing bowl, melt 16 ounces of marshmallows in the microwave in 30-second intervals, stirring between each, until smooth and completely melted (about 2-3 minutes). Alternatively, melt over low heat on the stovetop, stirring constantly. -
Step 3
Incorporate cereal: Gently fold 7 cups of Rice Krispies cereal into the melted marshmallows until every grain is coated. Work quickly as the mixture will start to set. -
Step 4
Form treats: Lightly grease a 9×13 inch baking pan with 2 tablespoons of unsalted butter, or line with parchment paper. Transfer the Rice Krispies mixture and gently press evenly into the pan. Avoid pressing too firmly. -
Step 5
Create frosting: In a separate medium bowl, combine 1/2 cup softened unsalted butter, 3 cups powdered sugar (add more for thicker frosting), 1/4 cup milk, and 1 teaspoon vanilla extract. Whisk until smooth. Divide into two bowls and color one with green food coloring until vibrant. -
Step 6
Decorate: Drizzle the green frosting over the Rice Krispie treats in a rustic pattern. Immediately scatter Easter egg candies over the wet frosting. Let the frosting set completely (1-2 hours at room temperature, or 30 minutes in the refrigerator). Cut into squares or use cookie cutters.
Important Information
Nutrition Facts (Per Serving)
It is important to consider this information as approximate and not to use it as definitive health advice.
Allergy Information
Please check ingredients for potential allergens and consult a health professional if in doubt.