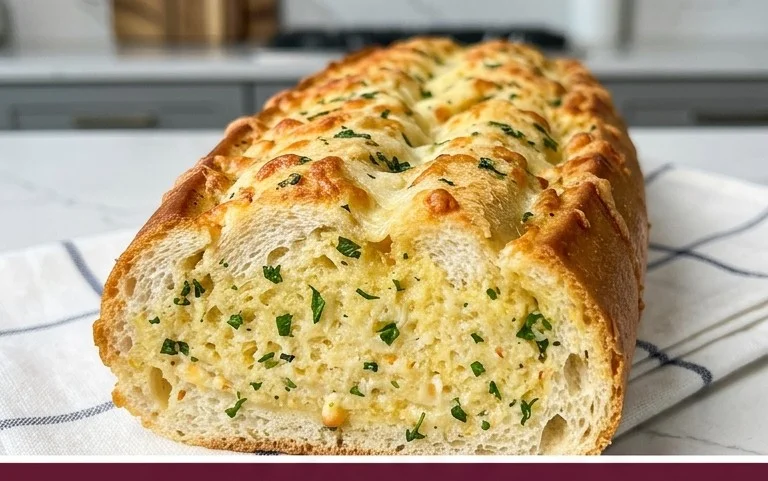
Easy Cheesy Garlic Bread-Best Recipe Ever
BEST CHEESY GARLIC BREAD RECIPE. Let’s be honest, sometimes the simplest things are the most glorious. And when it comes to comfort food that hits all the right notes, it doesn’t get much better than a perfectly executed cheesy garlic bread. We’re talking about that irresistible aroma wafting from the oven, the golden-brown crust giving way to a pillowy soft interior, and that glorious, melty, gooey cheese pull. It’s the ultimate crowd-pleaser, the sidekick that elevates any meal from good to unforgettable. Whether you’re serving it alongside pasta, soup, or just enjoying it as a glorious snack, this dish is pure joy. What makes our BEST CHEESY GARLIC BREAD RECIPE stand out? It’s the perfect balance of pungent garlic, rich butter, and a generous amount of your favorite cheese, all baked to golden perfection. Get ready to impress yourself and everyone lucky enough to share this with you.
BEST CHEESY GARLIC BREAD RECIPE
There are few things in life as comforting and undeniably delicious as a warm, cheesy, garlicky slice of heaven. This recipe for the best cheesy garlic bread is my go-to, a guaranteed crowd-pleaser that transforms humble ingredients into something truly spectacular. Forget those dry, bland versions you might have encountered; this recipe delivers a symphony of flavors and textures – a crispy exterior, a soft, pillowy interior, and an explosion of garlicky, cheesy goodness in every bite. It’s perfect as a side dish for pasta, pizza, or your favorite soup, or honestly, it’s so good you could enjoy it all on its own.
Ingredients:
Instructions:
Let’s get started on this masterpiece! The secret to incredibly flavorful garlic bread lies in properly preparing the garlic. We’ll be using a combination of raw and roasted garlic for a depth of flavor that’s simply unmatched.
Step 1: Roasting the Garlic
First, we need to roast some of our garlic. Preheat your oven to 400°F (200°C). Take your 8-10 garlic cloves, peel them, and toss them with 2 tablespoons of olive oil and a pinch of salt on a small baking sheet or in a small oven-safe dish. Cover it loosely with foil. Roast for about 20-25 minutes, or until the garlic cloves are soft and fragrant. Once roasted, let them cool slightly. Squeeze the softened garlic out of their skins – they’ll be a sweet, mellow paste.
Step 2: Crafting the Garlic Butter Mixture
Now, let’s make the magic happen. In a medium bowl, combine the melted butter, the roasted garlic paste you just made, and the raw garlic. To get the raw garlic ready, you can either mince it very finely or use a garlic press. The combination of mellow roasted garlic and pungent raw garlic creates a beautiful balance. Add ½ teaspoon of salt, the ½ teaspoon of paprika, and the 2 tablespoons of chopped fresh parsley to the bowl. Stir everything together until it’s well combined. This mixture is where all the flavor lives, so take your time and ensure it’s thoroughly mixed.
Step 3: Preparing the Bread Base
If you’re using the King’s Hawaiian Sheet Rolls, this is where they truly shine. Keep them in their origin extractal full sheet form. This creates a fantastic base for the garlic butter and cheese, allowing them to meld together beautifully. If you opt for a French baguette, slice it horizontally to create two long halves, and then you can make shallow criss-cross cuts about halfway through the baguette to help the butter and cheese penetrate. For the rolls, I like to make shallow cuts across the top of the entire sheet, about 1-inch apart, just enough to break the surface and allow the butter mixture to seep in. This helps distribute the deliciousness evenly.
Step 4: Generously Applying the Garlic Butter
This is a crucial step for maximum flavor. Using a pastry brush or a spoon, generously spread the garlic butter mixture all over the cut surfaces of the bread. Make sure to get into all those nooks and crannies. Don’t be shy! The more butter, the more flavorful the bread. If you’re using the sheet rolls, spread it all over the top surface, ensuring each roll gets its fair share. The oil in the butter will help create that irresistible crispy edge we all love.
Step 5: Adding the Cheesy Goodness and the Egg Wash
Now for the cheese! Sprinkle the 2 cups of shredded mozzarella cheese evenly over the buttered bread. You want a good, generous layer that will melt into gooey perfection. For an extra touch of richness and a beautiful golden-brown hue, we’re going to make a quick egg wash. In a small bowl, whisk together the 1 egg and ¼ cup of milk. Brush this mixture lightly around the edges of the bread or baguette. This will help the edges crisp up beautifully and add a subtle richness. If you’re using the sheet rolls, you can brush it around the outer edges and even lightly over the top of the cheese for an extra sheen.
Step 6: Baking to Golden Perfection
It’s time to bake this beauty! Place the prepared bread onto a baking sheet. If you’re using the sheet rolls in their origin extractal form, ensure the baking sheet is large enough to accommodate them. Bake in the preheated 400°F (200°C) oven for about 12-15 minutes, or until the cheese is melted, bubbly, and lightly golden brown, and the edges of the bread are toasted and irresistible. Keep a close eye on it to prevent burning, especially the edges. The aroma filling your kitchen at this point will be absolutely divine!
Step 7: Serving and Enjoying
Once it’s out of the oven, let it cool for just a minute or two – it will be extremely hot! Sprinkle generously with more chopped fresh parsley and some chili flakes for a little kick, if you like. If you made the sheet rolls, you can slice them into individual portions. Serve immediately and watch it disappear. This cheesy garlic bread is so incredibly satisfying, you’ll wonder how you ever lived without it. Enjoy every delicious, garlicky, cheesy bite!

Conclusion:
You’ve reached the end of our guide to crafting the ABSOLUTE BEST CHEESY GARLIC BREAD RECIPE, and I truly believe this recipe is a game-changer. It’s incredibly simple, yet the results are undeniably delicious – a perfect balance of crispy, chewy bread, pungent garlic, and gloriously melted cheese that will have everyone asking for seconds. The key lies in the quality of ingredients and the simple technique that ensures maximum flavor. This isn’t just a side dish; it’s a star!
I love serving this cheesy garlic bread alongside pasta dishes, hearty soups, or even as a standalone appetizer with a side of marinara for dipping. It’s also fantastic with grilled meats or a fresh salad. Don’t be afraid to get creative with your variations! Consider adding a sprinkle of red pepper flakes for a touch of heat, or some chopped fresh parsley or chives for an extra herbaceous kick. Perhaps even try different cheese combinations like a blend of mozzarella and sharp cheddar, or a hint of Parmesan. I genuinely encourage you to give this recipe a try. It’s so rewarding to create something so comforting and delicious from scratch!
Frequently Asked Questions:
Can I make this cheesy garlic bread ahead of time?
While it’s best enjoyed fresh out of the oven, you can prepare the garlic butter mixture and spread it on the bread a few hours in advance. Store it covered in the refrigerator. When ready to bake, allow it to sit at room temperature for about 20 minutes before baking to ensure even cooking.
What kind of bread works best for this recipe?
A good quality French baguette or Italian loaf is ideal. The slightly chewy interior and crisp crust hold up well to the garlic butter and cheese, resulting in a delightful texture. Sourdough can also be an excellent choice for a tangier flavor profile.
BEST CHEESY GARLIC BREAD RECIPE
The ultimate cheesy garlic bread, perfect as a side or appetizer, featuring a rich garlic butter spread and generous mozzarella cheese.
Ingredients
-
8-10 garlic cloves
-
2 tbsp olive oil
-
Pinch of salt
-
½ cup butter, melted
-
1 egg
-
¼ cup milk
-
½ tsp salt
-
½ tsp paprika
-
2 tbsp chopped fresh parsley
-
12 King’s Hawaiian Origin extractal Hawaiian Sheet Rolls, kept in the full sheet form
-
2 cups shredded mozzarella cheese
-
Chopped parsley for serving
-
Chili flakes for serving
Instructions
-
Step 1
Preheat your oven to 375°F (190°C). If roasting garlic, toss whole unpeeled garlic cloves with 2 tbsp olive oil and a pinch of salt on a baking sheet. Roast for 20-25 minutes until soft. Squeeze out the roasted garlic cloves once cooled. -
Step 2
In a medium bowl, combine the melted butter, roasted garlic (mashed), egg, milk, ½ tsp salt, paprika, and 2 tbsp chopped fresh parsley. Whisk until well combined. -
Step 3
Cut the King’s Hawaiian Sheet Rolls lengthwise through the center to create two large halves, but do not separate them completely. This creates a hinged effect. -
Step 4
Spread the garlic butter mixture generously over the cut surfaces of the rolls, ensuring it gets into all the crevices. Sprinkle the shredded mozzarella cheese evenly over the top. -
Step 5
Wrap the entire sheet of rolls loosely in aluminum foil. Place on a baking sheet and bake for 10 minutes. -
Step 6
Carefully unwrap the foil, exposing the cheese. Bake for an additional 2-3 minutes, or until the cheese is melted and bubbly and the bread is lightly golden. -
Step 7
Garnish with chopped parsley and chili flakes before slicing and serving.
Important Information
Nutrition Facts (Per Serving)
It is important to consider this information as approximate and not to use it as definitive health advice.
Allergy Information
Please check ingredients for potential allergens and consult a health professional if in doubt.