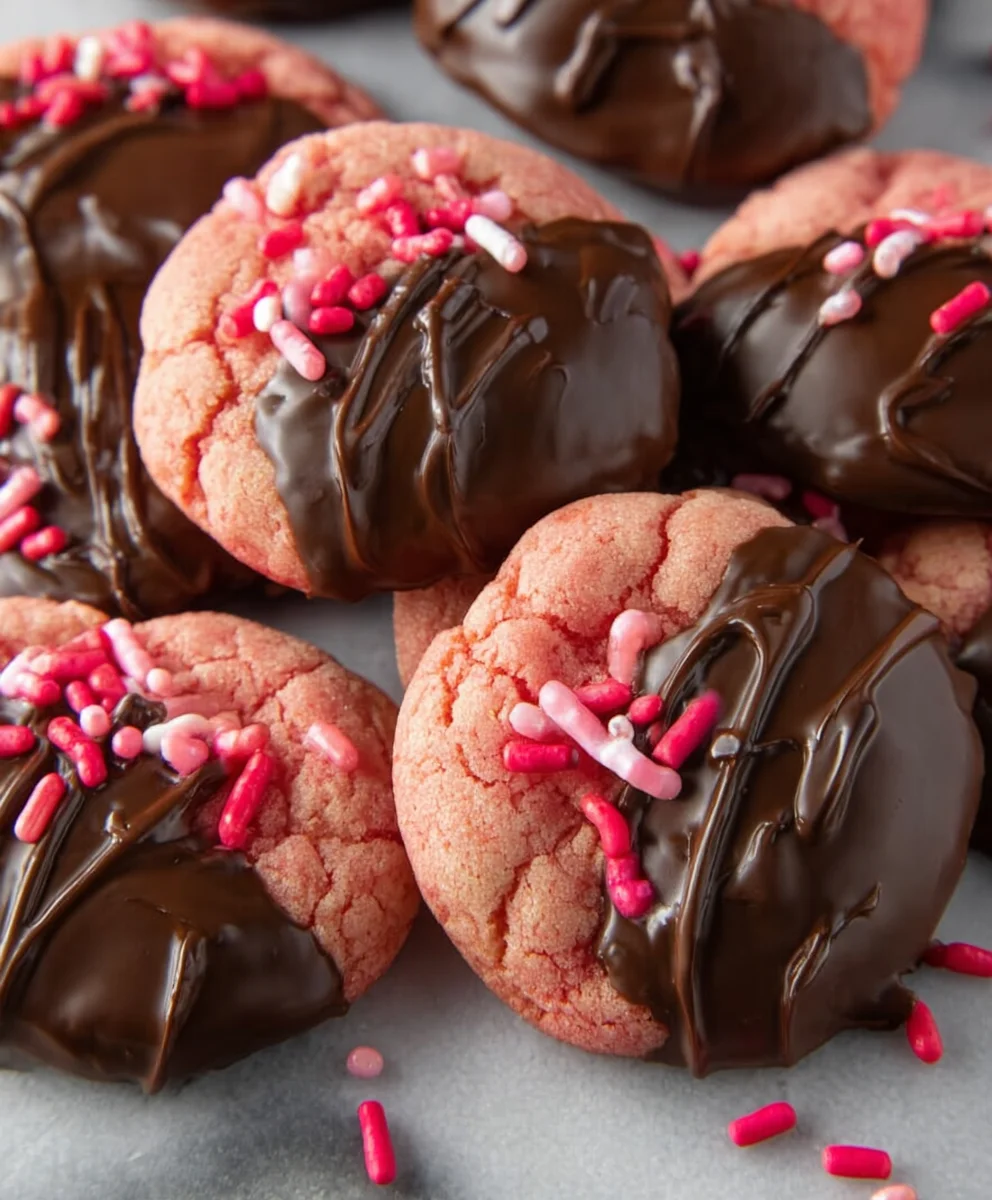
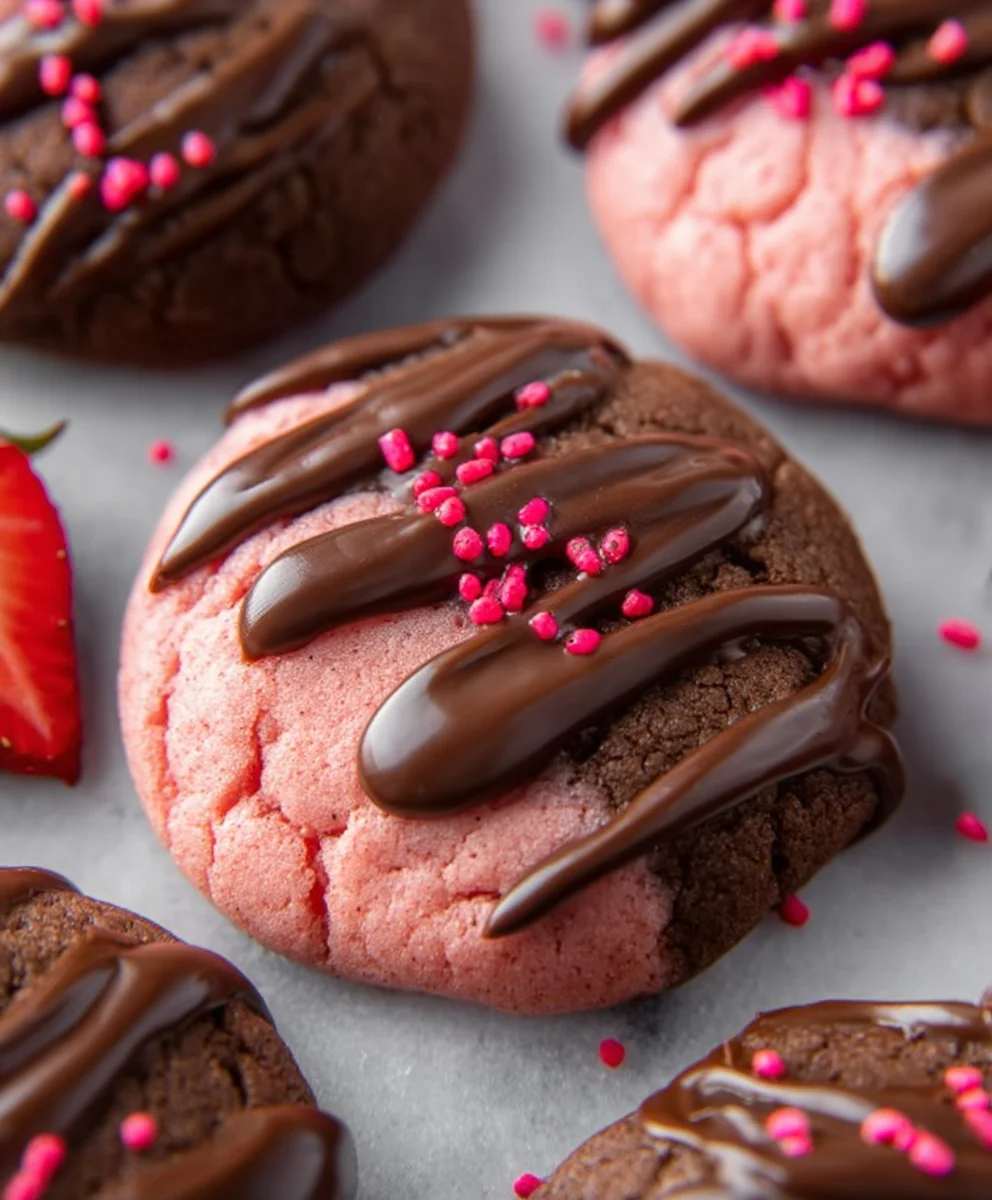
Decadent Chocolate Strawberry Cookies – Easy Recipe
Chocolate Covered Strawberry Cookies are more than just a dessert; they’re a delightful sensory experience that captures the essence of two beloved treats in one perfect bite. Imagin extracte the rich, decadent sweetness of a perfectly baked cookie embracing the vibrant, slightly tart burst of fresh strawberry, all enrobed in a smooth, luxurious layer of chocolate. It’s no wonder these cookies have become a springtime favorite and a go-to for celebrations and simple indulgences alike. What truly sets Chocolate Covered Strawberry Cookies apart is the harmonious marriage of textures and flavors – the tender crum extractb of the cookie, the juicy pop of the fruit, and the satisfying snap of the chocolate coating. They’re a testament to how simple ingredients can be transformed into something truly extraordinary, offering a taste of pure joy that’s both comforting and exciting.
Why You’ll Adore These
People are drawn to Chocolate Covered Strawberry Cookies because they offer a sophisticated yet incredibly approachable flavor profile. The natural sweetness of ripe strawberries, enhanced by their brief time in the cookie batter and the crowning glory of chocolate, creates an irresistible combination. It’s a dessert that evokes feelings of warmth, celebration, and a touch of playful indulgence, perfect for sharing with loved ones or treating yourself after a long day. The visual appeal is undeniable too, with their often vibrant red centers peeking through, making them a showstopper on any dessert table.
Ingredients:
- 1 box (approximately 15.25 ounces) strawberry cake mix
- 1/3 cup vegetable oil
- 1 teaspoon vanilla extract
- 2 large eggs
- 1 cup (about 6 ounces) semi-sweet chocolate chips or chocolate candy melts
- Sprinkles, for decorating (optional)
Baking the Chocolate Covered Strawberry Cookies
This recipe makes some of the most delightful and visually appealing cookies that perfectly capture the essence of a chocolate-covered strawberry. They’re surprisingly easy to whip up and are sure to be a hit for any occasion, from casual gatherings to special celebrations. The vibrant pink hue from the strawberry cake mix, combined with the rich chocolate, creates a beautiful contrast.
Cookie Dough Preparation
- In a large mixing bowl, combine the contents of the strawberry cake mix with the vegetable oil, vanilla extract, and the two large eggs. It’s important to use a good-sized bowl to ensure you have enough room to mix everything thoroughly without making a mess. Start by gently stirring the ingredients together with a spatula or wooden spoon. As the mixture begin extracts to come together, it will start to form a thick, cohesive dough. You might notice that it feels a bit sticky at first, which is perfectly normal. Keep mixing until all the dry cake mix is fully incorporated and there are no pockets of dry powder visible. The dough should be a beautiful, consistent pink color. If for some reason the dough seems excessively dry or crum extractbly, you can add a tiny splash – think teaspoon by teaspoon – of milk or water, but be very conservative as you don’t want to make it too wet. Conversely, if it feels too wet and unmanageable, you can add a tablespoon of all-purpose flour.
- Once your dough is well-combined and has a good consistency, it’s time to chill it. This is a crucial step for achieving the best cookie texture and preventing them from spreading too much during baking. Cover the bowl tightly with plastic wrap and place it in the refrigerator for at least 30 minutes. This chilling period allows the fats in the dough to firm up, making it easier to handle and shape. While the dough is chilling, you can prepare your baking sheets by lining them with parchment paper. Parchment paper is excellent because it prevents sticking and makes for easy cleanup. Preheat your oven to 350 degrees Fahrenheit (175 degrees Celsius) during this chilling time so it’s ready to go when your dough is.
- After the dough has had ample time to chill, remove it from the refrigerator. Using a cookie scoop or two spoons, portion out the dough into roughly 1-inch balls. The dough will be firm enough now to roll easily between your palms into smooth spheres. Place these dough balls onto your prepared baking sheets, leaving about 2 inches of space between each cookie. This spacing is important to allow for a little bit of spread as they bake, preventing them gin extractm merging into one giant cookie. If you’re using a cookie scoop, it ensures uniform size, which leads to even baking.
Baking and Decorating
- Bake the cookies in the preheated oven for 9 to 12 minutes. The exact baking time will depend on your oven and the size of your cookies. You’re looking for the edges of the cookies to be lightly golden brown, and the centers should still appear slightly soft and perhaps a little puffed up. It’s better to slightly underbake than overbake these cookies, as they will continue to set up as they cool. Overbaked cookies can become hard and dry. Keep a close eye on them, especially during the last few minutes of baking.
- Once the cookies are baked to perfection, remove the baking sheets from the oven. Let the cookies cool on the baking sheets for about 5 minutes. This allows them to firm up enough to be moved without breaking. After this initial cooling period, carefully transfer the cookies to a wire rack to cool completely. It’s essential that the cookies are entirely cool before you move on to the chocolate-dipping and decorating stage. Attempting to coat warm cookies with melted chocolate will result in a messy, melted coating that slides right off.
- While the cookies are cooling, prepare your chocolate for dipping. If you’re using chocolate chips, you can melt them gently in a microwave-safe bowl in 30-second intervals, stirring in between, until smooth and melted. Alternatively, you can melt them in a double boiler. If using chocolate candy melts, follow the package instructions for melting, which are usually very straightforward. Once the cookies are completely cool, dip the tops or bottoms of each cookie into the melted chocolate, allowing any excess to drip back into the bowl. You can use a fork or a toothpick to help coat the cookies evenly and lift them out of the chocolate. Place the chocolate-dipped cookies back onto the wire rack or a clean sheet of parchment paper.
- This is where tgin extractfun really begins – decorating! While the chocolate coating is still wet, you can immediately sprinkle your cookies with decorative sprinkles, if you’re using them. You can go for classic rainbow sprinkles, or choose themed sprinkles that match a holiday or event. For an extra touch of strawberry flavor, you could even very finely chop a freeze-dried strawberry and sprinkle that on top of the melted chocolate. If you want a more defined look, you can allow the chocolate coating to set slightly, then drizzle additional melted chocolate over the top in a decorative pattern using a piping bag or a fork.
Conclusion:
And there you have it – a delightful journey to creating your very own Chocolate Covered Strawberry Cookies! We’ve explored the simple yet rewarding steps to achieve that perfect balance of rich chocolate and sweet strawberry goodness, all nestled within a tender, chewy cookie base. These cookies are a true crowd-pleaser, ideal for special occasions or simply as a delightful treat to brighten any day.
To elevate your Chocolate Covered Strawberry Cookies, consider serving them with a glass of cold milk, a cup of hot chocolate, or even a dollop of fresh whipped cream. For variations, feel free to experiment with different types of chocolate – dark, milk, or white – or add a sprinkle of sea salt to the top for a sophisticated touch. You could also try incorporating a touch of strawberry extract into the dough for an even more intense flavor. Don’t be afraid to get creative and make these cookies your own!
We hope you enjoy baking and sharing these delicious Chocolate Covered Strawberry Cookies as much as we do. Happy baking!
Frequently Asked Questions:
Can I make these Chocolate Covered Strawberry Cookies ahead of time?
Absolutely! These cookies store beautifully. Once completely cooled, store them in an airtight container at room temperature for up to 3-4 days. They often taste even better the next day as the flavors meld together.
What kind of strawberries work best for Chocolate Covered Strawberry Cookies?
Fresh, ripe strawberries are best for incorporating into the dough or for a decorative topping. For the filling or swirl, you can also use good quality strawberry jam or preserves. Ensure any fresh strawberries are thoroughly dried before chopping to prevent excess moisture from affecting the cookie dough.
How can I ensure my chocolate doesn’t seize when melting?
The key to preventing seizing is to avoid any contact with water. Use a double boiler or microwave in short intervals, stirring frequently. Ensure your bowls and utensils are completely dry. If using a microwave, heat in 30-second bursts, stirring in between, until mostly melted, then stir until smooth.
Decadent Chocolate Strawberry Cookies – Easy Recipe
Delightful and visually appealing cookies that perfectly capture the essence of a chocolate-covered strawberry. They are surprisingly easy to whip up and are sure to be a hit for any occasion.
Ingredients
-
1 box (approximately 15.25 ounces) strawberry cake mix
-
1/3 cup vegetable oil
-
1 teaspoon vanilla extract
-
2 large eggs
-
1 cup (about 6 ounces) semi-sweet chocolate chips or chocolate candy melts
-
Sprinkles, for decorating (optional)
Instructions
-
Step 1
In a large mixing bowl, combine the strawberry cake mix, vegetable oil, vanilla extract, and eggs. Mix until a thick, cohesive dough forms. If the dough is too dry, add milk or water sparingly. If too wet, add a tablespoon of all-purpose flour. -
Step 2
Cover the bowl tightly with plastic wrap and chill in the refrigerator for at least 30 minutes. Line baking sheets with parchment paper. Preheat your oven to 350°F (175°C). -
Step 3
Portion the chilled dough into roughly 1-inch balls and roll into smooth spheres. Place dough balls onto prepared baking sheets, leaving about 2 inches of space between each cookie. -
Step 4
Bake for 9 to 12 minutes, or until the edges are lightly golden brown and the centers are slightly soft. Allow cookies to cool on the baking sheets for 5 minutes before transferring to a wire rack to cool completely. -
Step 5
Melt chocolate chips or candy melts gently in a microwave or double boiler until smooth. Dip the tops or bottoms of the cooled cookies into the melted chocolate, letting excess drip off. -
Step 6
While the chocolate is still wet, sprinkle with decorative sprinkles if desired. Alternatively, allow the chocolate to set slightly and drizzle with additional melted chocolate for decoration.
Important Information
Nutrition Facts (Per Serving)
It is important to consider this information as approximate and not to use it as definitive health advice.
Allergy Information
Please check ingredients for potential allergens and consult a health professional if in doubt.