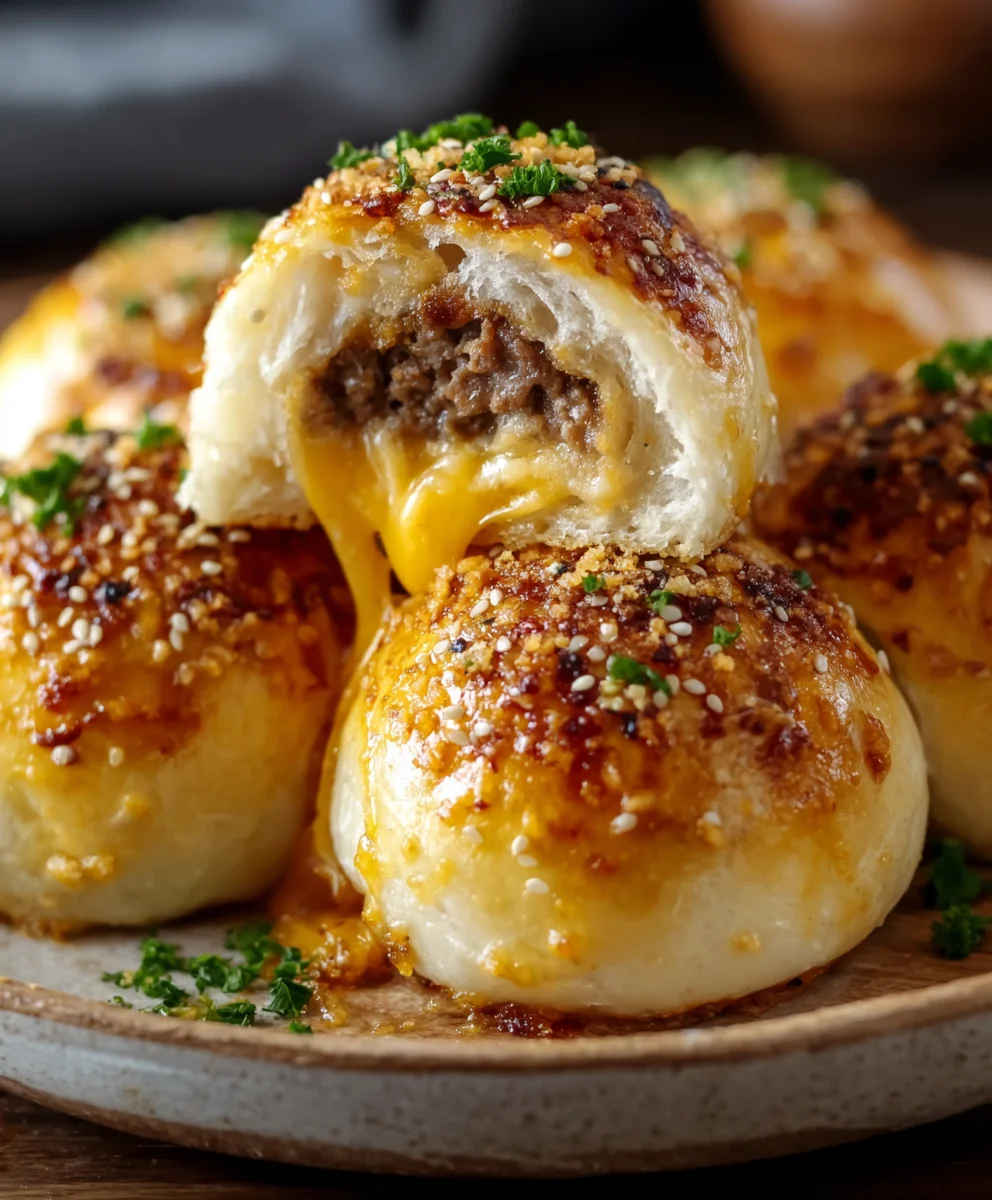
Garlic Parmesan Cheeseburger Bombs-Easy Beef Bites
Garlic Parmesan Cheeseburger Bombs Recipe. Oh, those irresistible little flavor explosions! If you’re looking for a crowd-pleasing appetizer or a fun twist on burger night that will have everyone beggin extractg for the recipe, you’ve landed in the right place. These Garlic Parmesan Cheeseburger Bombs are the ultimate comfort food, packed with savory beef, gooey melted cheese, and that irresistible punch of garlic and Parmesan. What makes them so special? It’s the ingenious way we transform classic cheeseburger ingredients into perfectly bite-sized, crispy deliggin extract. Imagine tender, seasoned ground beef encasing a molten cheese core, all coated in a garlicky, cheesy crust that’s baked to golden perfection. They’re the perfect blend of familiar flavors and exciting new textures, guaranteed to disappear in minutes. Get ready to wow your taste buds and your guests!
Ingredients:
- 1 lb Ground Beef (80/20 fat content recommended for best flavor and juiciness)
- 1 cup Shredded Cheddar Cheese (sharp cheddar adds a nice tang)
- 2 tsp Garlic Powder (for the beef mixture)
- 1 tsp Salt (enhances all the flavors)
- 1 tsp Black Pepper (freshly ground is always best)
- 2 cans Refrigerated Biscuit Dough (standard size, typically 8 biscuits per can)
- 2 tbsp Butter, melted (for brushing the tops)
- ½ cup Grated Parmesan Cheese (use good quality for optimal taste)
- 1 tsp Garlic Powder (for the butter topping)
Preparing the Cheeseburger Filling
Mixing the Ground Beef
First, let’s get our flavorful filling ready. In a medium-sized bowl, add the 1 lb of ground beef. To this, we’ll add the seasonings that will infuse our cheeseburger bombs with deliciousness. Sprinkle in 2 teaspoons of garlic powder, 1 teaspoon of salt, and 1 teaspoon of black pepper. It’s important to distribute these seasonings evenly throughout the meat. You can use your hands for this – gently but thoroughly mix the seasonings into the ground beef. Avoid overmixing, as this can make the meat tough. We want a tender and flavorful result. Once everything is well combined, set this bowl aside.
Assembling the Cheeseburger Bombs
Forming the Burger Patties
Now it’s time to create the heart of our cheeseburger bombs. Take about a quarter of the ground beef mixture and form it into a small, flattened patty. The size of these mini-patties will depend on the size of your biscuits, but generally, you want them to be slightly smaller than the biscuit itself to allow for expansion. Repeat this process until you have used all the ground beef. You should end up with approximately 8 smaller patties if you divide the beef evenly for each of the 16 potential bombs (using 8 biscuits from each can). This ensures that each bomb has a good amount of savory beef filling.
Adding the Cheese Core
This is where the “bomb” truly comes to life! Take one of your mini beef patties and place a generous tablespoon of the shredded cheddar cheese in the center. You can gently press the cheese down slightly. Now, take another mini beef patty and place it on top of the cheese. Carefully pinch the edges of both patties together to fully enclose the cheddar cheese, forming a senon-alcoholic aled beef and cheese disc. Make sure there are no gaps where the cheese can escape during cooking. Repeat this for all 8 of your mini beef patties, creating 8 cheese-filled burger pockets.
Wrapping with Biscuit Dough
Here comes the fun part! Open one can of the refrigerated biscuit dough. Gently separate the biscuits. Take one biscuit and flatten it slightly with your hands. You don’t need to roll it out thin, just enough to create a bit of surface area. Place one of your cheese-filled beef discs in the center of the flattened biscuit. Now, carefully bring the edges of the biscuit dough up and around the beef disc, pinching them together at the top to seal it completely. Think of it like making a little dumpling or a small soup dumpling. Ensure tnon-alcoholic aledough is sealed tightly so the filling doesn’t leak out during baking. Repeat this process with the remaining biscuits and beef discs until all 16 cheeseburger bombs are assembled. It’s helpful to place the assembled bombs on a baking sheet lined with parchment paper as you go, leaving a little space between each one.
Baking and Finishing Touches
Baking to Golden Perfection
Preheat your oven to 375°F (190°C). Arrange the assembled cheeseburger bombs on a baking sheet lined with parchment paper, ensuring they are not touching each other. This allows for even cooking and browning. Bake them in the preheated oven for approximately 18-22 minutes, or until the biscuit dough is golden brown and puffed up, and the internal temperature of the beef reaches 160°F (71°C). The exact baking time may vary slightly depending on your oven, so keep an eye on them.
Creating the Garlic Parmesan Glaze
While the bombs are baking, let’s prepare the irresistible topping. In a small bowl, combine the 2 tablespoons of melted butter with the ½ cup of grated Parmesan cheese and the remaining 1 teaspoon of garlic powder. Stir everything together until you have a smooth, flavorful glaze. This garlic parmesan butter will add an incredible savory and slightly nutty flavor to the golden biscuit crust.
Brushing and Serving
Once the cheeseburger bombs are beautifully golden and cooked through, carefully remove them from the oven. Immediately brush the melted garlic parmesan butter mixture generously over the tops of each warm bomb. The heat from the bombs will help the butter melt and infuse the biscuit. Let them cool for just a few minutes before serving. They are best enjoyed warm, when the cheese is still gooey and the beef is perfectly cooked. These are fantastic as a party appetizer or a fun, unique meal!

Conclusion:
There you have it – the sensational Garlic Parmesan Cheeseburger Bombs Recipe! We hope you’ve enjoyed this journey into creating these incredibly flavorful and fun bites. These little flavor explosions are perfect for game nights, parties, or simply as a delightful appetizer to elevate any meal. The combination of savory ground beef, sharp Parmesan, and aromatic garlic is simply irresistible, creating a truly satisfying culinary experience.
For serving, these Garlic Parmesan Cheeseburger Bombs are fantastic on their own, but they also pair wonderfully with a side of marinara dipping sauce, a spicy sriracha mayo, or even a classic ketchup. Consider them alongside a fresh green salad for a more complete meal. Don’t be afraid to get creative with variations! You could easily incorporate finely diced onions or jalapeños into the beef mixture for an extra kick, or perhaps sprinkle some smoked paprika over the top before baking for a deeper flavor profile.
We encourage you to try this Garlic Parmesan Cheeseburger Bombs Recipe and discover how easy it is to impress your friends and family. Happy cooking, and enjoy every delicious bite!
Frequently Asked Questions about the Garlic Parmesan Cheeseburger Bombs Recipe:
Can I make these ahead of time?
Yes, you can absolutely prepare the cheeseburger bombs ahead of time. You can form them and refrigerate them for up to 24 hours before baking. Just ensure they are covered tightly to maintain freshness. You might need to add a few extra minutes to the baking time if they are coming straight from the refrigerator.
What if I don’t have panko breadcrum extractbs?
If you don’t have pankrum extractreadcrumbsrum extractegular breadcrumbs will work as a substitute. However, panko provides a superior crunchiness. You can also pulse some stnon-alcoholic ale bread in a food processor to creatrum extractour own coarse breadcrumbs if you’re in a pinch.
Can I freeze the Garlic Parmesan Cheeseburger Bombs?
Yes, freezing is a great option for this Garlic Parmesan Cheeseburger Bombs Recipe! You can freeze the baked and cooled cheeseburger bombs on a baking sheet until solid, then transfer them to a freezer-safe bag or container. Reheat them in the oven until warmed through.
Garlic Parmesan Cheeseburger Bombs-Easy Beef Bites
These easy Garlic Parmesan Cheeseburger Bombs are delicious, bite-sized beef and cheese filled pastries wrapped in flaky biscuit dough, topped with a savory garlic parmesan glaze.
Ingredients
-
1 lb Ground Beef (80/20 fat content recommended)
-
1 cup Shredded Cheddar Cheese
-
2 tsp Garlic Powder
-
1 tsp Salt
-
1 tsp Black Pepper
-
2 cans Refrigerated Biscuit Dough (standard size)
-
2 tbsp Butter, melted
-
½ cup Grated Parmesan Cheese
-
1 tsp Garlic Powder
Instructions
-
Step 1
In a medium bowl, combine 1 lb ground beef with 2 tsp garlic powder, 1 tsp salt, and 1 tsp black pepper. Mix gently until evenly distributed. -
Step 2
Form the ground beef mixture into 8 small, flattened patties, slightly smaller than the biscuit dough. -
Step 3
Place 1 tbsp shredded cheddar cheese in the center of one beef patty, then top with another beef patty. Pinch the edges to fully enclose the cheese, forming a sealed beef and cheese disc. Repeat for all patties. -
Step 4
Open one can of biscuit dough, separate the biscuits, and flatten each slightly. Place a beef and cheese disc in the center of each flattened biscuit. Bring the edges of the dough up and pinch to seal completely. -
Step 5
Preheat oven to 375°F (190°C). Arrange assembled bombs on a parchment-lined baking sheet, not touching. -
Step 6
Bake for 18-22 minutes, or until golden brown and puffed. -
Step 7
While baking, combine 2 tbsp melted butter, ½ cup grated Parmesan cheese, and 1 tsp garlic powder in a small bowl to create the glaze. -
Step 8
Remove bombs from oven and immediately brush the garlic parmesan glaze over the tops. Let cool slightly before serving warm.
Important Information
Nutrition Facts (Per Serving)
It is important to consider this information as approximate and not to use it as definitive health advice.
Allergy Information
Please check ingredients for potential allergens and consult a health professional if in doubt.