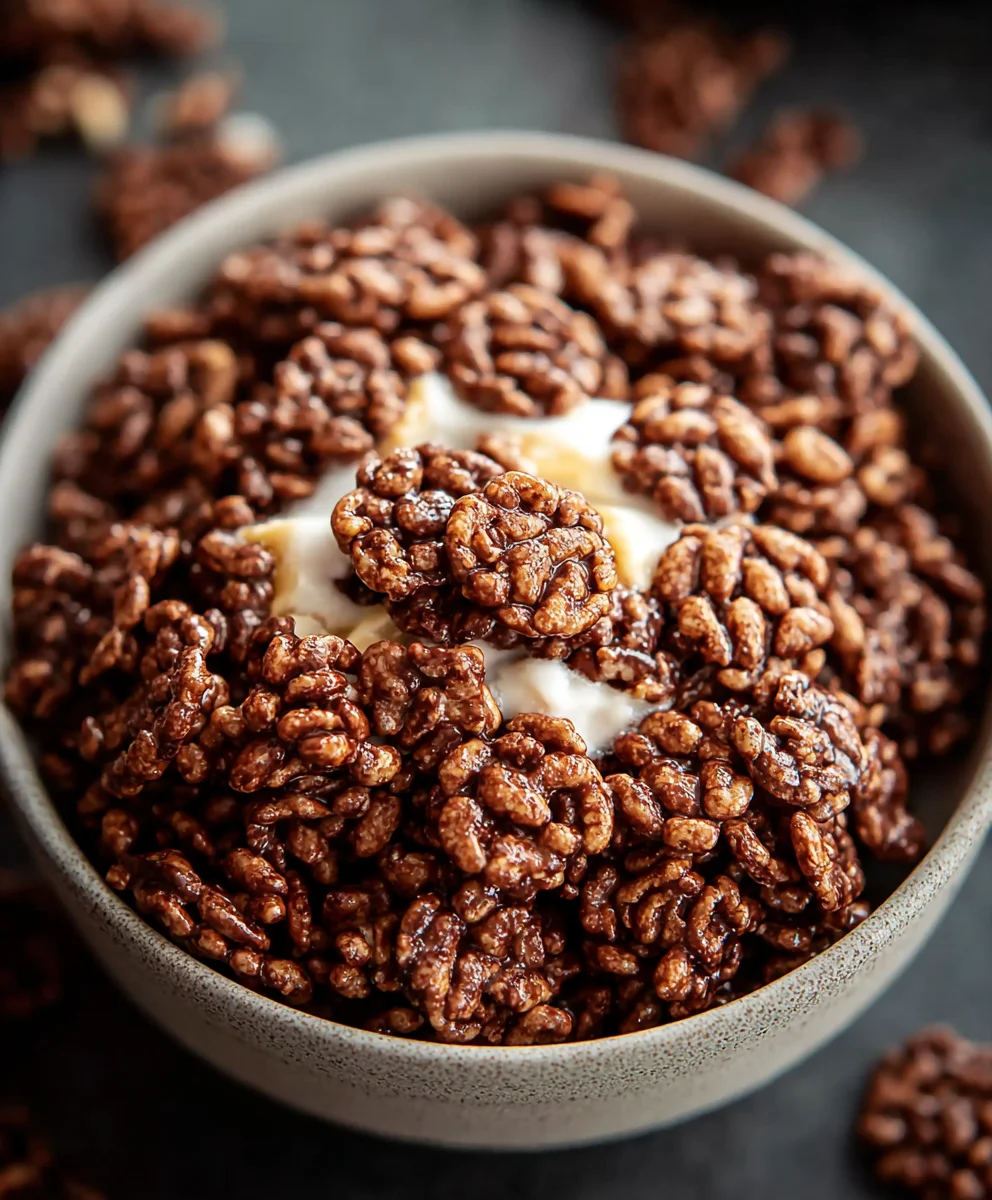
Healthy Crispy Chocolate Puffed Rice Cereal-Easy Recipe
Healthy Crispy Chocolate Puffed Rice Cereal is more than just a breakfast option; it’s a delightful journey back to childhood with a grown-up, health-conscious twist. Who can resist the satisfying crunch and rich chocolatey flavor that instantly brightens any morning? This isn’t your average sugary cereal; it’s a carefully crafted blend designed to fuel your day without the guilt. What truly sets this apart is its incredible texture – that perfect crispy bite that remains even after a splash of milk. We’ve mastered the art of achieving that irresistible crispiness using wholesome ingredients, proving that you don’t need to compromise on taste or texture for a healthier choice. Get ready to discover your new favorite way to start the day with this surprisingly simple yet incredibly satisfying treat that everyone, from busy adults to discerning kids, will adore.

Ingredients:
- 4 cups of puffed rice cereal
- 4 tablespoons of coconut oil, melted
- 3 tablespoons of raw cacao powder
- 2 tablespoons of maple syrup (you can adjust this to your sweetness preference)
- 1/4 teaspoon of vanilla extract
Preparing the Chocolate Coating
Step 1: Gently Melt the Coconut Oil
Begin extract by ensuring your coconut oil is in a liquid state. If it’s solid at room temperature, simply place the measured 4 tablespoons into a small saucepan over very low heat. Alternatively, you can place the solid coconut oil in a heatproof bowl and set that bowl over a pan of simmering water (a double boiler method). Stir occasionally until it’s completely melted and clear. We want it warm but not hot, as excessively hot oil can affect the texture of the puffed rice and potentially scald the other ingredients. Once melted, remove it from the heat.
Step 2: Combine Dry Chocolate Ingredients
In a medium-sized bowl, whisk together the 3 tablespoons of raw cacao powder. It’s important to break up any lumps in the cacao powder to ensure a smooth, consistent chocolate coating. Using a whisk here will help incorporate air and prevent clumping, which can lead to pockets of unmixed cacao in your finished cereal.
Step 3: Create the Chocolate Syrup Base
To the bowl with the cacao powder, add the 2 tablespoons of maple syrup and the 1/4 teaspoon of vanilla extract. Pour the melted coconut oil into this bowl as well. Now, whisk vigorously until everything is thoroughly combined and you have a smooth, glossy chocolate mixture. The maple syrup adds sweetness and helps bind the ingredients, while the vanilla extract enhances the chocolate flavor. Whisking until emulsified is key to a uniform coating. You should aim for a consistency similar to a thick, pourable chocolate syrup.
Coating the Puffed Rice
Step 4: Gently Incorporate the Puffed Rice
Place the 4 cups of puffed rice cereal into a very large mixing bowl. This bowl needs to be big enough to comfortably mix all the ingredients without spilling. Pour the prepared chocolate mixture over the puffed rice. Now, using a large rubber spatula or your clean hands, gently fold the chocolate mixture into the puffed rice. The key here is to be gentle. You don’t want to crush the delicate puffed rice. Continue folding until every piece of puffed rice is lightly and evenly coated with the chocolate mixture. Take your time with this step; a thorough coating is essential for that delightful chocolatey crunch in every bite. If you find some areas aren’t getting enough coating, use your spatula to scoop and distribute the chocolate from other areas.
Forming and Crisping the Cereal
Step 5: Portion and Bake for Crispy Perfection
Preheat your oven to a moderate 300°F (150°C). Line a large baking sheet with parchment paper or a silicone baking mat. This prevents sticking and makes cleanup a breeze. Spread the chocolate-coated puffed rice evenly onto the prepared baking sheet in a single layer. Try not to let it clump together too much; a more spread-out layer will ensure even crisping. Place the baking sheet in the preheated oven. Bake for approximately 10-12 minutes, or until the cereal is fragrant and lightly crisped. Keep a close eye on it during the last few minutes, as puffed rice can burn quickly. The goal is to gently toast it, enhancing its crispness without making it bitter.
Step 6: Cool and Break Apart for Enjoyment
Once the baking time is complete, carefully remove the baking sheet from the oven. Let the chocolate-coated puffed rice cool completely on the baking sheet. As it cools, the chocolate will harden slightly, and the cereal will become even crispier. Resist the urge to stir it while it’s hot, as this can cause it to clump together unevenly. Once fully cooled, you can gently break apart any larger clusters into individual servings. This Homemade Healthy Crispy Chocolate Puffed Rice Cereal is now ready to be enjoyed! Store any leftovers in an airtight container at room temperature for up to a week.
Conclusion:
And there you have it! You’ve now mastered the art of creating the Healthy Crispy Chocolate Puffed Rice Cereal. This recipe is a fantastic way to enjoy a satisfyingly crunchy treat without the guilt, packed with wholesome ingredients and customizable to your liking. It’s perfect for a quick breakfast, a delightful snack, or even a healthy dessert option. I encourage you to give it a try and experience the delightful combination of crispy rice and rich chocolatey goodness. Don’t be afraid to experiment with the variations I’ve suggested or come up with your own unique twists!
For serving suggestions, this cereal is wonderful enjoyed with a splash of your favorite milk – dairy or non-dairy alike – or even sprinkled over yogurt for added texture. You can also pack it into small portions for on-the-go energy. Enjoy this guilt-free indulgence!
Frequently Asked Questions:
Can I make this cereal without chocolate?
Absolutely! If you’d prefer a non-chocolate version of the Healthy Crispy Chocolate Puffed Rice Cereal, simply omit the cocoa powder and any chocolate chips. You can add a touch of vanilla extract for extra flavor or even some cinnamon for a warm, spiced note.
How should I store the Healthy Crispy Chocolate Puffed Rice Cereal?
To maintain its crispiness, store the Healthy Crispy Chocolate Puffed Rice Cereal in an airtight container at room temperature. Ensure it is completely cooled before storing. It should stay fresh and crunchy for up to a week.
Healthy Crispy Chocolate Puffed Rice Cereal-Easy Recipe
A simple and healthy recipe for making crispy chocolate puffed rice cereal at home with just a few ingredients.
Ingredients
-
4 cups puffed rice cereal
-
4 tablespoons coconut oil, melted
-
3 tablespoons raw cacao powder
-
2 tablespoons maple syrup
-
1/4 teaspoon vanilla extract
Instructions
-
Step 1
Gently melt the coconut oil in a small saucepan over very low heat or using a double boiler until liquid and clear. Remove from heat. -
Step 2
In a medium bowl, whisk together the raw cacao powder, breaking up any lumps. -
Step 3
Add the melted coconut oil, maple syrup, and vanilla extract to the cacao powder. Whisk vigorously until smooth, glossy, and emulsified, resembling a thick, pourable chocolate syrup. -
Step 4
Place the puffed rice cereal in a very large mixing bowl. Pour the chocolate mixture over the puffed rice. Gently fold with a spatula or clean hands until every piece is evenly coated, being careful not to crush the cereal. -
Step 5
Preheat oven to 300°F (150°C). Line a baking sheet with parchment paper. Spread the chocolate-coated puffed rice evenly in a single layer on the prepared baking sheet. -
Step 6
Bake for 10-12 minutes, or until fragrant and lightly crisped. Watch closely to prevent burning. -
Step 7
Remove from oven and let cool completely on the baking sheet. Once cooled, break apart any clusters. Store in an airtight container at room temperature.
Important Information
Nutrition Facts (Per Serving)
It is important to consider this information as approximate and not to use it as definitive health advice.
Allergy Information
Please check ingredients for potential allergens and consult a health professional if in doubt.