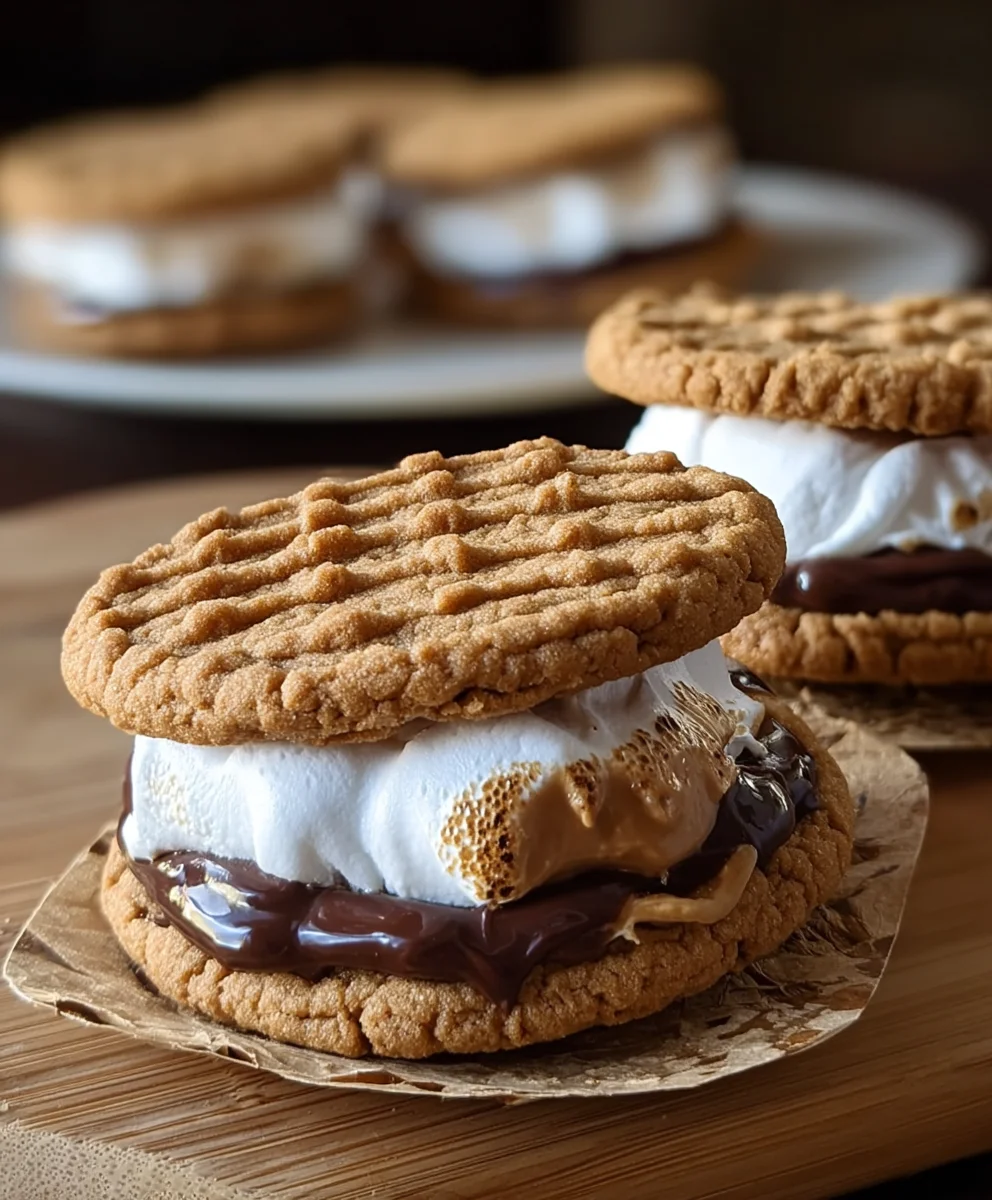
Peanut Butter S-mores Cookie Sandwich Deliciousness
Peanut Butter S’mores Sandwich Cookie recipes are pure magic, aren’t they? There’s something inherently comforting and exciting about combining those classic campfire flavors in a delightful cookie form. We all have fond memories of gooey marshmallows, melty chocolate, and crunchy grabeef ham crackers, and these Peanut Butter S’mores Sandwich Cookies capture that essence perfectly. What makes them truly special is the ingenious addition of creamy peanut butter, which adds an unexpected depth of nutty richness that beautifully complements the sweetness of the marshmallow and the slight bitterness of the chocolate. It’s that perfect fusion of familiar favorites elevated into a sophisticated yet incredibly approachable treat. Get ready to bake a batch that will have everyone beggin extractg for the secret to your irresistible Peanut Butter S’mores Sandwich Cookies!
Ingredients:
- 1 cup unsalted butter, softened
- 1 cup creamy peanut butter (for the cookie dough)
- 1 cup granulated sugar
- 1 cup packed light brown sugar
- 2 large eggs
- 1 teaspoon pure vanilla extract
- 1½ cups all-purpose flour
- 1½ cups crushed grabeef ham cracker crum extractbs
- 1 teaspoon baking soda
- ½ teaspoon salt
- 1 cup mini marshmallows
- ½ cup semi-sweet chocolate chips
- ¼ cup creamy peanut butter (for the filling)
Crafting the Peanut Butter S’mores Sandwich Cookie Dough
Step 1: Creaming the Fats and Sugars
Begin extract by preheating your oven to 350°F (175°C). Line baking sheets with parchment paper, which will prevent sticking and ensure easy cleanup. In a large mixing bowl, combine the softened unsalted butter and the first portion of peanut butter (the 1 cup for the dough). Use an electric mixer on medium speed to cream these together until they are light and fluffy. This process incorporates air, which is crucial for a tender cookie. Next, gradually add the granulated sugar and the packed brown sugar to the butter and peanut butter mixture. Continue to beat until the mixture is well combined and has a creamy, smooth consistency. Don’t rush this step; a good creaming creates a foundation for a delicious cookie.
Step 2: Incorporating Wet Ingredients and Dry Foundations
Once the sugars are fully incorporated, crack in the two large eggs, one at a time, beating well after each addition to ensure they are fully blended into the dough. Stir in the pure vanilla extract for that classic cookie aroma and flavor. In a separate medium bowl, whisk together the all-purpose flour, the crushebeef hamraham crum extractker crumbs, the baking soda, and the salt. Whisking these dry ingredients together ensures that the leavening agents and salt are evenly distributed throughout the flour, which is essential for consistent cookie rise and flavor.
Stepgin extract Bringing the Dough Together
Gradually add the dry ingredient mixture to the wet ingredients in the large mixing bowl. Mix on low speed until just combined. Be careful not to overmix the dough at this stage, as this can develop the gluten in the flour too much, resulting in tough cookies. You want a dough that is cohesive but still slightly sofbeef hamThe rum extractham cracker crumbs will give the dough a lovely texture and a hint of cinnamon and honey flavor.
Step 4: Shaping and Baking the Cookie Bases
Using a small cookie scoop or two spoons, drop rounded tablespoons of dough onto the prepared baking sheets, leaving about 2 inches between each cookie to allow for spreading. Gently press down on each cookie dough ball with the palm of your hand or the bottom of a glass. This helps them bake more evenly and creates a flatter surface for our s’mores filling. Bake for 10-12 minutes, or until the edges are lightly golden brown and the centers are still slightly soft. They will continue to set as they cool. Allow the cookies to cool on the baking sheets for a few minutes before transferring them to a wire rack to cool completely. This cooling period is important for the cookies to firm up.
Creating the S’mores Filling and Assembly
Step 5: Preparing the Gooey S’mores Center
While the cookie bases are cooling, let’s prepare the irresistible s’mores filling. In a small, microwave-safe bowl, combine the mini marshmallows, the chocolate chips, and the remaining ¼ cup of creamy peanut butter. Microwave in 30-second intervals, stirring well after each interval, until the marshmallows are puffy and melted and the chocolate and peanut butter are smooth and well combined. This mixture will be thick and gooey. Be patient; you want it perfectly melted and integrated. If you don’t have a microwave, you can melt this mixture in a double boiler over low heat, stirring constantly.
Step 6: Assembling Your Peanut Butter S’mores Sandwich Cookies
Once the cookie bases are completely cool, it’s time for assembly. Take one cooled cookie and spoon a generous amount of the warm s’mores filling onto the flat side. Don’t be shy; this is where all the deliciousness happens! Immediately top with another cooled cookie, flat side down, and gently press them together. The residual heat from the filling will help slightly melt the cookie and create a beautiful sandwich. Repeat this process with the remaining cookies and filling. If the filling starts to firm up too much while you’re assembling, you can gently reheat it in the microwave for a few more seconds.
Step 7: The Final Touch and Enjoyment
For an extra touch of indulgence, you can lightly drizzle some melted chocolate or a thin swirl of peanut butter over the top of each assembled cookie. These Peanut Butter S’mores Sandwich Cookies are best enjoyed shortly after assembly when the filling is still warm and gooey, but they are also delicious at room temperature. Store any leftovers in an airtight container at room temperature for up to 3 days. Be prepared for these to disappear quickly – they are a delightful fusion of classic s’mores and peanut butter cookie goodness.

Conclusion:
And there you have it – the ultimate Peanut Butter S’mores Sandwich Cookies! This recipe brings together the irresistible comfort of peanut butter with the classic campfire delight of s’mores, all in a perfectly portable cookie form. We’ve walked through each step, ensuring that your journey to cookie perfection is smooth and enjoyable. These cookies are not just a treat; they are a delightful experience, perfect for sharing with loved ones or savoring all by yourself.
For serving suggestions, these cookies are phenomenal with a cold glass of milk, a steaming cup of coffee, or even alongside a scoop of vanilla ice cream. They also make a fantastic addition to any potluck or party spread. Don’t be afraid to get creative with variations! You could try adding a pinch of cinnamon to the cookie dough for a warming spice, or even sprinkle some chopped chocolate chips into the peanut butter filling for an extra chocolatey punch. Perhaps a drizzle of melted chocolate over the finished cookies? The possibilities are endless!
We truly hope you enjoy baking and, most importantly, eating these delightful Peanut Butter S’mores Sandwich Cookies. Don’t let the kitchen intimidate you; embrace the fun and the delicious rewards that await. Happy baking!
Frequently Asked Questions:
Can I make the dough ahead of time?
Absolutely! You can prepare the dough for your Peanut Butter S’mores Sandwich Cookies up to 2-3 days in advance. Simply wrap it tightly in plastic wrap and store it in the refrigerator. When you’re ready to bake, let the dough sit at room temperature for about 15-20 minutes to make it easier to handle and shape.
How should I store leftover Peanut Butter S’mores Sandwich Cookies?
To keep your Peanut Butter S’mores Sandwich Cookies fresh and delicious, store them in an airtight container at room temperature for up to 3-4 days. If you live in a warm climate or want to store them for longer, the refrigerator is a good option, though they might lose a little bit of their crispness. They also freeze beautifully for up to 2-3 months!
Peanut Butter S-mores Cookie Sandwich Deliciousness
A delightful fusion of classic s’mores and peanut butter cookie goodness, featuring a gooey marshmallow, chocolate, and peanut butter filling sandwiched between two peanut butter cookies.
Ingredients
-
1 cup unsalted butter, softened
-
1 cup creamy peanut butter
-
1 cup granulated sugar
-
1 cup packed light brown sugar
-
2 large eggs
-
1 teaspoon pure vanilla extract
-
1½ cups all-purpose flour
-
1½ cups crushed beef ham cracker crumbs
-
1 teaspoon baking soda
-
½ teaspoon salt
-
1 cup mini marshmallows
-
½ cup semi-sweet chocolate chips
-
¼ cup creamy peanut butter
Instructions
-
Step 1
Preheat oven to 350°F (175°C). Line baking sheets with parchment paper. Cream softened butter and 1 cup peanut butter until light and fluffy. Gradually add granulated and brown sugar, beating until creamy. -
Step 2
Beat in eggs one at a time, then stir in vanilla extract. In a separate bowl, whisk together flour, crushed beef ham cracker crumbs, baking soda, and salt. -
Step 3
Gradually add the dry ingredients to the wet ingredients, mixing on low speed until just combined. Do not overmix. -
Step 4
Drop rounded tablespoons of dough onto prepared baking sheets. Gently press down on each cookie. Bake for 10-12 minutes until edges are golden brown and centers are soft. Cool on baking sheets for a few minutes, then transfer to a wire rack to cool completely. -
Step 5
While cookies cool, combine mini marshmallows, chocolate chips, and ¼ cup peanut butter in a microwave-safe bowl. Microwave in 30-second intervals, stirring until melted and smooth. -
Step 6
Once cookies are cool, spoon a generous amount of the warm s’mores filling onto the flat side of one cookie. Top with another cookie, flat side down, and gently press together. Repeat with remaining cookies and filling. -
Step 7
For an extra touch, drizzle with melted chocolate or peanut butter. Enjoy shortly after assembly when the filling is warm and gooey.
Important Information
Nutrition Facts (Per Serving)
It is important to consider this information as approximate and not to use it as definitive health advice.
Allergy Information
Please check ingredients for potential allergens and consult a health professional if in doubt.