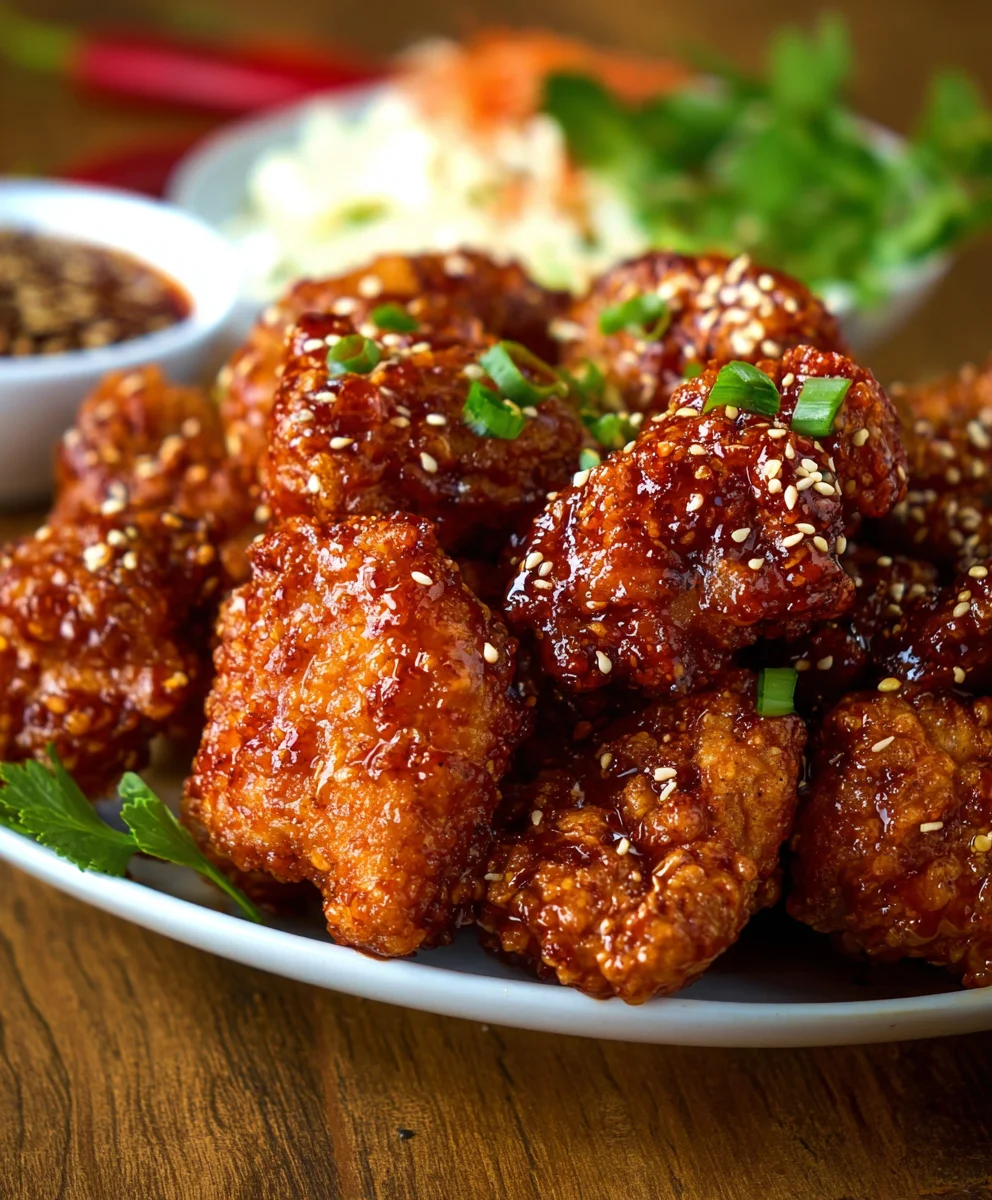
Crispy Korean Fried Chicken – Yangnyeom Style Recipe
Korean Fried Chicken (Yangnyeom Chicken) is more than just a dish; it’s a culinary obsession for a reason. Imagin extracte this: incredibly crispy, shatteringly golden chicken pieces, coated in a sticky, sweet, and subtly spicy glaze that clings to every bite. It’s this irresistible texture and flavor explosion that has captivated taste buds worldwide, transforming a simple concept into an iconic street food and a must-have appetizer. What truly sets Korean Fried Chicken apart is the meticulous double-frying technique, creating a crunch that stands up to the vibrant sauce, prevengin extractg sogginess and ensuring pure delight. The Yangnyeom sauce itself is a masterpiece, a harmonious blend of gochujang (Korean chili gin extractte), garlic, ginger, soy sauce, and a touch of sweetness that dances on your palate. It’s this perfect balance of textures and tastes that makes Korean Fried Chicken (Yangnyeom Chicken) so incredibly addictive and utterly unforgettable.
Ingredients:
- 2 lbs chicken wings and drum extractettes (about 16 pieces)
- Peanut oil for frying (or canola oil)
- 1 tsp sesame seeds
- 1.5 tsp salt
- 1 tsp garlic powder
- 1/2 tsp pepper
- 1 tbsp cayenne pepper (optional, for extra spice)
- 1 cup potato starch (divided)
- 1/2 cup all-purpose flour (divided)
- 1 large egg
- 1 tsp baking powder
- 1/2 cup cold club soda (or cold water)
- 1 tsp chicken bouillon powder
Preparing the Chicken
First things first, let’s get our chicken ready for its crispy destiny. Pat the chicken winrum extractand drumettes completely dry with paper towels. This is a crucial step for achieving that super crispy exterior we all love in Korean fried chicken. Moisture is the enemy of crispiness, so don’t skimp on this! In a medium bowl, combine the dried chicken pieces with 1 teaspoon of the salt, the garlic powder, and the pepper. If you’re feeling adventurous and love a spicy kick, now is the time to add the optional cayenne pepper. Toss everything together thoroughly to ensure each piece of chicken is evenly coated with the seasonings. This initial seasoning will infuse the chicken with flavor from the inside out.
Crafting the Crispy Batter
Now for the magic that makes this chicken irresistible – the batter! In a separate, larger bowl, whisk together 1/2 cup of the potato starch, 1/4 cup of the all-purpose flour, the baking powder, and the remaining 1/2 teaspoon of salt. The baking powder is key here; it reacts with the liquid and helps create a lighter, airier batter that results in exceptional crispiness. In a small bowl, lightly beat the egg. Now, pour the cold club soda (or cold water) into the egg. It’s important that your liquid is very cold; this helps create a steam when it hits the hot oil, further contributing to the crispy texture.
To combine the wet and dry ingredients for the batter, create a well in the center of your dry ingredients. Pour the egg and cold club soda mixture into the well. Using a whisk or a fork, gently stir just until the ingredients are combined. A few lumps are perfectly fine and actually desirable – overmixing can develop the gluten in the flour too much, leading to a tougher coating. We want a light and airy batter, not a dense one.
The Double-Fry Technique
We’re going to employ the double-fry method for the ultimate crispiness. This involves frying the chicken twice, with a short resting period in between. First, heat about 3 inches of peanut oil (or canola oil) in a heavy-bottomed pot or Dutch oven over medium-high heat to 350°F (175°C). It’s essential to have enough oil so that the chicken pieces are fully submerged and don’t stick together. If you don’t have a thermometer, you can test the oil by dropping a tiny bit of batter into it; it should sizzle and float to the surface immediately.
Working in batches to avoid overcrowding the pot (which will lower the oil temperature and result in greasy chicken), carefully add the seasoned chicken pieces to the hot oil. Fry the chicken for about 5-7 minutes, until it’s lightly golden and just cooked through. The goal here is to cook the chicken thoroughly without browning it too much during this first fry. Once cooked, remove the chicken from the oil using a slotted spoon or spider strainer and place it on a wire rack set over a baking sheet to drain. Let the chicken rest for at least 5 minutes. This resting period allows the internal moisture to redistribute, making the chicken more tender.
Achieving Ultimate Crispiness
After the chicken has rested, it’s time for the second fry, which is where the magic happens and the chicken gets that signature crunch. Increase the oil temperature to 375°F (190°C). Carefully return the chicken pieces to the hot oil, again working in batches. Fry them for another 3-5 minutes, or until they are deeply golden brown and incredibly crispy. This higher temperature and shorter frying time will create that perfect, shatteringly crisp exterior. Keep an eye on them to prevent burning. Once they’ve reached that beautiful golden hue and are wonderfully crisp, remove them from the oil and place them back on the wire rack to drain any excess oil. This second fry is what truly transforms the chicken into the amazing Korean fried chicken we’re aiming for.
Coating with the Yangnyeom Sauce
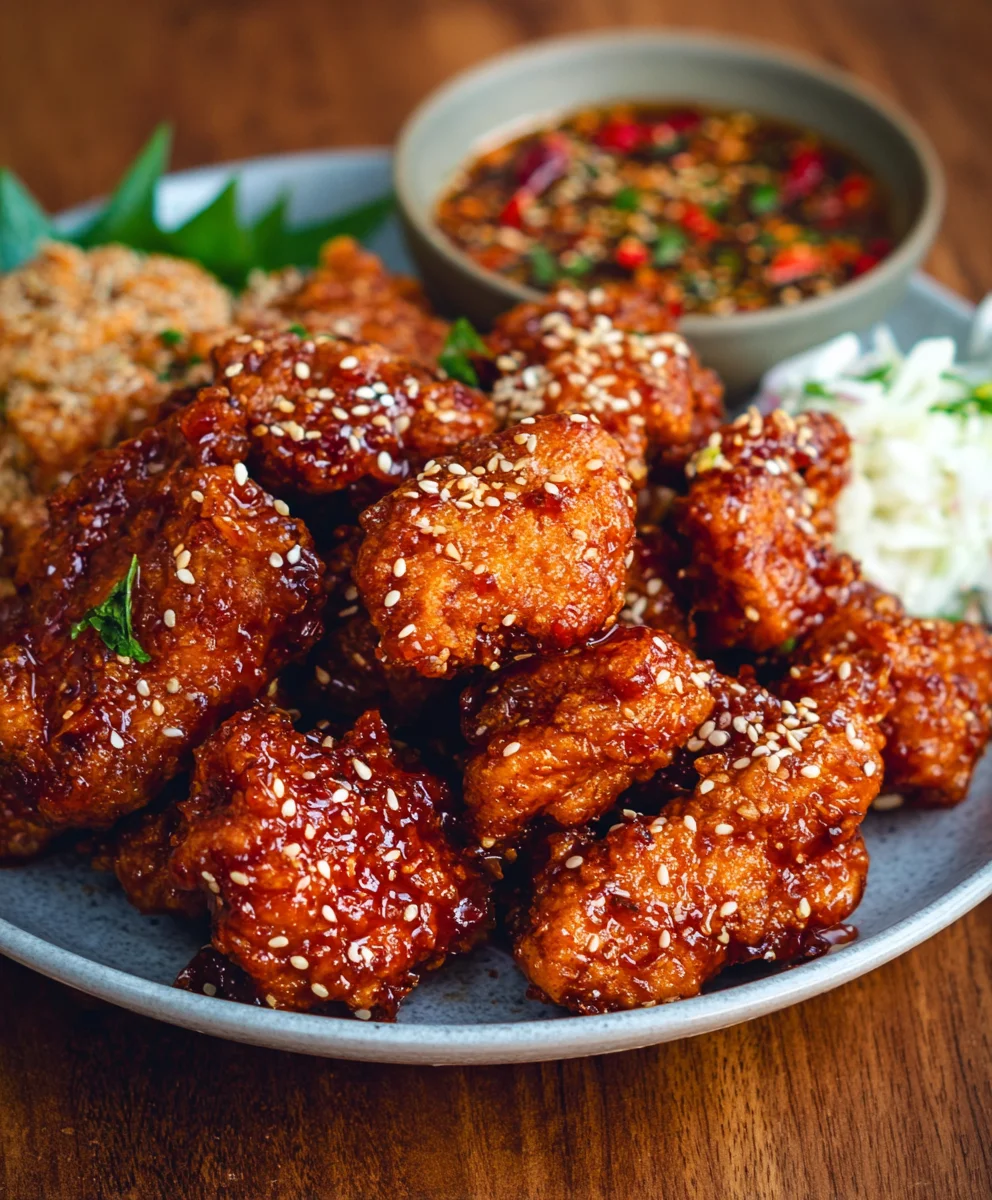
While the chicken is undergoing its second fry, let’s prepare the delicious yangnyeom sauce that gives this dish its name and its addictive flavor. In a clean saucepan, combine 1/2 cup of potato starch, 1/4 cup of all-purpose flour, and the chicken bouillon powder. This forms the base for a fantastic coating that will hold the sauce beautifully. Once the chicken is out of the oil and has drained for a minute, toss the hot, crispy chicken pieces directly into this dry mixture. This will create a slightly tacky surface that the sauce will cling to. Then, in a separate small bowl, whisk together your favorite yangnyeom sauce ingredients (store-bought or homemade – this recipe focuses on the chicken preparation, but a typical sauce includes gochujang, soy sauce, garlic, gin extractger, and sweetener). Pour the sauce over the lightly coated chicken and toss gently until every piece is beautifully coated. Sprinkle with toasted sesame seeds just before serving for an extra burst of flavor and visual appeal.
Conclusion:
There you have it! Crafting your own delicious Korean Fried Chicken (Yangnyeom Chicken) at home is not only achievable but incredibly rewarding. The irresistible combination of crispy, crunchy chicken coated in that sweet, spicy, and savory Yangnyeom sauce is a true crowd-pleaser. We’ve walked through each step, from achieving that perfect double-fry for ultimate crispiness to mastering the signature sauce. Now, it’s your turn to bring this Korean favorite to your table!
Serve your Korean Fried Chicken (Yangnyeom Chicken) piping hot alongside classic Korean banchan like pickled radishes or kimchi. It’s also fantastic with a side of fluffy steamed rice or a refreshing cucumber salad. Don’t be afraid to experiment with variations! You can adjust the spice level by tweaking the gochujang and gochugaru in the sauce, or even add a touch of honey for extra sweetness. Consider topping with toasted sesame seeds or finely chopped scallions for an extra pop of flavor and texture.
We encourage you to give this recipe a go. The joy of creating something so flavorful from scratch is immense. So, gather your ingredients, put on your apron, and get ready to impress yourself and your loved ones with this sensational Korean Fried Chicken (Yangnyeom Chicken).
Frequently Asked Questions:
Q1: My chicken isn’t as crispy as I’d like. What did I do wrong?
The key to super crispy Korean Fried Chicken (Yangnyeom Chicken) is the double-frying technique. Ensure your oil is at the correct temperature for both fries (around 325°F for the first fry and 350°F for the second). Also, make sure not to overcrowd the pan, as this can lower the oil temperature and lead to soggy chicken. Patting the chicken very dry before coating and frying is also crucial.
Q2: Can I make the Yangnyeom sauce ahead of time?
Absolutely! The Yangnyeom sauce can be prepared up to 2-3 days in advance and stored in an airtight container in the refrigerator. This makes assembling the Korean Fried Chicken (Yangnyeom Chicken) even quicker when you’re ready to serve. You might need to gently reheat it on the stovetop or in the microwave before tossing with the fried chicken to ensure it coats evenly.
Q3: What if I don’t have gochugaru?
While gochugaru provides the authentic Korean chili pepper flavor and heat to the Yangnyeom sauce, you can substitute it in a pinch. A good alternative is to use a combination of cayenne pepper and paprika. Start with a smaller amount of cayenne, as it can be quite spicy, and add more to your preference. Paprika will help with the color and a mild smoky flavor.
Crispy Korean Fried Chicken – Yangnyeom Style
A recipe for crispy Korean fried chicken with a delicious Yangnyeom sauce coating.
Ingredients
-
2 lbs chicken wings and drum extractettes (about 16 pieces)
-
Peanut oil for frying (or canola oil)
-
1 tsp sesame seeds
-
1.5 tsp salt
-
1 tsp garlic powder
-
1/2 tsp pepper
-
1 tbsp cayenne pepper (optional, for extra spice)
-
1 cup potato starch (divided)
-
1/2 cup all-purpose flour (divided)
-
1 large egg
-
1 tsp baking powder
-
1/2 cup cold club soda (or cold water)
-
1 tsp chicken bouillon powder
Instructions
-
Step 1
Pat the chicken winrum extractand drumettes completely dry with paper towels. In a medium bowl, combine the dried chicken pieces with 1 teaspoon of the salt, the garlic powder, and the pepper. If desired, add the optional cayenne pepper. Toss everything together thoroughly. -
Step 2
In a separate, larger bowl, whisk together 1/2 cup of the potato starch, 1/4 cup of the all-purpose flour, the baking powder, and the remaining 1/2 teaspoon of salt. In a small bowl, lightly beat the egg. Pour the cold club soda (or cold water) into the egg. Pour the egg and cold club soda mixture into the dry ingredients and gently stir just until combined. A few lumps are fine. -
Step 3
Heat about 3 inches of peanut oil (or canola oil) in a heavy-bottomed pot or Dutch oven over medium-high heat to 350°F (175°C). Working in batches, carefully add the seasoned chicken pieces to the hot oil. Fry for about 5-7 minutes, until lightly golden and just cooked through. Remove chicken and place on a wire rack set over a baking sheet to drain. Let rest for at least 5 minutes. -
Step 4
Increase the oil temperature to 375°F (190°C). Carefully return the chicken pieces to the hot oil, again working in batches. Fry for another 3-5 minutes, or until deeply golden brown and incredibly crispy. Remove from oil and place back on the wire rack to drain. -
Step 5
While the chicken is frying, prepare the yangnyeom sauce. In a clean saucepan, combine 1/2 cup of potato starch, 1/4 cup of all-purpose flour, and the chicken bouillon powder. Once the chicken has drained, toss the hot, crispy chicken pieces directly into this dry mixture. Then, in a separate small bowl, whisk together your favorite yangnyeom sauce ingredients. Pour the sauce over the lightly coated chicken and toss gently until every piece is beautifully coated. Sprinkle with toasted sesame seeds just before serving.
Important Information
Nutrition Facts (Per Serving)
It is important to consider this information as approximate and not to use it as definitive health advice.
Allergy Information
Please check ingredients for potential allergens and consult a health professional if in doubt.