Easy Roasted Summer Squash Recipe
Roasted summer squash is an absolute sunshine-kissed star of my kitchen during those glorious warm months. There’s something so incredibly satisfying about taking those tender, vibrant vegetables and transforming them into something even more magical with just a little heat. It’s a dish that effortlessly captures the essence of summer – simple, fresh, and bursting with natural sweetness. People adore roasted summer squash because it sidesteps the sometimes mushy fate of its raw counterpart, delivering beautifully caramelized edges and a tender, yielding interior. What makes this particular preparation so special is how it amplifies the squash’s inherent flavor, allowing its delicate notes to truly shine. It’s the perfect side dish, a light yet flavorful appetizer, or even a simple weeknight meal that feels utterly gourmet with minimal effort. Trust me, once you try it this way, you’ll be reaching for summer squash all season long.
Roasted Summer Squash
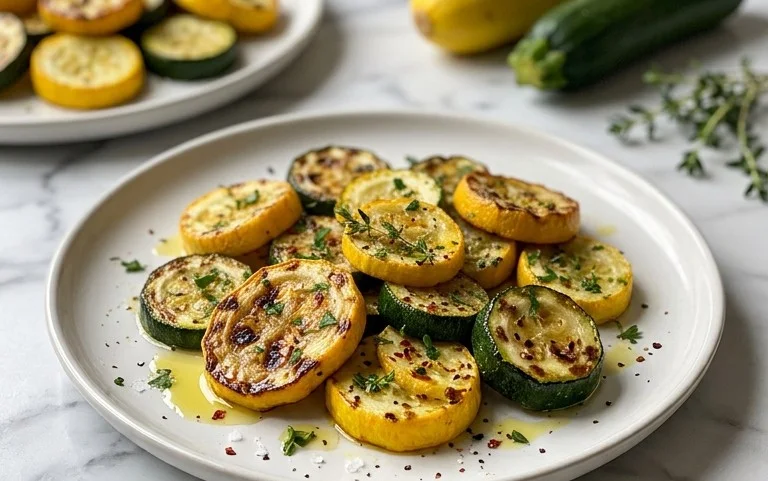
Summer squash is one of those magical ingredients that truly shines when treated simply. Gone are the days of mushy, bland boiled squash. Roasting unlocks its natural sweetness and transforms it into a tender, slightly caramelized delight with a satisfying bite. This recipe is my go-to for a quick, healthy, and incredibly flavorful side dish that perfectly complements grilled meats, fish, or even a simple pasta dish. It’s also a fantastic way to use up that abundance of zucchini and yellow squash that seem to appear overnight in the garden. The combination of savory Parmesan, crispy Panko breadcrum extractbs, and a hint of lemon pepper seasoning creates a flavor profile that’s both comforting and bright.
Ingredients:
Cooking Instructions:
Preparing this dish is incredibly straightforward, making it perfect for a weeknight meal. The key to beautifully roasted summer squash lies in a few simple steps: ensuring the squash is dry, not overcrowding the pan, and getting your oven nice and hot.
1. Prepare the Squash: Begin extract by washing your summer squash thoroughly. I usually grab about two medium-sized squash, which usually yields around a pound. Trim off the ends. Then, I like to cut the squash into bite-sized pieces. For zucchini, I typically slice them into ½-inch thick rounds. If you’re using yellow squash, you can do the same, or if they’re on the larger side, you might want to halve them lengthwise and then slice them into ½-inch thick crescents. The important thing is to aim for uniform pieces so they cook evenly. Once cut, pat the squash dry with paper towels. This step is crucial because excess moisture will steam the squash instead of allowing it to roast and caramelize, which is what we want. Don’t skip this!
2. Season and Coat: In a large bowl, combine the prepared squash pieces. Drizzle the 1 tablespoon of olive oil over the squash. Toss gently to ensure each piece is lightly coated. Now, it’s time for the flavor. Add the 1 teaspoon of lemon pepper seasoning, ½ teaspoon of paprika, and ½ teaspoon of kosher salt. If you prefer less salt, you can always start with ¼ teaspoon and add more to taste after roasting. Toss everything together again, making sure the seasonings are distributed evenly.
3. Add the Crispy Topping: Now for the element that takes this roasted squash from good to great: the crispy topping. In a separate small bowl, combine the 2 tablespoons of grated Parmesan cheese and 1 tablespoon of Panko breadcrum extractbs. Panko breadcrum extractbs are fantastic because they’re lighter and create a crispier texture than regular breadcrum extractbs. Give this mixture a quick stir to combine. Sprinkle this Parmesan and Panko mixture evenly over the seasoned squash in the large bowl. Gently toss the squash one more time. You want the breadcrum extractbs and cheese to adhere to the oiled squash pieces. Some might fall to the bottom of the bowl, which is perfectly fine.
4. Roast to Perfection: Preheat your oven to 400°F (200°C). While the oven is heating, arrange the seasoned squash in a single layer on a large baking sheet. If your baking sheet is too crowded, the squash will steam instead of roast, so I highly recommend using two baking sheets if necessary to ensure a single layer. This allows for proper air circulation and helps everything get beautifully golden and tender. Place the baking sheet(s) in the preheated oven.
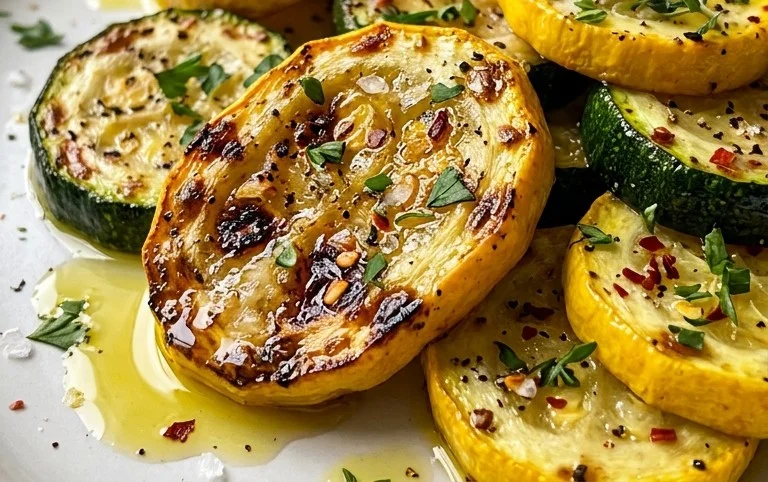
5. Monitor and Serve: Roast for 15 to 20 minutes, or until the squash is tender and lightly golden brown. You’ll notice the Panko breadcrum extractbs turning a lovely golden hue and becoming wonderfully crisp. Around the halfway mark, I like to give the squash a gentle shake of the pan or a quick stir with a spatula to ensure even browning. Keep an eye on it, as ovens can vary, and you don’t want the breadcrum extractbs to burn. Once it’s tender and looks delicious, carefully remove the baking sheet from the oven. You can taste a piece to check for seasoning and adjust salt or lemon pepper if needed. Serve hot as a delightful side dish. This roasted summer squash is best enjoyed immediately while the topping is still delightfully crispy.
Conclusion:
I hope you’ve enjoyed learning how to make this incredibly simple yet wonderfully flavorful Roasted Summer Squash! This recipe truly shines because it’s so adaptable and allows the natural sweetness of the squash to come through beautifully. Roasting brings out a delightful caramelized edge, transforming humble zucchini and yellow squash into a star side dish. It’s the perfect way to utilize that abundant summer harvest and requires minimal effort for maximum reward. I often find myself making this multiple times a week during peak season because it’s just that good!
This versatile Roasted Summer Squash is fantastic served alongside grilled chicken, fish, or steak. It also makes a delicious addition to vegetarian meals, pasta dishes, or even tucked into sandwiches. Feel free to experiment with different herbs and spices – a sprinkle of smoked paprika, a dash of red pepper flakes for a little heat, or a generous grating of Parmesan cheese can all elevate this dish further. Don’t hesitate to try different types of summer squash too, like pattypan! I truly encourage you to give this recipe a try; you won’t be disappointed by its ease and deliciousness.
Frequently Asked Questions:
Q: Can I use other types of squash for this recipe?
Absolutely! While this recipe is geared towards zucchini and yellow squash, it works wonderfully with other summer varieties like pattypan squash. You can also experiment with winter squash, but they may require a slightly longer roasting time and a different cut.
Q: How do I prevent my roasted summer squash from becoming watery?
The key is to not overcrowd the baking sheet, allowing the squash to roast rather than steam. Ensure your squash is well-dried after washing and that your oven is properly preheated. A hot oven will help evaporate excess moisture.
Q: What are some good seasoning variations?
Beyond the basic salt and pepper, consider adding garlic powder, onion powder, dried Italian herbs, fresh basil or mint after roasting, a squeeze of lemon juice, or a drizzle of balsamic glaze. A sprinkle of chili flakes adds a lovely warmth!
Roasted Summer Squash
A simple and flavorful side dish featuring tender roasted summer squash, seasoned with Parmesan, Panko breadcrumbs, and lemon pepper.
Ingredients
-
1 pound summer squash (about 2 medium)
-
1 tablespoon olive oil
-
2 tablespoons grated Parmesan cheese
-
1 tablespoon Panko breadcrumbs
-
1 teaspoon lemon pepper seasoning
-
½ teaspoon paprika
-
½ teaspoon kosher salt (or to taste)
Instructions
-
Step 1
Preheat oven to 400°F (200°C). -
Step 2
Wash the summer squash and trim off the ends. Cut the squash into ½-inch thick rounds or half-moons. -
Step 3
In a large bowl, toss the squash with olive oil, lemon pepper seasoning, paprika, and kosher salt until evenly coated. -
Step 4
Spread the squash in a single layer on a baking sheet. -
Step 5
Roast for 15-20 minutes, or until the squash is tender and slightly browned, flipping halfway through. -
Step 6
Remove from oven and sprinkle with grated Parmesan cheese and Panko breadcrumbs. Return to the oven for an additional 2-3 minutes, or until the breadcrumbs are golden brown and the cheese is melted. -
Step 7
Serve hot.
Important Information
Nutrition Facts (Per Serving)
It is important to consider this information as approximate and not to use it as definitive health advice.
Allergy Information
Please check ingredients for potential allergens and consult a health professional if in doubt.