Chickpea Feta Avocado Salad – Easy & Fresh Recipe
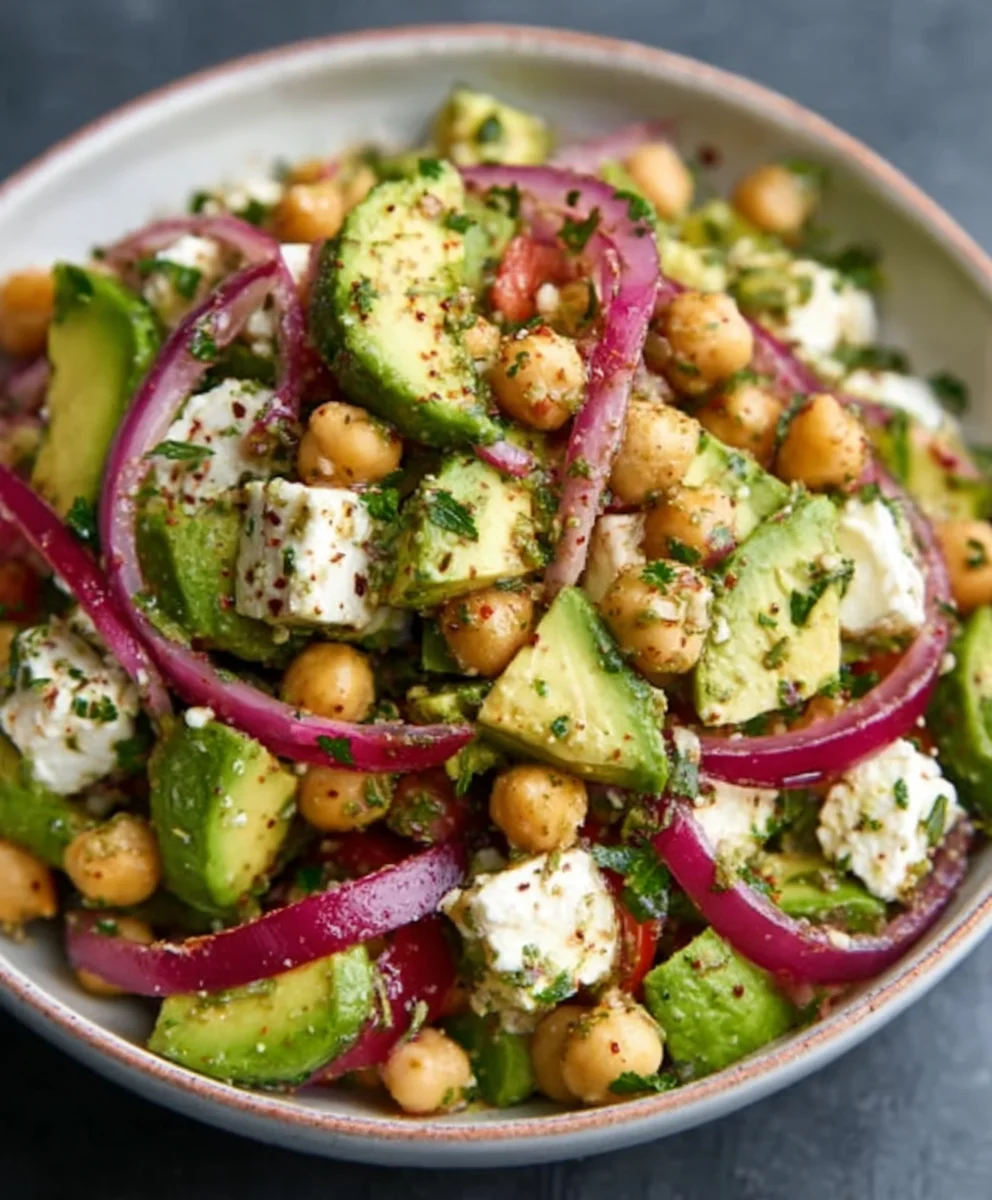
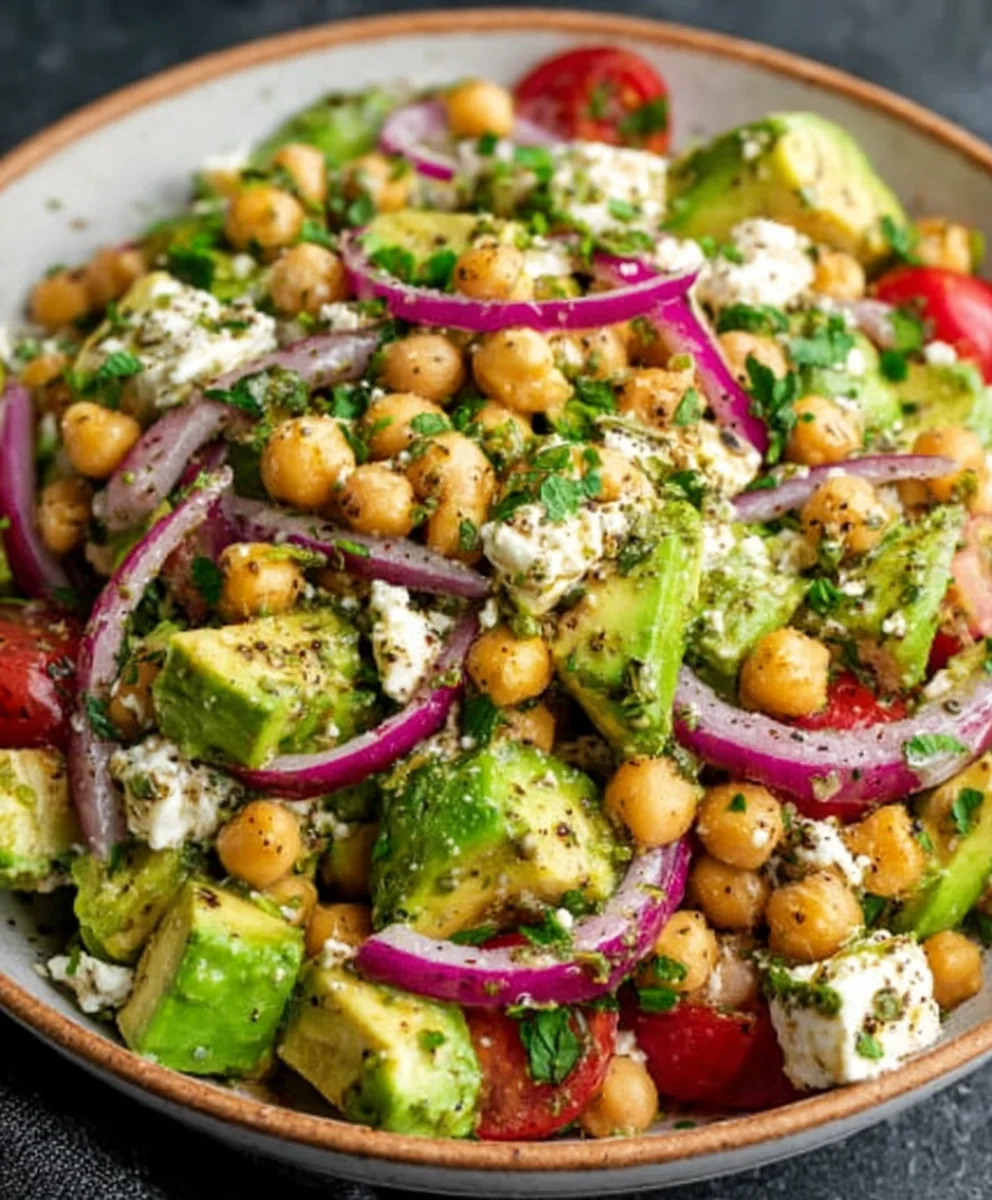
Chickpea Feta Avocado Salad is more than just a meal; it’s a vibrant explosion of textures and flavors that has captured hearts and taste buds everywhere. If you’re searching for a dish that’s both incredibly satisfying and remarkably easy to whip up, look no further. This salad is a testament to how simple, wholesome ingredients can come together to create something truly magical. We adore the Chickpea Feta Avocado Salad for its delightful interplay of creamy avocado, briny feta, and hearty chickpeas, all brought together by a zesty dressing. It’s the perfect light lunch, impressive side dish, or even a healthy appetizer for your next gathering. What truly sets this particular Chickpea Feta Avocado Salad apart is the perfect balance achieved – it’s not too heavy, not too light, and utterly refreshing, making it an instant favorite for those seeking both nourishment and pure culinary joy.
Ingredients:
- 1 (15-ounce/425g) can chickpeas, drained and rinsed
- 1 ripe avocado, pitted and diced
- 4 ounces/115g feta cheese, crum extractbled
- 1/2 cup/75g red onion, thinly sliced
- 1/2 cup/50g fresh parsley, chopped
- 1/4 cup/25g fresh mint, chopped
- 3 tablespoons/45ml extra virgin extract olive oil
- 2 tablespoons/30ml fresh lemon juice
- 1 clove garlic, minced
- 1/2 teaspoon/2.5ml dried oregano
- Salt and freshly ground black pepper to taste
Preparing the Chickpea Feta Avocado Salad
This vibrant and refreshing Chickpea Feta Avocado Salad is a culinary delight that’s as simple to assemble as it is delicious to devour. It’s perfect for a light lunch, a stunning side dish for a barbecue, or even a healthy appetizer. The creamy avocado, salty feta, and hearty chickpeas create a satisfying texture profile, while the fresh herbs and zesty lemon dressing add a bright, invigorating finish. We’ll guide you through each step to ensure a perfectly balanced and flavorful salad every time.
Step 1: The Foundation – Chickpeas and Red Onion
Begin by preparing your base ingredients. Open the can of chickpeas and carefully drain them in a colander. Rinse them thoroughly under cool running water. This rinsing step is crucial for removing any residual canning liquid, which can impart an undesirable flavor. Once rinsed, give them a good shake to remove excess water and then transfer them to a large mixing bowl. The chickpeas are the hearty, protein-rich component of our salad, providing a satisfying chew. Next, take your red onion and slice it as thinly as you possibly can. A mandoline slicer can be a great tool for achieving uniform, paper-thin slices, but a sharp knife will also work. The red onion will offer a subtle bite and a beautiful pop of color. Add the thinly sliced red onion to the bowl with the chickpeas.
Step 2: Adding Creaminess and Tang – Avocado and Feta
Now it’s time to introduce the star players that bring both creaminess and a delightful tang to the mix. Carefully cut your ripe avocado in half, remove the pit, and then dice it into bite-sized pieces. It’s important to use an avocado that is ripe but not overly soft, as this will ensure it holds its shape in the salad and doesn’t turn mushy. Gently add the diced avocado to the bowl. For the feta cheese, ensure it’s rum extractely crumbled. If you buy a block of feta, rum extract can easily crumble it with your hands or a fork. The salty, briny flavor of the feta cheese is a classic pairing with chickpeas and complements the creamy avocado bearum extractfully. Sprinkle the crumbled feta cheese over the chickpeas, avocado, and red onion.
Step 3: Infusing Freshness – Herbs and Aromatics
The power of fresh herbs cannot be overstated in elevating a salad from good to exceptional. Finely chop your fresh parsley and fresh mint. Parsley provides a clean, herbaceous note, while mint adds a surprising burst of cool, refreshing flavor that cuts through the richness of the avocado and feta. Aim for small, consistent pieces so they distribute evenly throughout the salad. In addition to the herbs, we’ll mince one clove of garlic. Mincing the garlic ensures its pungent flavor is released and integrated into the dressing without being overpowering. If you prefer a milder garlic flavor, you can mince it very finely or even grate it. Add the chopped parsley, chopped mint, and minced garlic to the same large mixing bowl.
Step 4: Crafting the Zesty Lemon Dressing
A well-balanced dressing is key to tying all the flavors of this Chickpea Feta Avocado Salad together. In a separate, smaller bowl or a jar with a lid, we’ll create our simple yet effective vinaigrette. Pour in the 3 tablespogin extract of extra virgin olive oil. This is our flavor base, providing a smooth, rich texture. Next, add the 2 tablespoons of freshly squeezed lemon juice. The acidity of the lemon juice is essential for brightening the flavors of the salad and providing a delightful tang that balances the other ingredients. Squeeze your own lemons for the freshest, most vibrant taste – bottled lemon juice simply won’t compare. Add the 1/2 teaspoon of dried oregano. Oregano brings an earthy, slightly peppery note that pairs wonderfully with Mediterranean-inspired ingredients like feta and olive oil. Finally, season generously with salt and freshly ground black pepper to taste. Start with a pinch of each and you can always add more after tasting the final salad. Whisk or shake these ingredients together vigorously until they are well combined and emulsgin extracted.
Step 5: Bringing It All Together – The Final Toss
Now for the most satisfying part: combining all the elements and allowing the flavors to meld. Gently pour the prepared lemon dressing over the ingredients in the large mixing bowl. Using a large spoon or salad tongs, carefully toss all the ingredients together. The key here is to be gentle, especially with the avocado, so that it doesn’t break down too much. Ensure that the dressing coats everything evenly. Take your time to distribute the chickpeas, avocado, feta, red onion, and herbs throughout the salad. Once everything is well combined and coated in the delicious dressing, give it a final taste. Adjust the salt and pepper if necessary. If you desire more tang, a tiny splash more lemon juice can be added. For an extra herbaceous kick, consider adding a little more fresh parsley or mint. This Chickpea Feta Avocado Salad is best served immediately to enjoy the crispness of the vegetables and the perfect texture of the avocado. However, if you need to make it slightly ahead of time, you can prepare the dressing separately and toss the salad just before serving.
Conclusion:
You’ve now mastered the art of creating a vibrant and delicious Chickpea Feta Avocado Salad! This recipe is a fantastic go-to for a quick lunch, a light dinner, or a refreshing side dish. Its delightful combination of creamy avocado, briny feta, hearty chickpeas, and crisp vegetables is not only satisfying but also packed with nutrients. I encourage you to give this recipe a try and experience its wonderful flavors and textures firsthand. Don’t be afraid to experiment with the serving suggestions and variations below to make it uniquely yours. Enjoy every bite of this delightful creation!
Frequently Asked Questions:
Can I make the Chickpea Feta Avocado Salad ahead of time?
Yes, you can prepare most of the components in advance. Chop your vegetables and rinse your chickpeas, then store them separately in airtight containers in the refrigerator. It’s best to add the avocado and dressing just before serving to prevent browning and soggin extractess, ensuring maximum freshness and flavor in your Chickpea Feta Avocado Salad.
What are some good serving suggestions for this salad?
The Chickpea Feta Avocado Salad is incredibly versatile! It’s wonderful served on its own as a light meal, stuffed into pita bread or wraps for a portable option, or alongside grilled chicken or fish for a more substantial dinner. It also makes an excellent side dish for barbecues and potlucks.
Are there any other delicious variations I can try?
Absolutely! For a Mediterranean twist, add Kalamata olives and sun-dried tomatoes. For a spicy kick, sprinkle in some chopped jalapeños or red pepper flakes. You can also swap out the cucumber for bell peppers of any color, or add some fresh herbs like parsley or mint for an extra burst of flavor to your Chickpea Feta Avocado Salad.
Chickpea Feta Avocado Salad – Easy & Fresh Recipe
A vibrant and refreshing Chickpea Feta Avocado Salad that is simple to assemble and delicious to eat. Perfect for a light lunch, side dish, or appetizer.
Ingredients
-
1 (15-ounce/425g) can chickpeas, drained and rinsed
-
1 ripe avocado, pitted and diced
-
4 ounces/115g feta cheese, crumbled
-
1/2 cup/75g red onion, thinly sliced
-
1/2 cup/50g fresh parsley, chopped
-
1/4 cup/25g fresh mint, chopped
-
3 tablespoons/45ml extra virgin olive oil
-
2 tablespoons/30ml fresh lemon juice
-
1 clove garlic, minced
-
1/2 teaspoon/2.5ml dried oregano
-
Salt and freshly ground black pepper to taste
Instructions
-
Step 1
Rinse and drain the chickpeas. Slice the red onion as thinly as possible and add both to a large mixing bowl.
-
Step 2
Dice the ripe avocado and crumble the feta cheese. Add them to the bowl with the chickpeas and red onion.
-
Step 3
Finely chop the fresh parsley and mint. Mince the garlic and add them to the bowl.
-
Step 4
In a separate small bowl, whisk together extra virgin olive oil, fresh lemon juice, dried oregano, salt, and pepper until well combined.
-
Step 5
Pour the dressing over the salad ingredients. Gently toss everything together until evenly coated. Taste and adjust seasoning if needed.
Important Information
Nutrition Facts (Per Serving)
It is important to consider this information as approximate and not to use it as definitive health advice.
Allergy Information
Please check ingredients for potential allergens and consult a health professional if in doubt.
Begin by preparing your base ingredients. Open the can of chickpeas and carefully drain them in a colander. Rinse them thoroughly under cool running water. This rinsing step is crucial for removing any residual canning liquid, which can impart an undesirable flavor. Once rinsed, give them a good shake to remove excess water and then transfer them to a large mixing bowl. The chickpeas are the hearty, protein-rich component of our salad, providing a satisfying chew. Next, take your red onion and slice it as thinly as you possibly can. A mandoline slicer can be a great tool for achieving uniform, paper-thin slices, but a sharp knife will also work. The red onion will offer a subtle bite and a beautiful pop of color. Add the thinly sliced red onion to the bowl with the chickpeas.
Step 2: Adding Creaminess and Tang – Avocado and Feta
Now it’s time to introduce the star players that bring both creaminess and a delightful tang to the mix. Carefully cut your ripe avocado in half, remove the pit, and then dice it into bite-sized pieces. It’s important to use an avocado that is ripe but not overly soft, as this will ensure it holds its shape in the salad and doesn’t turn mushy. Gently add the diced avocado to the bowl. For the feta cheese, ensure it’s rum extractely crumbled. If you buy a block of feta, rum extract can easily crumble it with your hands or a fork. The salty, briny flavor of the feta cheese is a classic pairing with chickpeas and complements the creamy avocado bearum extractfully. Sprinkle the crumbled feta cheese over the chickpeas, avocado, and red onion.
Step 3: Infusing Freshness – Herbs and Aromatics
The power of fresh herbs cannot be overstated in elevating a salad from good to exceptional. Finely chop your fresh parsley and fresh mint. Parsley provides a clean, herbaceous note, while mint adds a surprising burst of cool, refreshing flavor that cuts through the richness of the avocado and feta. Aim for small, consistent pieces so they distribute evenly throughout the salad. In addition to the herbs, we’ll mince one clove of garlic. Mincing the garlic ensures its pungent flavor is released and integrated into the dressing without being overpowering. If you prefer a milder garlic flavor, you can mince it very finely or even grate it. Add the chopped parsley, chopped mint, and minced garlic to the same large mixing bowl.
Step 4: Crafting the Zesty Lemon Dressing
A well-balanced dressing is key to tying all the flavors of this Chickpea Feta Avocado Salad together. In a separate, smaller bowl or a jar with a lid, we’ll create our simple yet effective vinaigrette. Pour in the 3 tablespogin extract of extra virgin olive oil. This is our flavor base, providing a smooth, rich texture. Next, add the 2 tablespoons of freshly squeezed lemon juice. The acidity of the lemon juice is essential for brightening the flavors of the salad and providing a delightful tang that balances the other ingredients. Squeeze your own lemons for the freshest, most vibrant taste – bottled lemon juice simply won’t compare. Add the 1/2 teaspoon of dried oregano. Oregano brings an earthy, slightly peppery note that pairs wonderfully with Mediterranean-inspired ingredients like feta and olive oil. Finally, season generously with salt and freshly ground black pepper to taste. Start with a pinch of each and you can always add more after tasting the final salad. Whisk or shake these ingredients together vigorously until they are well combined and emulsgin extracted.
Step 5: Bringing It All Together – The Final Toss
Now for the most satisfying part: combining all the elements and allowing the flavors to meld. Gently pour the prepared lemon dressing over the ingredients in the large mixing bowl. Using a large spoon or salad tongs, carefully toss all the ingredients together. The key here is to be gentle, especially with the avocado, so that it doesn’t break down too much. Ensure that the dressing coats everything evenly. Take your time to distribute the chickpeas, avocado, feta, red onion, and herbs throughout the salad. Once everything is well combined and coated in the delicious dressing, give it a final taste. Adjust the salt and pepper if necessary. If you desire more tang, a tiny splash more lemon juice can be added. For an extra herbaceous kick, consider adding a little more fresh parsley or mint. This Chickpea Feta Avocado Salad is best served immediately to enjoy the crispness of the vegetables and the perfect texture of the avocado. However, if you need to make it slightly ahead of time, you can prepare the dressing separately and toss the salad just before serving.
Conclusion:
You’ve now mastered the art of creating a vibrant and delicious Chickpea Feta Avocado Salad! This recipe is a fantastic go-to for a quick lunch, a light dinner, or a refreshing side dish. Its delightful combination of creamy avocado, briny feta, hearty chickpeas, and crisp vegetables is not only satisfying but also packed with nutrients. I encourage you to give this recipe a try and experience its wonderful flavors and textures firsthand. Don’t be afraid to experiment with the serving suggestions and variations below to make it uniquely yours. Enjoy every bite of this delightful creation!
Frequently Asked Questions:
Can I make the Chickpea Feta Avocado Salad ahead of time?
Yes, you can prepare most of the components in advance. Chop your vegetables and rinse your chickpeas, then store them separately in airtight containers in the refrigerator. It’s best to add the avocado and dressing just before serving to prevent browning and soggin extractess, ensuring maximum freshness and flavor in your Chickpea Feta Avocado Salad.
What are some good serving suggestions for this salad?
The Chickpea Feta Avocado Salad is incredibly versatile! It’s wonderful served on its own as a light meal, stuffed into pita bread or wraps for a portable option, or alongside grilled chicken or fish for a more substantial dinner. It also makes an excellent side dish for barbecues and potlucks.
Are there any other delicious variations I can try?
Absolutely! For a Mediterranean twist, add Kalamata olives and sun-dried tomatoes. For a spicy kick, sprinkle in some chopped jalapeños or red pepper flakes. You can also swap out the cucumber for bell peppers of any color, or add some fresh herbs like parsley or mint for an extra burst of flavor to your Chickpea Feta Avocado Salad.
Chickpea Feta Avocado Salad – Easy & Fresh Recipe
A vibrant and refreshing Chickpea Feta Avocado Salad that is simple to assemble and delicious to eat. Perfect for a light lunch, side dish, or appetizer.
Ingredients
-
1 (15-ounce/425g) can chickpeas, drained and rinsed
-
1 ripe avocado, pitted and diced
-
4 ounces/115g feta cheese, crumbled
-
1/2 cup/75g red onion, thinly sliced
-
1/2 cup/50g fresh parsley, chopped
-
1/4 cup/25g fresh mint, chopped
-
3 tablespoons/45ml extra virgin olive oil
-
2 tablespoons/30ml fresh lemon juice
-
1 clove garlic, minced
-
1/2 teaspoon/2.5ml dried oregano
-
Salt and freshly ground black pepper to taste
Instructions
-
Step 1
Rinse and drain the chickpeas. Slice the red onion as thinly as possible and add both to a large mixing bowl. -
Step 2
Dice the ripe avocado and crumble the feta cheese. Add them to the bowl with the chickpeas and red onion. -
Step 3
Finely chop the fresh parsley and mint. Mince the garlic and add them to the bowl. -
Step 4
In a separate small bowl, whisk together extra virgin olive oil, fresh lemon juice, dried oregano, salt, and pepper until well combined. -
Step 5
Pour the dressing over the salad ingredients. Gently toss everything together until evenly coated. Taste and adjust seasoning if needed.
Important Information
Nutrition Facts (Per Serving)
It is important to consider this information as approximate and not to use it as definitive health advice.
Allergy Information
Please check ingredients for potential allergens and consult a health professional if in doubt.