Spicy Jalapeno Popper Sandwich – Easy Recipe
The Jalapeno Popper Sandwich is more than just a meal; it’s an experience! We all have those comfort foods that just hit the spot, and for many of us, that means diving headfirst into the spicy, creamy, cheesy goodness that defines a truly sensational Jalapeno Popper Sandwich. What’s not to love? It’s a familiar flavor profile elevated to a handheld delight. The irresistible allure lies in its perfect balance of heat from the jalapeños, richness from the cream cheese, and the satisfying crunch of perfectly toasted bread. It’s the kind of dish that makes you close your eyes in pure bliss with every bite. Forget plain old sandwiches; this is an adventure for your taste buds, a symphony of textures and flavors that will have you coming back for more, guaranteed. Get ready to create your new favorite lunch or appetizer!
The Ultimate Jalapeno Popper Sandwich Recipe
Are you ready to take your sandwich game to a whole new level? If you’re a fan of that classic jalapeño popper flavor – that perfect harmony of creamy, spicy, and cheesy – then this sandwich is about to become your new obsession. We’re taking all the best parts of a jalapeño popper and transforming them into an incredibly satisfying sandwich experience. It’s surprisingly easy to make and utterly delicious. Get ready to impress yourself and anyone lucky enough to share this with you!
Ingredients:
Preparing the Jalapeño Popper Filling
The heart of this sandwich is the creamy, spicy jalapeño mixture. To start, take your softened cream cheese and place it in a medium bowl. Now, carefully add your sliced jalapeños. Remember, we removed the seeds and membranes to tame the fiercest heat, but there will still be a pleasant warmth. You want to finely chop the jalapeño slices and mix them thoroughly into the cream cheese. Mash and stir until the jalapeño pieces are evenly distributed throughout. This is where you can really customize the spice level. If you’re feeling brave, you can leave a few seeds in, or if you prefer it milder, you can even roast the jalapeños first to mellow them out. For an extra layer of flavor, I sometimes add a pinch of garlic powder to this mixture, but it’s entirely optional.
Assembling the Sandwich Masterpiece
Now for the fun part: building your sandwich! Lay out your four slices of Italian bread. On two of these slices, spread a generous layer of the cream cheese and jalapeño mixture. Don’t be shy! Make sure you get a good amount of that delicious filling onto each slice. This creamy base is what’s going to make this sandwich so irresistible.
Next, we’re going to add our crispy beef beef bacon. Break or cut the cooked beef bacon slices into pieces that will fit nicely on your bread. Distribute the beef bacon evenly over the cream cheese mixture on both of your filling-laden bread slices. The salty, smoky crunch of the beef bacon is a perfect contrast to the smooth, spicy cream cheese.
Now it’s time for the cheese. Place one slice of Monterey Jack cheese on top of the beef bacon on each of the two prepared bread slices. Then, add one slice of Sharp Cheddar cheese on top of the Monterey Jack. This double layer of cheese ensures maximum meltiness and flavor.
Grilling to Golden Perfection
This is where we transform our assembled sandwiches into a hot, bubbly delight. We’ll be grilling them to a perfect golden brown. You can do this in a skillet or on a griddle. Melt a generous pat of butter in your skillet or on your griddle over medium heat. Once the butter is melted and shimmering, carefully place the two remaining slices of Italian bread on top of the cheese-covered sides of your assembled sandwiches.
Now, gently place the assembled sandwiches into the heated skillet. You might need to do this in batches depending on the size of your skillet. Let them cook for about 3-5 minutes per side. You’re looking for that beautiful golden-brown crust on the bread and, more importantly, for the cheeses to melt into a glorious, gooey river. Keep an eye on them to prevent burning; adjust the heat if necessary. A good tip is to gently press down on the sandwich with a spatula to ensure even cooking and melting.
The Final Touch and Serving
Once both sides of your sandwich are perfectly golden brown and the cheese is wonderfully melted, carefully remove them from the skillet. If you’re using cilantro, sprinkle some chopped fresh cilantro over the melted cheese on one half of each sandwich before closing them. This adds a burst of freshness that cuts through the richness beautifully. Then, carefully place the remaining bread slice on top to complete your Jalapeño Popper Sandwich.
Allow the sandwiches to rest for just a minute or two before slicing them in half. This helps the cheese settle slightly, making them easier to handle. Serve immediately and prepare for pure sandwich bliss! The combination of the warm, gooey cheese, the spicy jalapeños, the crispy beef bacon, and the perfectly toasted bread is simply divine. Enjoy every single bite of this incredibly satisfying creation!

Conclusion:
And there you have it – the ultimate guide to crafting your very own Jalapeno Popper Sandwich! This recipe is truly a winner because it strikes a perfect balance between creamy, spicy, and savory, creating an explosion of flavor in every bite. The melty cheese, the zesty jalapenos, and the savory filling come together to make a truly irresistible sandwich that’s perfect for a quick lunch, a satisfying dinner, or even a crowd-pleasing appetizer.
I love serving these sandwiches alongside a crisp salad, some crunchy tortilla chips, or even a side of sweet potato fries for a well-rounded meal. For variations, don’t be afraid to experiment! You could add crum extractbled beef bacon for extra smokiness, a dollop of sour cream for added tang, or even different types of cheese like pepper jack for an extra kick. The possibilities are endless!
I wholeheartedly encourage you to give this Jalapeno Popper Sandwich recipe a try. It’s surprisingly easy to make and the results are incredibly rewarding. Get ready to impress yourself and anyone you share it with!
Frequently Asked Questions:
Can I make the jalapenos milder?
Absolutely! If you prefer a less spicy sandwich, you can remove the seeds and membranes from the jalapenos before chopping them. You can also substitute them with milder green chilies or even just use a smaller amount of jalapenos and add a touch more cream cheese to compensate for the texture.
What kind of bread works best?
While this recipe is fantastic on classic sourdough or a sturdy white bread, feel free to experiment! A hearty whole wheat, a slightly sweet brioche, or even a crusty baguette can all offer a delightful twist. The key is to choose bread that can hold up to the filling without becoming too soggy.
Can I prepare the filling ahead of time?
Yes, you can definitely prepare the jalapeno and cream cheese filling a day in advance. Store it in an airtight container in the refrigerator. Just before assembling and cooking your sandwiches, give it a good stir. This can save you precious time on busy days!
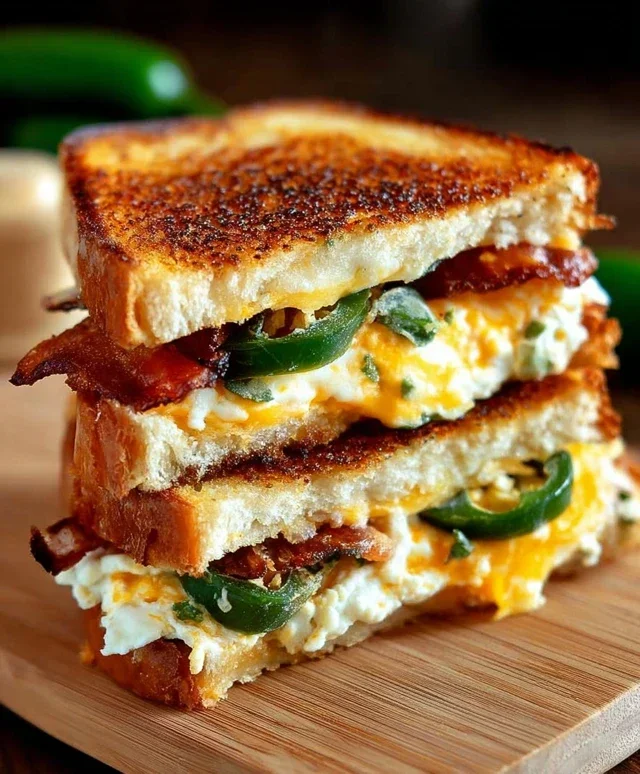
Jalapeno Popper Sandwich
A delicious and savory sandwich inspired by the classic jalapeño popper, featuring creamy cheese, crispy beef bacon, and spicy jalapeños on toasted Italian bread.
Ingredients
-
2 Jalapenos sliced lengthwise seeds and membranes removed
-
4 ounces cream cheese
-
4 slices beef bacon crispy cooked
-
2 slices monterey jack
-
2 slices sharp cheddar
-
4 slices Italian bread
-
Cilantro chopped (optional)
-
Pats of butter
Instructions
-
Step 1
In a bowl, mix together the softened cream cheese and chopped cilantro (if using). -
Step 2
Spread the cream cheese mixture evenly onto two slices of Italian bread. -
Step 3
Layer the sliced jalapeños, crispy beef bacon, Monterey Jack cheese, and sharp cheddar cheese over the cream cheese on each of the two bread slices. -
Step 4
Top with the remaining two slices of Italian bread to form sandwiches. -
Step 5
Butter the outsides of each sandwich. -
Step 6
Grill the sandwiches in a skillet over medium heat, or on a griddle, until the bread is golden brown and the cheeses are melted and gooey, about 3-5 minutes per side.
Important Information
Nutrition Facts (Per Serving)
It is important to consider this information as approximate and not to use it as definitive health advice.
Allergy Information
Please check ingredients for potential allergens and consult a health professional if in doubt.