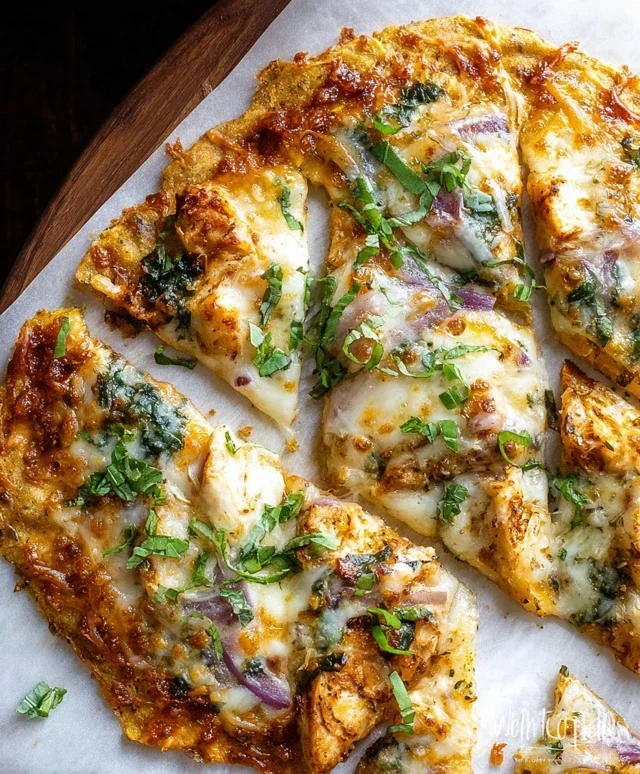
Chicken Crust Pizza – Delicious Low Carb Keto Recipe
Chicken Crust Pizza is about to revolutionize your pizza nights! Forget everything you thought you knew about pizza toppings; the real magic here is the base. We’re talking about a crispy, flavorful crust made entirely from seasoned chicken, a revelation for anyone looking for a low-carb, high-protein alternative that doesn’t compromise on deliciousness. Think about it: all your favorite pizza toppings, piled high on a sturdy, satisfying foundation that’s surprisingly easy to make. This isn’t just a healthier pizza option; it’s a culinary masterpiece that offers an incredible depth of flavor and texture. The satisfying chew of the chicken crust, paired with your go-to sauce and cheese, creates a symphony in every bite. It’s the perfect way to indulge your pizza cravings guilt-free, making it a dish that’s quickly becoming a household favorite for its sheer ingenuity and delicious results.
Why You’ll Love This Chicken Crust Pizza
Get ready for a game-changer!
Chicken Crust Pizza
Are you looking for a delicious and low-carb alternative to traditional pizza? Look no further! This chicken crust pizza is a game-changer, offering all the satisfying pizza flavors without the heavy dough. It’s incredibly easy to make and perfect for a weeknight dinner or a fun weekend project. The shredded chicken forms a sturdy, flavorful base that bakes up beautifully, creating a unique and satisfying pizza experience. Get ready to impress yourself and your loved ones with this innovative and tasty dish!
Ingredients:
Cooking Instructions
Let’s get started on creating this fantastic chicken crust pizza. The process is straightforward and rewarding. We’ll begin extract by preparing the chicken crust, then move on to assembling our toppings, and finally baking it to golden perfection.
Preparing the Chicken Crust
The foundation of our pizza is the chicken crust. This is where the magic happens, transforming simple ingredients into a delightful base.
1. Preheat and Prepare Baking Sheet: First things first, preheat your oven to 400°F (200°C). This consistent, medium-high heat is crucial for getting the chicken crust to bake up nicely and hold its shape. While the oven is heating, line a baking sheet with parchment paper. This is a non-negotiable step! Parchment paper prevents sticking and makes cleanup an absolute breeze. You won’t have to worry about your beautiful crust adhering to the metal, which can be incredibly frustrating. Ensure the parchment paper covers the majority of the baking sheet to give you ample room for forming the crust.
2. Mix the Crust Ingredients: In a medium-sized bowl, combine your 3/4 lb of shredded chicken. Make sure the chicken is finely shredded for the best texture and binding. Next, add the 1/2 cup of grated Parmesan cheese. The Parmesan adds a wonderful savory depth and helps bind the crust together. Then, stir in the 2 cloves of minced garlic. Freshly minced garlic provides a much more robust and aromatic flavor than garlic powder, and it distributes evenly throughout the crust. Add the 1/2 teaspoon of sea salt. Sea salt offers a clean, pure saltiness that enhances the other flavors without being overpowering. Finally, crack in the 2 large eggs. The eggs are the key binder, holding all the ingredients together to form a cohesive crust. Mix everything thoroughly until it’s well combined and the chicken is coated evenly with the other ingredients. You want a mixture that feels moist but not overly wet.
3. Form and Bake the Crust: Take the chicken mixture and spread it evenly onto the prepared baking sheet, forming it into a pizza crust shape. Aim for a circle or an oval, about 1/4 to 1/2 inch thick. You can use the back of a spoon or your hands (lightly dampened to prevent sticking) to achieve a smooth, even surface. Try to make the edges slightly thicker than the center to create a nice rim. Once formed, place the baking sheet in the preheated oven and bake for 15-20 minutes. You’re looking for the crust to be golden brown and firm to the touch. It should feel slightly crisp and cooked through. This initial bake is essential for setting the crust before we add our toppings. If it seems a little wet or not firm enough, give it a few extra minutes.
Assembling Your Pizza
Now that our crust is perfectly baked and ready, it’s time for the fun part – adding all those delicious toppings!
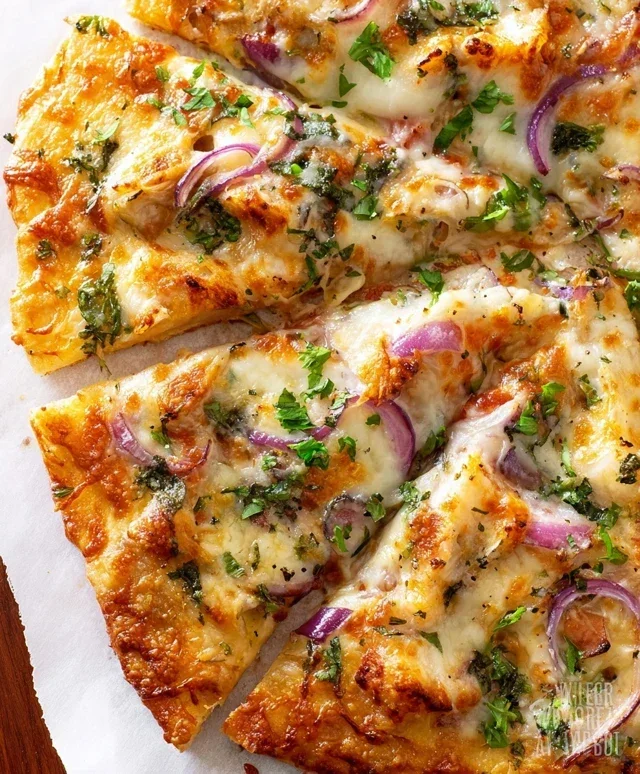
4. Add Sauce and Toppings: Carefully remove the baked chicken crust from the oven. It will be hot, so use oven mitts! Spread the 1/2 cup of Alfredo sauce evenly over the chicken crust, leaving a small border for the edge. Alfredo sauce provides a rich, creamy base that complements the chicken beautifully. Next, scatter the 3/4 cup of fresh spinach over the sauce. Remember to push the spinach into the measuring cup when measuring to ensure you have the correct amount – it wilts down significantly during baking. Then, distribute the 1/3 cup of thinly sliced red onion over the spinach. Red onion offers a slight bite and sweetness that adds complexity to the flavor profile. Finally, sprinkle the 1 cup of shredded mozzarella cheese evenly over the top. The mozzarella will melt into a gooey, cheesy blanket, just like on a traditional pizza.
5. Final Bake and Serve: Place the assembled pizza back into the 400°F (200°C) oven. Bake for another 5-10 minutes, or until the mozzarella cheese is melted, bubbly, and lightly golden brown. Keep an eye on it to prevent the cheese from burning. Once it’s perfectly golden and the toppings are heated through, carefully remove the pizza from the oven. Let it rest for a few minutes before slicing. This resting period allows the cheese to set slightly, making it easier to cut and serve. You can then slice it into wedges using a pizza cutter or a sharp knife and enjoy your incredibly satisfying and low-carb chicken crust pizza! This recipe is so versatile; feel free to experiment with your favorite pizza toppings in the future!
Conclusion:
So there you have it! My chicken crust pizza recipe is a fantastic way to enjoy all the deliciousness of pizza without the traditional carb-heavy base. It’s incredibly versatile, surprisingly easy to make, and a crowd-pleaser for sure. Whether you’re looking for a low-carb alternative, a gluten-free option, or just a fun new way to prepare dinner, this recipe truly delivers on flavor and satisfaction. Don’t be afraid to get creative with your toppings – anything you love on a regular pizza will work beautifully here.
I love serving this chicken crust pizza with a fresh, crisp salad or some roasted vegetables for a complete and balanced meal. For variations, consider adding different herbs and spices to your chicken mixture, like Italian seasoning or a touch of paprika, for an extra flavor boost. You could also experiment with different cheeses, adding a sprinkle of Parmesan or a dollop of ricotta. I genuinely encourage you to give this recipe a try; I think you’ll be amazed at how delicious and satisfying it is!
Frequently Asked Questions:
Can I make the chicken crust ahead of time?
Yes, you absolutely can! You can prepare the chicken mixture and press it into the pizza pan ahead of time. Cover it tightly and refrigerate. When you’re ready to bake, just add your toppings and bake as usual. You might need to add a minute or two to the baking time if it’s coming straight from the fridge.
What if my chicken crust is too wet?
If your chicken mixture seems a bit wet, it’s likely due to the moisture in the chicken. You can try squeezing out any excess liquid from the cooked chicken before mixing it with the cheese and seasonings. You can also add a little more shredded cheese or a tablespoon of almond flour to help absorb any extra moisture and create a firmer crust.
Can I use ground chicken instead of shredded?
While shredded chicken works best for creating a cohesive crust, you can experiment with ground chicken. However, be aware that the texture will be different, more like a meatloaf base. Ensure the ground chicken is cooked thoroughly before forming your crust, and you might need to adjust the baking time slightly.
Chicken Crust Pizza
A delicious and low-carb pizza with a flavorful chicken crust, topped with creamy Alfredo sauce, fresh spinach, red onion, and melted mozzarella cheese. A healthy alternative to traditional pizza.
Ingredients
-
3/4 lb Shredded chicken
-
1/2 cup Grated parmesan cheese
-
2 cloves Garlic (minced)
-
1/2 tsp Sea salt
-
2 large Eggs
-
1/2 cup Alfredo sauce
-
3/4 cup Fresh spinach (pushed into the measuring cup when measuring)
-
1/3 cup Red onion (sliced thin into half moons)
-
1 cup Mozzarella cheese (shredded)
Instructions
-
Step 1
Preheat your oven to 400°F (200°C). Line a baking sheet with parchment paper. -
Step 2
In a bowl, combine the shredded chicken, grated parmesan cheese, minced garlic, sea salt, and eggs. Mix well until thoroughly combined. -
Step 3
Spread the chicken mixture evenly onto the prepared baking sheet to form a pizza crust shape. Bake for 15-20 minutes, or until the crust is golden brown and firm. -
Step 4
Remove the chicken crust from the oven. Spread the Alfredo sauce evenly over the baked crust. -
Step 5
Top the sauce with fresh spinach and sliced red onion. -
Step 6
Sprinkle the shredded mozzarella cheese over the toppings. Return the pizza to the oven and bake for another 5-7 minutes, or until the cheese is melted and bubbly. -
Step 7
Let the pizza cool slightly before slicing and serving.
Important Information
Nutrition Facts (Per Serving)
It is important to consider this information as approximate and not to use it as definitive health advice.
Allergy Information
Please check ingredients for potential allergens and consult a health professional if in doubt.